Everything you need to know about DLNA: The de facto home-entertainment network standardIf you’ve ever watched the photos on your digital camera come alive on your TV or played the music files on your computer over your home theater system, you’ve brushed against the magic of DLNA. This widely integrated but little understood technology allows you to stream media files from a hard drive or memory card to other devices on your home network without your needing to know a whole lot about codecs, file formats, or even how your network operates.DLNA stands for Digital Living Network Alliance, the trade group founded by Sony in 2003 to define the interoperability guidelines that make this communication possible. Prior to DLNA, setting up a home-entertainment network was an arduous process of gathering IP addresses and configuring each component to talk to the others with no guarantee of success. DLNA simplified the process by establishing a single protocol that ensured DLNA-certified multimedia devices from different manufacturers would work together. A great example is your DVR for recording television shows. Normally this is restricted to playing only on the TV where it is attached. With a DLNA media player you can watch the shows on any network attached DLNA TV, PC, or other playback device in the house. Learn More>>here. Hot Search: AVI to DLNA | ISO to DLNA | HD Movies to DLNA | DVD to DLNA | HDD Media Players are designed to give you a wide range of connectivity. Many units allow you to access network attached storage devices, USB hard drives, and shared folder on Windows PC’s and Macintosh computers (e.g WD TV Live Plus/Hub, Popcorn Hour NMT). DLNA players take integration in a completely new direction. A DLNA media player can seamlessly integrate with any other DLNA compliant devices in your home. Let’s discuss the real vision of DLNA. Your other high definition media players may allow you to view videos from PC’s scattered about the house, but normally they are restricted to displaying your videos on only one television, the one they are attached to.You will need to choose between a DLNA wireless media player or one which connects to your wired network. Just match it to your home setup.If you want the smoothest, most consistent interface from room to room in your home, DLNA cannot be beat. With a DLNA media player you will be able to share your media throughout the home with ease.If you are interested in the home of the future DLNA can lead you in the right path. You will need to start planning your purchases for all audio and video equipment more carefully, to transition your home to a fully DLNA enabled home. Luckily, most DLNA media players also support all the functions of other HD digital media players. They just extend the technology for the future of your home. Top DLNA Video Converter Software for DLNA Owners: Not all the videos can be streamed from PC to HDTV via DLNA. Only specified media formats (MPEG-1, MPEG-4 and WMV 9) are good for DLNA video streaming. Errors occur in case of unsupported video format. Native formats for DLNA media streaming:  To stream MKV, AVI, H.264 videos to HDTV, you can transcode the format to one of the applicable required formats. A recommended transcoder here is Pavtube Video Converter Ultimate, which uses CUDA acceleration tech and converts videos fast enough. You can also use Pavtube BDMagic app to convert Blu-rays and DVDs to PC hard drive and your PC a DMS for streaming to HDTV and other DLNA certified devices like PS3 and Xbox 360.Free Download and trail:
 Other Download:- Pavtube old official address: http://www.pavtube.cn/blu-ray-video-converter-ultimate/- Cnet Download: http://download.cnet.com/Pavtube-Video-Converter-Ultimate/3000-2194_4-75938564.htmlRead More:
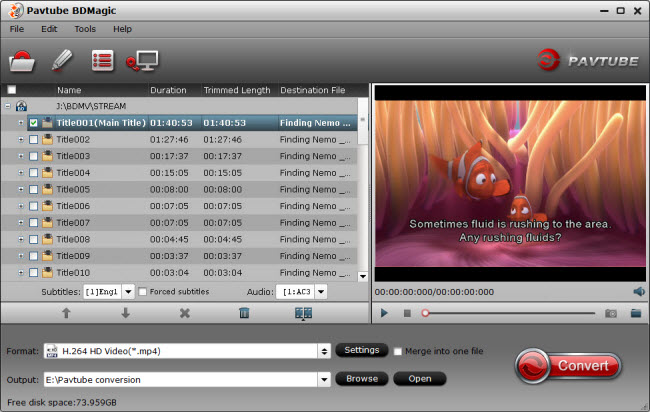
Summary: Still have doubt about how to rip Blu-ray to H.264 MKV for playing? This article shares a step-by-step guide on how to convert Blu-ray to H.264 MKV so that you can enjoy your Blu-ray movies more conveniently. As cloud storage becomes more affordable, physical storage media Blu-rays are quickly becoming a thing of the past. If you get a Blu-ray movie, you may want to play them on your different media players or portable devices like the new iPad Pro, iPhone 6S, or HDTV. Although Blu-ray file is convenient for backing up and archiving, but it’s not natively supported by most digital players. Why not rip and convert your Blu-rays to store as H.264 MKV files for playback on your devices? And so they are accessible across different media formats you own. To rip Blu-ray for HD backup and then to play on HDTV or other HD media players, convert Blu-ray to H.264 MKV will be your best choice. In that case, a decent Blu-ray ripper plays a big role. Here, Pavtube BDMagic is one of the most frequently used Blu-ray ripping tool to convert Blu-ray movies to H.264 MKV as well as H.264 MOV, H.264 MP4 etc videos in an amazing way. Read the review. With full Blu-ray supports, it is capable of removing AACS and BD+ copy-protections as well as converting Blu-ray to all other regular video formats like MP4, AVI, WMV, MOV, FLV, WMV, etc. Moreover, video editing functions like clip, rotate, add watermarks, adjust video effects, etc. are provided. You can get H.264 encoded HD MKV from Blu-ray not only for space-saving storage but also for playing on H.264 compatible multimedia players like VLC, Divx, PotPlayer, PowerDVD 14 Ultra, etc with rich media experience. For Mac users, you can turn to Pavtube BDMagic for Mac(including El Capitan). Now just choose the right version according to your demand and follow the guide to accomplish the conversion.Free Download Top Blu-ray to H.264 MKV Ripper: Other Download:- Pavtube old official address: http://www.pavtube.cn/blu-ray-ripper/- Cnet Download: http://download.cnet.com/Pavtube-BDMagic/3000-7970_4-75922877.htmlStep-by-Step guide: Encode Blu-ray to H.264 MKV with ease Step 1. Load Blu-ray moviesInstall and launch the best Blu-ray to H.264 MKV Converter program. Insert your Blu-ray disc into your BD drive, and click "Load file(s)" icon to load your Blu-ray movies. You can also import movies files from Blu-ray folder, ISO and DVD discs. 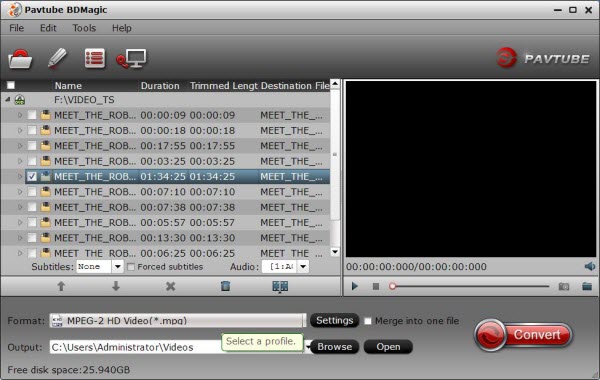 Step 2: Select H.264 encoded HD MKV format to output.Tap on the "Format" bar to select "HD Video" > "MKV HD Video(*.mp4)" to output, then hit "Settings" on the main interface to open "Profile Settings" window, under Video settings panel, click "Codec" drop-down selection, choose "H.264" as your final output file codec.
 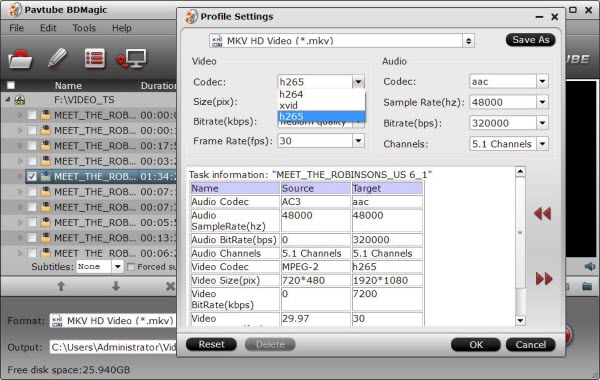 Step 3: Change output file resolution.If you want to play converted Blu-ray movies on 4K TV, you can upscale the output file resolution to 3840*2160 from "Size(pix)" in the "Profile Settings" window.
 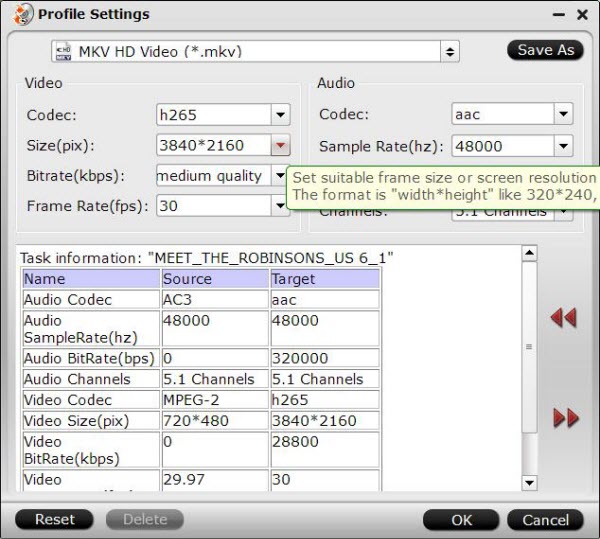 Step 4: Convert Blu-ray to H.264 encoded HD MKV format.Hit the "Convert" icon on the right-bottom to start the conversion process. Get ripped Blu-ray files by clicking the "Open output folder" button.Then you will be able to save all your precious Blu-ray movies with subtitle languages and audio tracks well reserved for playing on various H.264 capable players with rich media experience. Read More:
Microsoft Corp. Isn’t the only company introducing a new Windows 10 hybrid tablet-laptop this week. On Thursday, Dell Inc. revealed a trio of new XPS laptops, including the XPS 12: a tablet that docks with a sleek keyboard to become a laptop. The new XPS 13 and XPS 15 have their own bragging points: Dell claims it’s built the smallest 13-inch and 15-inch laptops on the planet.The point is that if you are a Dell XPS 12/13/15 owner and there are tons of 4K/HD video files sitting on your shelf, here I will teach you how to convert 4K/HD video so that you can play 4K/HD video files on your Dell XPS 12/XPS 13/XPS 15 while commuting or travelling. Just keep scrolling and you will get the full answer you need. The first thing you should be aware of that an up-to-date Video to Dell XPS 12/13/15 Converter is needed if you want to play your 4K/HD Videos and Movies on the new Dell XPS 12/13/15. Here, Pavtube Video Converter Ultimate(Read the review) is highly recommended. This is the Top HD/4K Video Converter and editor which could be functional in all HD/4K videos to Dell XPS 12/XPS 13/XPS 15 conversion. As an H.265/HEVC decoder, it can also convert H.265 video to Dell XPS 12/13/15 supported format for playback on Windows 10. For Mac users, turn to iMedia Converter for Mac. Free download: Other Download:- Pavtube old official address: http://www.pavtube.cn/blu-ray-video-converter-ultimate/- Cnet Download: http://download.cnet.com/Pavtube-Video-Converter-Ultimate/3000-2194_4-75938564.htmlHot News: Pavtube Software officially released its 2015 Christmas Day Deal. Pavtube Video Converter Ultimate/iMedia Converter for Mac is available with 20% off is provided on christmas week, Don’t miss it!Part II: Step-by-step guide on Convert 4K/HD Videos and Movies to Dell XPS 12/13/15 on Windows 10Step 1: After the successful installation, click “Load file(s)” or “Add video” to load video file you want to convert in your PC into the program. It supports batch conversion, you can you can add movies in different formats like HD/4K videos at one time. 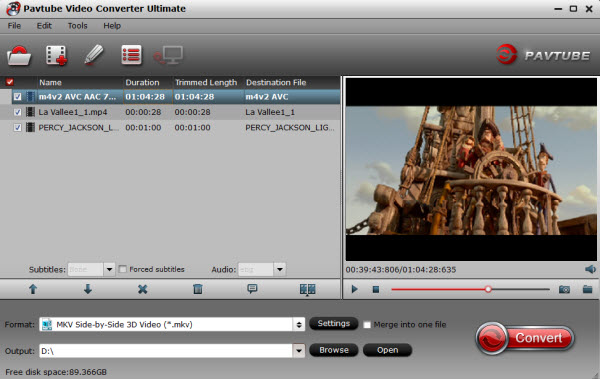 Step 2: When you click the “Format” bar to come to the output list, as we mentioned above, we can suggest you to choose the “Microsoft Surface Windows RT/Pro H.264 Video (*.mp4)” as the best output one for Dell XPS 12/13/15. For others? You can drop down the list and find more. And the video/audio parameters can be reset in “Settings” to achieve a satisfying playback in for Dell XPS 12/13/15.
 Step 3: Hit the big button “Convert” to get the cork started. If you follow several steps mentioned above, after easily transferring files to Dell XPS 12/13/15, we can enjoy the HD/4K videos nicely with high definition. Would you like to have a try?Now, you can enjoy the 4K/HD Videos and Movies to Dell XPS 12/13/15 on Windows 10 for entertainment. Please feel free to share this tutorial if you think it is helpful!Read More:
Google has announced its newest iteration of its flagship laptop - the Chromebook Pixel 2. One evidence of this is the fact that the Pixel 2 has the USB Type-C connector. The new Pixel’s display is still a super-sharp, 12.85-inch, 2560 x 1700 touchscreen and you will eagle-eyed will quickly spot the new USB Type-C 3.0 ports, a 3.5mm headphone jack and an SD card reader. You also get a built-in 720p webcam and dual microphones, with the laptop's speakers being hidden under the keyboard.
Hot Search: Blu-ray to Smart TV | Blu-ray to RAID 5| Blu-ray to Micca Media Player |
You may have collected a pile of Blu-ray and DVD discs. Ever felt it's a bother for you to find the one you need from them? Want to playing Blu-ray/DVD movies on Chromebook? In fact, Chrome OS doesn't support the video codecs for Blu-rays or DVDs. That means Blu-ray/DVD cannot work with Chromebooks. In this case we will have to convert Blu-ray/DVD to Chromebook Pixel 2 supported file type first. For this purpose, we will have to find a good Blu-ray/DVD ripper to convert Blu-ray/DVD to Chromebook Pixel 2 friendly video and then transfer the Blu-ray/DVD rips to Chromebook Pixel 2 for playback.
Here, Pavtube BDMagic is the best Blu-ray converting software so far <review>, you can rip and convert Blu-ray/DVD to any video format for Chromebook Pixel 2. You can play the ripped/converted BD video on Samsung Chromebook 2, Toshiba Chromebook, HP Chromebook 11, HP Chromebook 14, Acer C720P Chromebook, Acer C720 Chromebook , Acer C7 Chromebook, Samsung Chromebook etc. For transferring and watching Blu-ray/DVD movies on Chromebook Pixel 2, you can convert/rip BD to H.264 MP4 with this best Blu-ray Ripper. In addition, you can convert MKV, AVI, MTS, MXF video to Chromebook Pixel 2 supported video format.
How to Rip Blu-ray/DVD to Chromebook Formats and then Play Blu-ray/DVD on Chromebook Pixel 2?
* Chromebook Pixel 2 Supported Meida File Types: .3gp, .avi, .mov, .mp4, .m4v, .m4a, .mp3, .mkv, .ogv, .ogm, .ogg, .oga, .webm, .wav
* Chromebook Pixel 2 Supported Codecs: .ogv(Theora), .webm(vp8), .mp4(H264, MPEG), .mov(H264, MPEG), .avi(MPEG4/MP3, DIVX/MP3, XVID/MP3), .3gp(H264/AAC, MPEG4/AMR-NB)
* Preparation Tools: Movie Blu-ray/DVD Disc | Top Blu-ray/DVD Ripper | USB Flash disk (or SD card) | BD Drive
Note: If you are Mac user, you can free download Pavtube BDMagic for Mac (including El Capitan).
Free Download and trail:
Other Download:
- Pavtube old official address: http://www.pavtube.cn/blu-ray-ripper/
- Cnet Download: http://download.cnet.com/Pavtube-BDMagic/3000-7970_4-75922877.html
Step Guide: Transfer and watch Blu-ray/DVD movies on Chromebook Pixel 2
Step 1. Add Blu-ray/DVD movies
Place the disc from the BD drive, launch the Blu-ray Ripper for Android. and then click "disc" button to import Blu-ray movies into the program. DVD discs, ISO and IFO files are also supported.
 Step 2. Select output video format
Select an Chromebook Pixel 2 friendly format, e.g. H.264 .mp4 for conversion. MP4 format is suitable for all your Samsung, Acer, HP and Toshiba Chromebooks.
Step 2. Select output video format
Select an Chromebook Pixel 2 friendly format, e.g. H.264 .mp4 for conversion. MP4 format is suitable for all your Samsung, Acer, HP and Toshiba Chromebooks.
 Step 3. Start ripping Blu-ray/DVD
Finally, hit the big “Convert” button to start converting Blu-ray to Chromebook MP4 video. After sucessful ripping, you can get the converted video and transfer the ripped movie video to Chromebook with USB flash disk and then play watch movie on Chromebook offline at leisure time.
How to play ripped video on Chromebook Pixel 2015
First plug the USB stick to your Chromebook Pixel 2. By default, Chromebook uses the built-in media player to play audio and video files. Just simply double-click the target video file in Files app and now you can enjoy Blu-ray videos on Chromebook Pixel 2 offline!
Read More:
Step 3. Start ripping Blu-ray/DVD
Finally, hit the big “Convert” button to start converting Blu-ray to Chromebook MP4 video. After sucessful ripping, you can get the converted video and transfer the ripped movie video to Chromebook with USB flash disk and then play watch movie on Chromebook offline at leisure time.
How to play ripped video on Chromebook Pixel 2015
First plug the USB stick to your Chromebook Pixel 2. By default, Chromebook uses the built-in media player to play audio and video files. Just simply double-click the target video file in Files app and now you can enjoy Blu-ray videos on Chromebook Pixel 2 offline!
Read More:
When you travel or just have time to kill, everybody pulls out a smartphone or tablet to surf the Web, watch a video, or listen to some tunes. But what if you have a huge digital library of movies and music? Those phones and iPads only come with so much space, which easily gets filled up when you download apps and take a lot of photos or videos. This is where the Seagate® Wireless Plus device comes in. If you have a Seagate Wireless Plus 1TB/2TB device, you probably would like to add your MKV,AVI,WMV,FLV,M2TS videos to store in Seagate Wireless Plus 1TB/2TB to allow you to view via streamers like PS4, WD TV, etc. Here is how to. Hot search: Blu-ray to Seagate Central 3TB | | Blu-ray/DVD on Windows Home Server | Blu-ray/DVD to Seagate Wireless Plus | DVD to PlexYou can put many kinds of purchased movies to Seagate Wireless Plus in various formats, but your portable devices maybe can’t play all kinds of videos like iPad, iPhone, Android Smart Phone, tablet, etc. For example, your Android phones and tablet can’t play the movies ripped from purchased Blu-ray/DVD discs for copy protection. Or too high-resolution file maybe cause a choppy viewing experience or fail to play on your iPad for the too much bandwidth desire. For resolving these issues, you maybe should use a software on your computer to change the file format/codec to one that is supported by general portable devices or modify the file to a lower quality to prevent playability issues. Here, for Mac and Windows users, I recommend Pavtube Video Converter Ultimate and Pavtube iMedia Converter for Mac. Store Purchased HD/Blu-ray/DVD movies to Seagate Wireless Plus 1TB/2TB for EnjoymentPavtube Video Converter Ultimate is the best video transcoding solution for Windows users to rip and backup Blu-ray/DVD movies, transcode H.265/HEVC, TiVo, MXF, MOV, M4V, and other HD videos to regular H.264 MP4, AVI, MKV, etc and to devices, like iPad, iPhone, Android phones, Windows phones, game consoles, HD media players, and more. Here is review. This Ultimate Converter can help you to remove Blu-ray/DVD region lock as well as batch convert HD/SD videos in multiple format like FLV, AVI, WMV, MKV, MOV, VOB, MTS, M2TS, TOD, etc to playback on your LG WebOs HDTV easily without any restriction. Free download and install Other Download:- Pavtube old official address: http://www.pavtube.cn/blu-ray-video-converter-ultimate/- Cnet Download: http://download.cnet.com/Pavtube-Video-Converter-Ultimate/3000-2194_4-75938564.htmlStep 1: Load HD Video files to the program. Start the program on your computer and click”Add Video/Audio” from”File”drop-down list to add the files you desire to convert to the application. Step 2: Choose output file format.From the”Format” drop-down option, you can select a format that’s widely support by many portable devices such as”H.264 Video(*MP4)” format as the output profile.
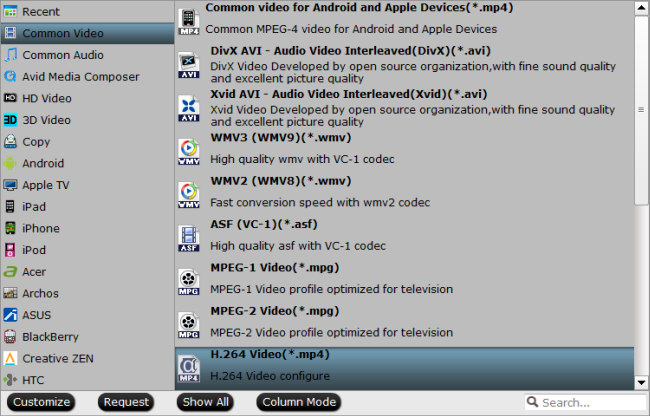 Step 3: Adjust output profile parameters.For smaller size and better playback your purchased movies via Seagate Wireless Plus, you can adjust the output video parameters. Remember, lower bitrate leads to lower storage space.
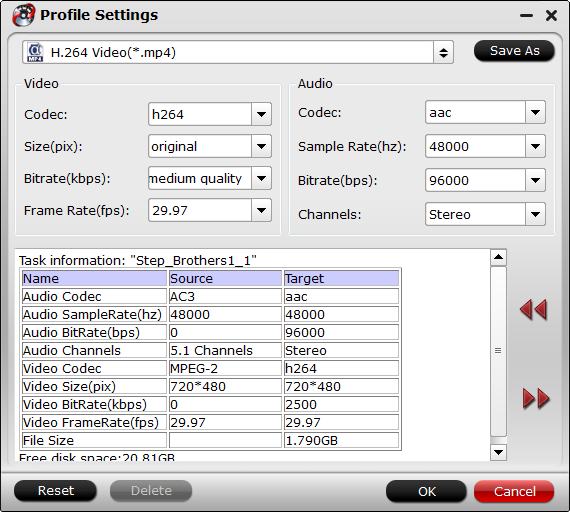 Step 4: Transcode movies for Seagate Hit the right-bottom”Convert”button to start transcode video on Windows for storing movies to Seagate Wireless Plus 1TB/2TB. And after the process, open output folder, you can find your created movies. Move Your Digital Movies On to Seagate Wireless Plus 1TB/2TBIt’s easy to take your media wherever you go. When you buy digital downloads, just load them up on the Wireless Plus device. Once the movies are on your mobile device or computer, then it’s simple to load them up onto the Wireless Plus device:
- Connect to the Wireless Plus network from the device where you’ve downloaded your movies.
- From the Wireless Plus main screen, navigate to one of the media views: Videos, Photos, Music, Documents.
- Click the Upload button on the top menu.
- Enter the file name or click Browse and then locate the file you want to copy to your Wireless Plus device.
- Click Upload. The file will be added to the category you selected.
Now you can take more than 300 Blu-ray/DVD movies with you and watch them wherever you go, no wires necessary. You can start downloading data for all your travels, whether to work at a cafe or to see the world. Read More: