Adobe Premiere pro CS6 comes with Encore already integrated into the system to ease the process of creating a DVD or Blue-ray media disc. There must be some occasions when you want to edit your favorite DVD movies to make some modifications. Adobe Premiere Pro is widely used by video professionals. However, you will discover nothing happened when you try to import DVD into Adobe Premiere Pro. And this article discusses the details to tell you two ways of edit DVD videos into Premiere Pro CS6 for sharing.
Though Adobe Premiere supports lots of video and audio format, such as 3GP, 3G2, ASF, DV-AVI, DV, FLV/F4V, M4V, MOV, MP4, MPEG, MPE, MPG, WMV, etc. etc. it doesn’t support DVD importing like most video editing software. To add DVD movies to Premiere Pro CS6, you’ll need to convert DVD files to Premiere compatible video format.
In order to solve the issues, two possible solutions are provided for you.
Solution 1: Put the DVD into your computer player, open the DVD in Explorer, copy the folder Video_TS to your computer. Open the folder and rename all the files with the extension VOB to MPG. That’s it. Premiere will now import them.
Important note: This way seems to work only for non-protected DVDs. If have some commercial DVDs, you may need another solution. By the way, we searched the issues online, some guys give the feedback renaming the files didn’t work; the files would import but then was unusable in Premiere Pro.
Solution 2: The alternative trick is to rip the video files out of the DVDs, transcode them to a format that Adobe Premier Pro does support then import. You best bet is to use a DVD to Adobe Premiere Pro Converter to rip DVD and convert video to MPG format, which can be easily recognized by APP.
To rip DVD to Premiere Pro CS6, you will need a DVD ripping software, here you can try Pavtube BDMagic for Mac, (See other options), this is top Mac Blu-ray Ripper software on the market, which can convert Blu-ray and DVD to MPEG-2/MOV for Adobe Premiere Pro native editing, or rip BD/DVD to MKV, AVI, WMV, MP4, M4V, FLV for playback.
In the program, there are many output formats have been optimized, they are for portable devices and editing software, so you just need to click and choose as you want. Below are the detail steps for ripping Blu-ray and DVD on Mac to use in Premiere Pro CC, CS6, CS5.Rip Blu-ray/DVD to Premiere Pro CC, CS6, CS5 with Best Blu-ray Ripper for Mac.
Rip DVD to Premiere Pro CS6 with Best Blu-ray Ripper for Mac
Get this Best Mac Blu-ray Ripper for Premiere Pro installed;

 Other Download:
- Pavtube old official address: http://www.pavtube.cn/blu-ray-ripper-mac/
- Cnet Download: http://download.cnet.com/Pavtube-BDMagic/3000-7970_4-76177782.html
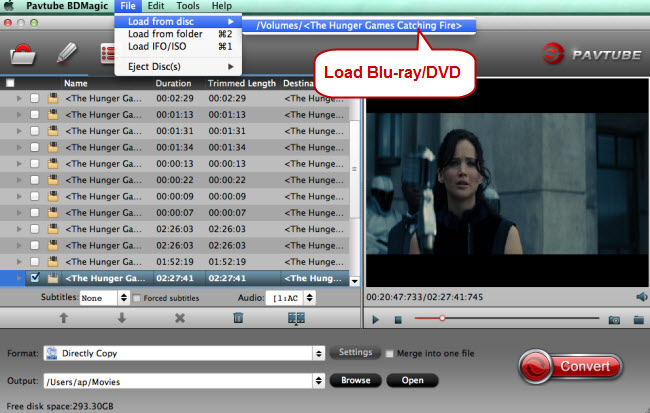
There is a disc icon on the top left which let you load from disc, folder or ISO/IFO respectively.
Other Download:
- Pavtube old official address: http://www.pavtube.cn/blu-ray-ripper-mac/
- Cnet Download: http://download.cnet.com/Pavtube-BDMagic/3000-7970_4-76177782.html
There is a disc icon on the top left which let you load from disc, folder or ISO/IFO respectively.
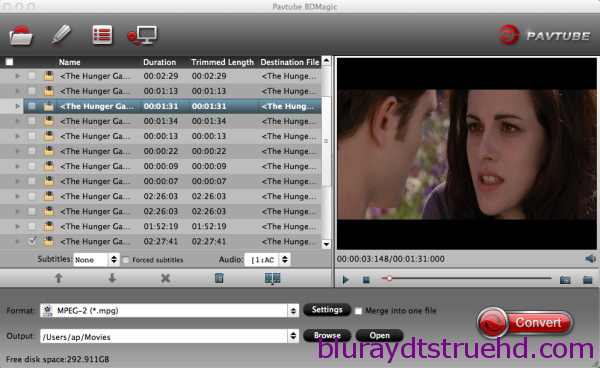 Step 2. Choose your Output directory down.
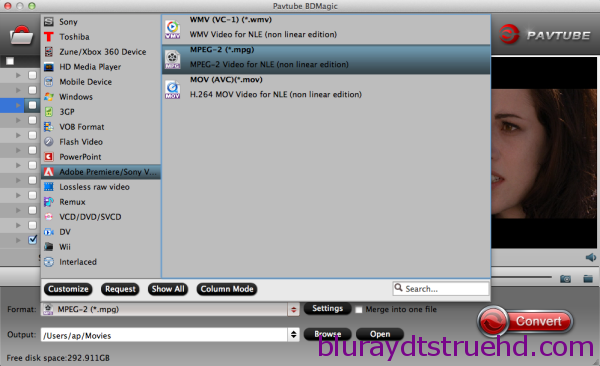
For editing DVD movies in Premiere Pro CS6, the MOV is preferred. Click “Format” and choose “MOV (AVC)(*.mov)” or “MPEG-2 (*.mpg)” from “Adobe Premiere/Sony Vegas” option.
Step 2. Choose your Output directory down.
For editing DVD movies in Premiere Pro CS6, the MOV is preferred. Click “Format” and choose “MOV (AVC)(*.mov)” or “MPEG-2 (*.mpg)” from “Adobe Premiere/Sony Vegas” option.
 PS: It has various profiles and formats so that you can rip DVD to various formats according to your needs.
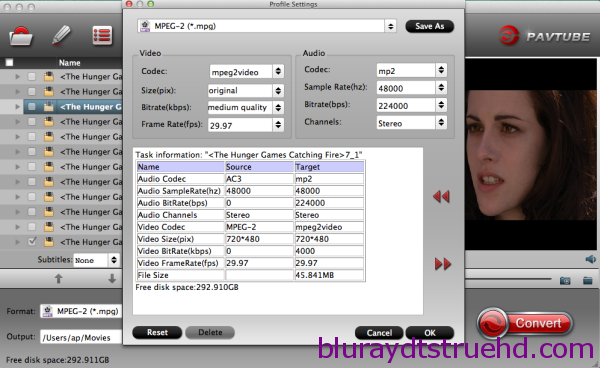
Step 3. Set up frame rate, bitrate and other output settings.
Click Settings, you can find file details including codec, size, bitrate and frame rate. You are able to fix them according to your needs.Pls rember: the higher bitrate you choose, the better video quality it outputs.
PS: It has various profiles and formats so that you can rip DVD to various formats according to your needs.
Step 3. Set up frame rate, bitrate and other output settings.
Click Settings, you can find file details including codec, size, bitrate and frame rate. You are able to fix them according to your needs.Pls rember: the higher bitrate you choose, the better video quality it outputs.
 Step 4. Start ripping.
Now just press the big circular “Convert” button to convert DVD to Premiere Pro CS6 and let it do its magic. Then, you can learn how to import video files into Premiere Pro.Wait for moments and you will get the fresh hot converted videos for Premiere Pro.
Read More:
Step 4. Start ripping.
Now just press the big circular “Convert” button to convert DVD to Premiere Pro CS6 and let it do its magic. Then, you can learn how to import video files into Premiere Pro.Wait for moments and you will get the fresh hot converted videos for Premiere Pro.
Read More:
Q: “ How to get and play 3d movies via USB on lg 3d tv and what format? I have a lg 42lm3410 3d tv i want to watch 3d content, but i can’t find any sites and mkv not supported. I have heard of converters(wondershare) but i can’t figure correct settings for conversion. So, what do i do with bitrate and sample rate values ? Any great solutions for me?” - Do you have the same question? Are you looking for best free 3D video players? Or, want a professional but easy to use program to enable 3D movies playback on any 3D TV? Check this zone, you will find all solutions to play a3D MKV on 3D TV. Where are the 3D .mkv come from?Usually, the 3D .mkv come from Blu-ray disc. If we copy or backup the Blu-ray movies to our computer, we can get .mkv files. The MKV video keeps original quality and resolution. MKV is a contain format, most of the electronic equipment doesn’t support .mkv playback, especially 3D MKV files. To enjoy 3D MKV on 3D TV with 3D effects, you need to convert 3D MKV movies to 3D TV supported format as Side-by-Side 3D MP4. Are you trying to find out the answer? Self-help is better than help from others! How wonderful it will be if we can enjoy 3D movies on 3D TV by ourselves. Hot Search: 3D ISO movie to 3D MKV | 3D Blu-rays to 3D Projector | 3D MP4 on 3D Devices | 3D Blu-ray on ATV 3 | Can I play 3D movies on 3D TV? Sure! With this 3D Video Converter UltimateThanks to a variety of very cool Pavtube 3D Video Converter Ultimate, it helped lots of 3D movie fans and very easy to use. It not only for Create 3D movies out of 2D sources, but also can create 3D movies out of source 3D Blu-ray content in 5 different 3D video formats: MKV, MP4, MOV, WMV and AVI for multiple 3D media players like HTC EVO 3D, LG Optimus 3D P920, 3D HDTV, 3D game consoles, etc. Here is review. Note:If you are on Mac, turn to 3D iMedia Converter for Mac. Don’t hesitate to get it now and follow the easy steps below to make your 3D MKV files playable anywhere on 3DTV. How to Convert 3D MKV movies to 3DTV for playing
 Other Download:
- Pavtube old official address: http://www.pavtube.cn/blu-ray-video-converter-ultimate/- Cnet Download: http://download.cnet.com/Pavtube-Video-Converter-Ultimate/3000-2194_4-75938564.htmlStep 1: Add 3D MKV MoviesClick Add button to add 3D MKV videos to the program. You can also directly drag the video files into the program. And you can add multiple files to save your time for this program supports batch conversion.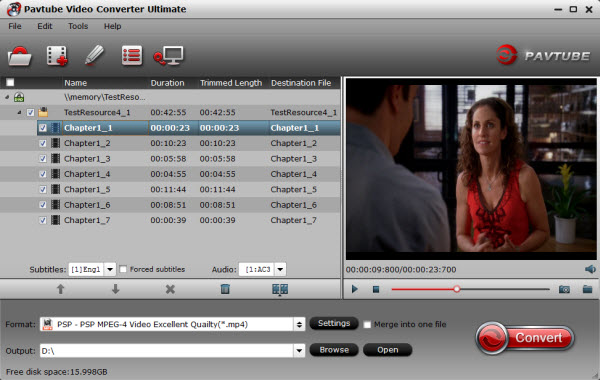 Step 2: Edit or clip 3D MKV movies (Optional)Click “Edit” on the menu to trim, crop, add special effects to your source movies.Step 3: Set output optionsYou can then select an output format and specify a directory on your computer to save the output files. From the Format bar, find “3D Video” catalogue, and choose either“MP4 Side-by-Side 3D Video (*.mp4)” as output for converting 3D MKV to side-by-side 3D MP4 video. See also: Differences Between Anaglyph 3D and Side-by-Side 3D.
 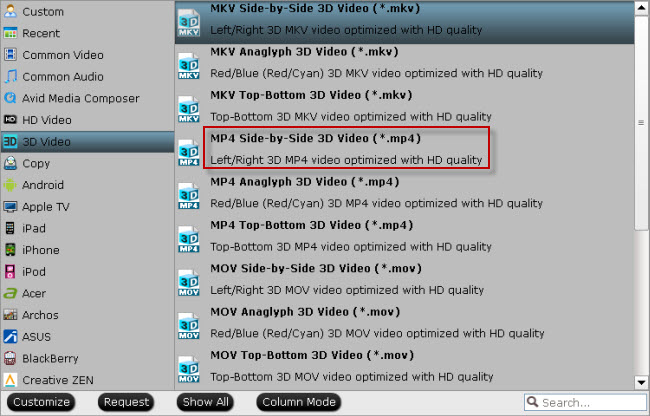 Step 4: Start 3D MKV Conversion Click “Convert” button to start 3D MKV to 3D MP4 conversion in side-by-side mode. Once the conversion finished, you are able to get the generated 3D MP4 files via clicking “Open” button with ease. Then, you can enjoy the 3D MKV Movies on 3D TV on the sofa at the weekend. If you need to convert downloaded 3D MKV movie videos or other videos to AVI, MOV, WMV, VOB, 3GP, H.265, H.264, MPEG etc., just use Pavtube Video Converter Ultimate! Read More:
Still have trouble about only extracting audio from DVD? Is it possible to rip music and audio from DVD for playing on watching your phones or burning to play on your car or teaching lessons on class? Therefore, Pavtube as Top DVD Audio Ripper, an up-to-date DVD backup solution provider, chooses AC3 which is more frequently used in DVD as the output audio format to satisfy the needs of the masses. You can extract the audio from the DVD disc, and convert DVD to AC3 5.1 Channel Audio File.
Hot Search: Audio on Apple Watch | AAC to AC3/MP3 in VLC | Pure Audio to PonoPlayer | Blu-ray with 7.1 audio |
What Can AC3 File Be Applied to?
AC3 audio can be played by VLC, WMV, and common players for DVD. If you cannot play AC3 file directly, try to install an AC-3 filter on your computer. Furthermore, extracting audio from DVD has other applications besides enjoying the original DVD sound:
Getting audio from a DVD is useful for further edition. The extracted audio from DVD can be added to the self-created video for some video edition lovers. The uses can be more only if you can imagine.
“I teach listening in a college. In order to develop the interests of my students and make my class more vivid, I decided to play the audios of hot movies on the class for listening training. I have, to keep pace with the times, some latest DVD movies but I wonder if it is possible to get audio from a DVD?”
The answer is absolutely yes! Pavtube DVDAid ripping audio off DVD saves more time than ripping video to a great extent. There is a click-and-go way to grab only the audio from a DVD and save it as AC3/5.1 channel audio file. What’s better, you can also select the title you need for audio extraction while letting other unnecessary titles go to spend less time and make the extracted AC3 file smaller. With it, you can easily extract songs from DVD and convert DVD to AC3 5.1 Channel Audio File. Read the review.
Note: If you are Mac users, try DVDAid for Mac, you can easily convert DVD to AC3 5.1 Channel Audio File on Mac OS X E1 Capitan
How to only Extract AC3 Audio from DVD in a Simple Way?
Get a free trial and follow the guide below:
Other Download:
- Pavtube old official address: http://www.pavtube.cn/dvd_ripper/
- Cnet Download: http://download.cnet.com/Pavtube-DVDAid/3000-7970_4-76158510.html
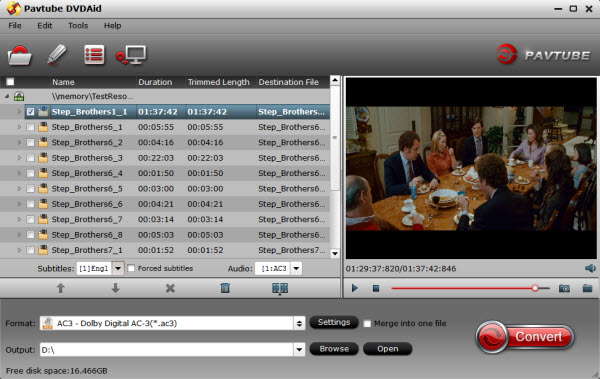
Step 1. Free download Pavtube DVDAid, install and launch the program.
After running Pavtube DVDAid, just click “Load disc” button to load source .DVD files.
 Step 2. Select AC3 audio as output format for playing.
Move your cursor to Format and choose “Common Audio> AC3 – Dolby Digital AC-3(*.ac3)” as below:
Step 2. Select AC3 audio as output format for playing.
Move your cursor to Format and choose “Common Audio> AC3 – Dolby Digital AC-3(*.ac3)” as below:
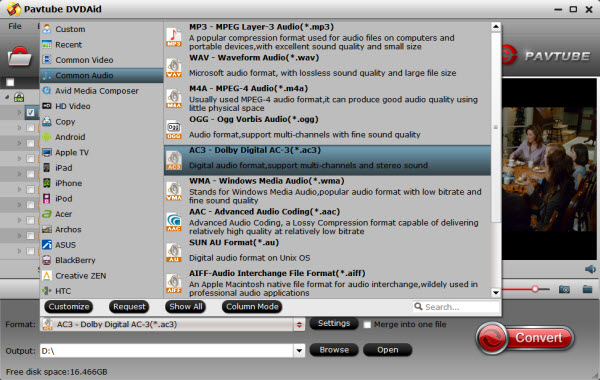 As listed above, there are several presets for other audio format; just choose one as your needs.
Step 3. Adjust audio specs and trim audio length (optional).
Tip 1: If you are not satisfied with the default audio quality, just click the “Settings” icon and choose wanted audio settings including sample rate, bitrate and audio channel.
Tip 2: If you only want to extract one clip that contains background music from DVD, you can click “Edit” icon. On the “Video Editor” Window, you can play and preview the original video and output effects. Also you can flip video, trim, add effect, reset, and adjust volume.
The “Trim” feature allows users to decide where to start and where to end when converting the selected clip, so that unwanted segments will be cut out after conversion.
As listed above, there are several presets for other audio format; just choose one as your needs.
Step 3. Adjust audio specs and trim audio length (optional).
Tip 1: If you are not satisfied with the default audio quality, just click the “Settings” icon and choose wanted audio settings including sample rate, bitrate and audio channel.
Tip 2: If you only want to extract one clip that contains background music from DVD, you can click “Edit” icon. On the “Video Editor” Window, you can play and preview the original video and output effects. Also you can flip video, trim, add effect, reset, and adjust volume.
The “Trim” feature allows users to decide where to start and where to end when converting the selected clip, so that unwanted segments will be cut out after conversion.
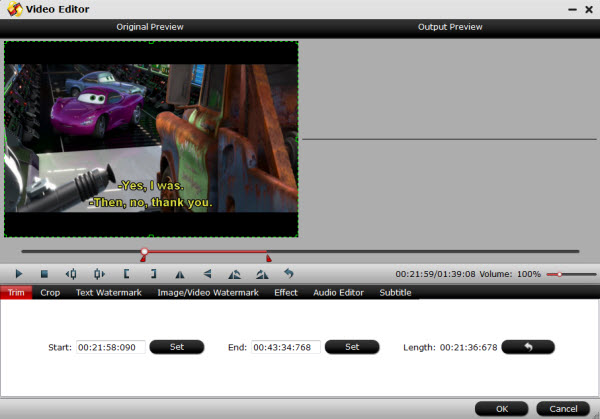 To set your audio length, please switch to “Trim” tab in “Video Editor” Interface and follow any of the methods below:
1. Drag the control sliders to include the segment you want to remain.
2. Click the left square bracket to set start point, and click the right square bracket to set end point when previewing the video.
3. Input specific values to “Start” and “End” box.
Trim frame by frame
Pavtube DVDAid offers “Previous Frame” and “Next Frame” options for users to select frames and trim accurately.
Step 4. Start converting DVD to AC3 audio files.
Now back to the main interface and hit “Convert” to convert your DVD files to AC3 audio files. It will start batch conversion automatically one by one. Wait for a while during the progress; after it completed, click “Open output folder” to locate the converted audio file.
Minutes later, you will get the converted files from this DVD to AC3 5.1 Channel Audio File converter on your computer, import them to your devices and now enjoy the beautiful music anytime anywhere you like!
Read More:
To set your audio length, please switch to “Trim” tab in “Video Editor” Interface and follow any of the methods below:
1. Drag the control sliders to include the segment you want to remain.
2. Click the left square bracket to set start point, and click the right square bracket to set end point when previewing the video.
3. Input specific values to “Start” and “End” box.
Trim frame by frame
Pavtube DVDAid offers “Previous Frame” and “Next Frame” options for users to select frames and trim accurately.
Step 4. Start converting DVD to AC3 audio files.
Now back to the main interface and hit “Convert” to convert your DVD files to AC3 audio files. It will start batch conversion automatically one by one. Wait for a while during the progress; after it completed, click “Open output folder” to locate the converted audio file.
Minutes later, you will get the converted files from this DVD to AC3 5.1 Channel Audio File converter on your computer, import them to your devices and now enjoy the beautiful music anytime anywhere you like!
Read More:
Real Customer overview from Pavtube:
“ I prefer the original format (VIDEO_TS for regular DVDs, and I don't know for Blu-rays, as I have not started yet.) I watch on my television screen only. The bigger screen the better, so no phone, no tablet, nothing else. I watch them at leisure. Eventually research on the Science Fiction ones and store them on external hard drives linked to my Macmini media server. I find that Pavtube irritating to the extreme. If my friend had not recommended your product, this saturation advertising strategy would have absolutely turned me AWAY from your company.”
Tips for Mac users: QuickTime Alternative | Blu-ray to H.265 MP4 Mac | Play H.265/HEVC with VLC | Import H.265 to iTunes |
One common question always puzzle you that want to play DVD films on Mac Mini? Here is the answer. If you’re HD movie lover and wish to add DVD movies to the newly built Mac HTPC, Pavtube BDMagic for Mac is a good combination. This top Mac Mini DVD Player copies protected Blu-ray and DVD movie to your Mac HTPC with highly quality. In that way you can play DVD movie on Mac Mini HTPC without quality loss. The following guide tells how to copy/rip DVD movies to Mac Mini HTPC with Pavtube BDMagic for Mac.
Preparations:
1. Mac mini
2. external BD drive
3. source Blu-ray Discs.
4. Pavtube Mac Mini Blu-ray Player (The software is able to back up Blu-ray movies and commercial DVDs for Mac HTPC Media Center without quality loss or compress the BD and DVD movies to MOV, MP4, MKV, M4V, etc. in perfect sync.) Read the review.

 Make 1:1 Copy DVD to Watch Any DVD Movies via Mac Mini
Step 1. Load DVDs, also Blu-rays
Run Mac Mini HTPC converter on Mac, It work on both with Mac OS X 10.9 and Yosemite 10.10 perfectly. and load Blu-ray/DVD movies by clicking “File” > “Load from disc.” For Blu-ray import, an external or internal Blu-ray is required to read your Blu-ray disc.
Make 1:1 Copy DVD to Watch Any DVD Movies via Mac Mini
Step 1. Load DVDs, also Blu-rays
Run Mac Mini HTPC converter on Mac, It work on both with Mac OS X 10.9 and Yosemite 10.10 perfectly. and load Blu-ray/DVD movies by clicking “File” > “Load from disc.” For Blu-ray import, an external or internal Blu-ray is required to read your Blu-ray disc.
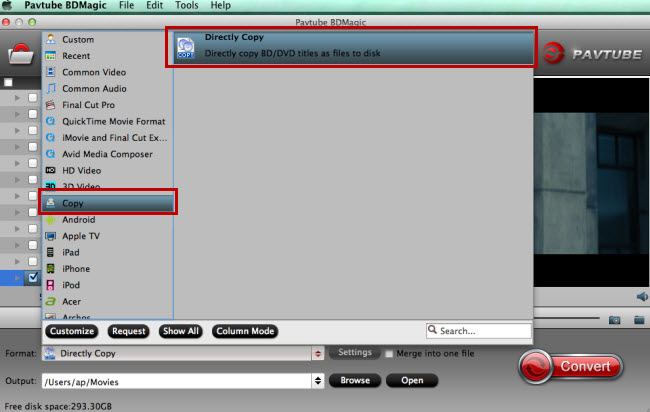
 Step 2. Choose “Directly Copy” to backup the main content.
Under “Format” menu, there are many formats and devices for you to choose. If you just want to backup the main content of the DVD, go to find “Copy” option and choose “Directly Copy” that can meet your demands well.
Step 2. Choose “Directly Copy” to backup the main content.
Under “Format” menu, there are many formats and devices for you to choose. If you just want to backup the main content of the DVD, go to find “Copy” option and choose “Directly Copy” that can meet your demands well.
 Tips: Here, we can recommend you Pavtube ByteCopy for Mac, you can get the container format with multiple audio tracks and subtitles included. Besides retaining multiple audio tracks and multiple subtitles in an video files without transcoding and quality loss. A simple guide about DVD to lossless MKV. For more movie entertainment, read this Pavtube Softwares Comparison review to get more multimedia tools.
Step 3. Start ripping.
Click big “Convert” button to start conversion. It won’t take much time for conversion and then you will get the main content of the DVD. Once completed, hit “Open” button you will go to location of generated files.
After you finished all the tasks, you can transfer the converted DVD files on Mac Mini. Have fun!
Read More:
Tips: Here, we can recommend you Pavtube ByteCopy for Mac, you can get the container format with multiple audio tracks and subtitles included. Besides retaining multiple audio tracks and multiple subtitles in an video files without transcoding and quality loss. A simple guide about DVD to lossless MKV. For more movie entertainment, read this Pavtube Softwares Comparison review to get more multimedia tools.
Step 3. Start ripping.
Click big “Convert” button to start conversion. It won’t take much time for conversion and then you will get the main content of the DVD. Once completed, hit “Open” button you will go to location of generated files.
After you finished all the tasks, you can transfer the converted DVD files on Mac Mini. Have fun!
Read More:
As the development of technology, there are more and more 4K support cameras come out like Nabi Square. If you want to edit 4K videos in non-linear editing programs i.e. Final Cut Pro, you might need to take time to convert before you can start post production. That’s because FCP can’t support 4K resolution video. And this article will show an easiest way.
Fuhu Announces Nabi Square HD -- the 4K Camera Created to Capture Childhood
Nabi Square HD™, the first-ever 4K action camera for kids that is shock-proof, drop-proof and waterproof without a case, built for the rugged and extreme adventures of childhood. Unlike most high quality cameras that require protective gearing and an attentive parent, nabi Square HD was created for parents to comfortably leave the camera with their kids to capture child's most daring and precious moments -- whether biking for the very first time or child's first trip to the beach. nabi Square HD is designed to work with a child's outdoor activities such as biking, running, jumping or swimming, while capturing the most vivid and crisp still image in 8MP or video in 4K.
Powerful and durable, nabi Square HD is a professional grade camera dedicated to capture the extremeness of childhood and family-first moments through the eyes of a child. It's also more powerful, and supports 4K video recording at 15 fps, 2.7k recording at 30 fps, 1080p at 60 fps and high-speed, 120 fps capture at 720p.
Tips for Editing: Edit ALEXA Mini video in iMovie | H.265 to Avid Media Composer | XAVC S to Avid Media Composer |
How to Convert Nabi Square HD 4K video to ProRes for editing in Final Cut Pro
The latest version of the FCP X support import video resolution up to 5K, why FCP 7 and FCP X can’t import 4K video files? Obvious, resolution isn’t a problem, video format is a major cause. Different video format has different video and audio codec, FCP doesn’t support all formats importing. Such as FCP X and FCP 7 can’t import 4K Nabi Square HD 4K video files. If you want to have a smooth Nabi Square HD 4K video and FCP workflow, you are advised to convert 4K video to ProRes for further editing in FCP. Learn>> FCP X video file format.
At first, I introduce a powerful high-quality 4K video converter, player and editor on Mac OS X - Pavtube iMedia Converter for Mac can deliver you a whopping help. The program can effortlessly encode/re-encode 4K MP4, XAVC, XAVC S, etc footage to advanced encoders like Apple ProRes, Apple Intermediate Codec, MPEG-2, DNxHD, etc. to seamlessly fit for Final Cut Pro, iMovie/FCE, Adobe Premiere Pro, Avid Media Composer and more. Plus, this 4K Video Converter is also available to customize the output resolutions to any size like 1080p, 2K, 4K as users want. Just download it and keep reading for a brief how-to on each process.
Read the Review: Import H.265/HEVC to FCP X | Choose Best Suitable Editing Programs
Step-by-Step Guide:
Step 1: Download and have a quick installation.
The trial version will have a watermark on your converted files. Except for that, there are no time limitation, no virus, and no unnecessary bundle apps while downloading. After that, click “Add Video” button to load your 4K files.
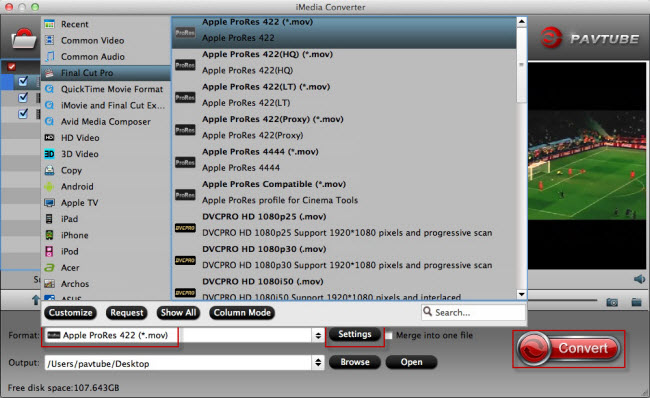
 Step2: Choose ProRes MOV for output format
Clicking the Format bar, you can click “Final Cut Pro” >> “Apple ProRes Codes 422 (*.mov)” as output format from the format list. (Read difference about Types of Apple ProRes Codecs).
Step2: Choose ProRes MOV for output format
Clicking the Format bar, you can click “Final Cut Pro” >> “Apple ProRes Codes 422 (*.mov)” as output format from the format list. (Read difference about Types of Apple ProRes Codecs).
 Step 3: (Necessary point) How to preserve 4K resolution with output videos
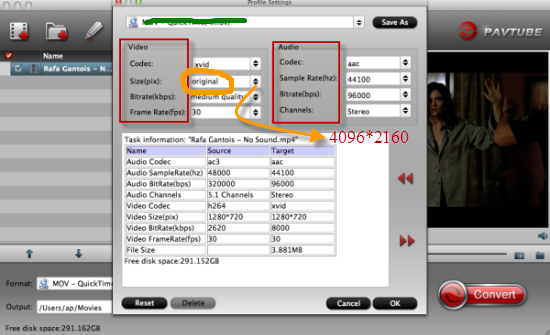 In order to get the output videos with 4K resolution, we should click the ‘Settings’ and get in to set the ‘Video size’ to ‘4K’. However, there are no ‘4K’ items we need to tap the ‘4096*2160’ in the blank. That’s the necessary step we need to do here.
Finally, when you go back to the main interface, of course we can click the “Convert” icon to make our work started. From Nabi Square HD 4K Video to FCP ProRes 4K, is that cool? Easily transfer your 4K files to FCP for professional workflow, we can enjoy ourselves then!
Read More:
In order to get the output videos with 4K resolution, we should click the ‘Settings’ and get in to set the ‘Video size’ to ‘4K’. However, there are no ‘4K’ items we need to tap the ‘4096*2160’ in the blank. That’s the necessary step we need to do here.
Finally, when you go back to the main interface, of course we can click the “Convert” icon to make our work started. From Nabi Square HD 4K Video to FCP ProRes 4K, is that cool? Easily transfer your 4K files to FCP for professional workflow, we can enjoy ourselves then!
Read More:
