Monday, June 1, 2015

Convert Blu-ray to Toshiba Chromebook 2 for playing

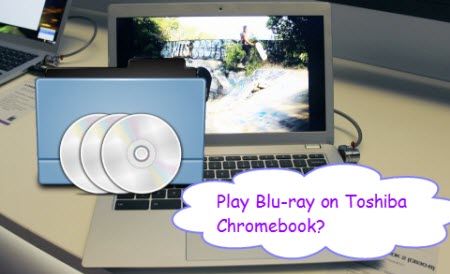
Toshiba has updated its 13-inch Chromebook model with the new Chromebook 2, boasting improved components and a gorgeous 1080p IPS display. Has anyone figured out to run blu-rays on these things? Is it possible to play Blu-ray on Toshiba Chromebook 2 directly? In this guide, we will show you a flexible Blu-ray Ripper to convert Blu-ray to Chromebook 2 friendly video and then transfer the Blu-ray rips to Chromebook 2 for playback. 


You may have collected a pile of Blu-ray discs. Ever felt it's a bother for you to find the one you need from them? We spent some time with it to see if this really can playback Blu-ray Movies on Chromebook 2. Go through some threads related to Chromebooks, a common suggestion is to convert Blu-ray to Chromebook 2 friendly video before transferring Blu-ray files. Here Pavtube BDMagic is highly recommended to help you rip Blu-ray to Toshiba Chromebook 2 supported MP4 video files. Read the review

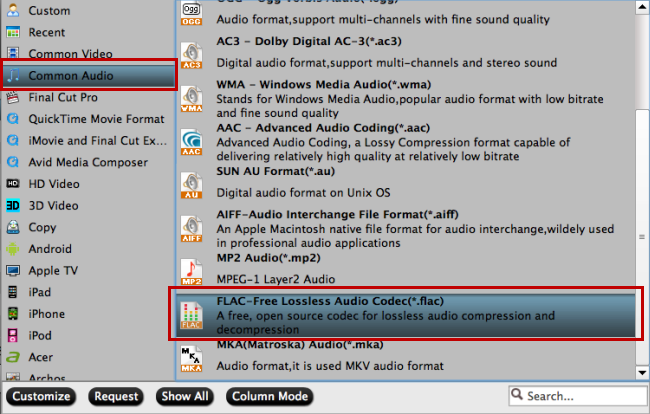
With this program, you can convert any latest Blu-ray and DVD movies to Chromebook without hassle. Besides, it allows you to convert your Blu-ray, DVD files to virtually any popular video/audio formats like AVI, WMV, FLV, MKV, MOV, MP3, WAV, AAC, OGG, etc. for playing and sharing anytime as you like. In addition, the smart built-in video editor allows you to edit Blu-ray/DVD videos by trimming, cropping, adding watermarks, etc. 

Note: If you're a Mac user, you can turn to Pavtube BDMagic for Mac (Yosemite included), which has the same function as the Windows version. Just download the right program and follow the easy steps to complete the whole conversion in just a few clicks. 
  
How to transfer Blu-ray movie to Toshiba Chromebook 2

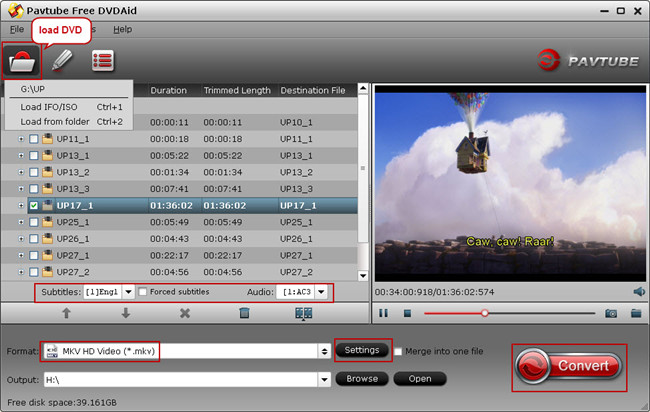
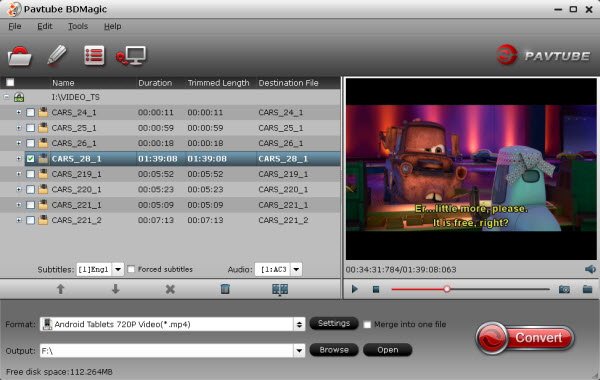
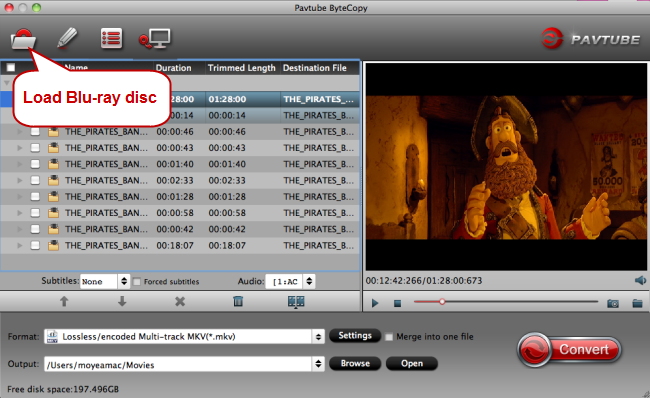
Step 1. Run Blu-ray to Chromebook converter and click disc button to load Blu-ray movie you want to convert. You can then review them on the right viewing window and take snapshots freely. 


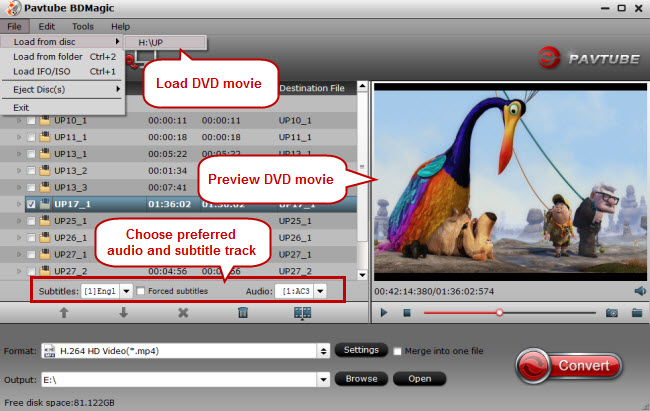
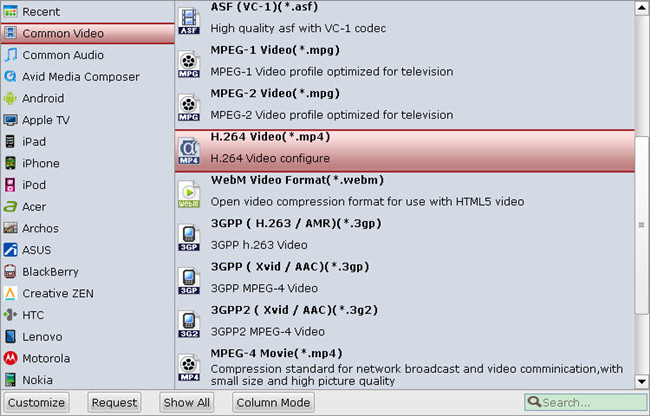
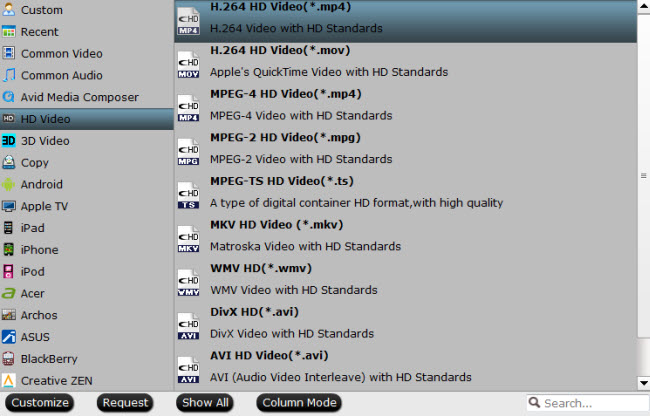
Step 2. Click Format bar and just select an output format as you like. In most cases, MP4 format is recommended to users. It could fit on your Samsung, Acer, HP and Toshiba Chromebooks. 


* Chromebook Supported Meida File
  Types: .3gp, .avi, .mov, .mp4, .m4v, .m4a, .mp3, .mkv, .ogv, .ogm, .ogg, .oga, .webm, .wav

* Chromebook Supported Codecs:

.ogv(Theora), .webm(vp8), .mp4(H264, MPEG), .mov(H264, MPEG), .avi(MPEG4/MP3, DIVX/MP3, XVID/MP3), .3gp(H264/AAC, MPEG4/AMR-NB)

Tips: If you need to change your video's resolution, frame rate, bit rate or etc, just click on Settings.

Step 3. Hit the “Convert” button at the bottom of the main interface to start the conversion. It will automatically convert Blu-ray to Chromebook 2 compatible video files. Once the conversion is finished, click “Open” to quickly find the converted movies. Then, you can transfer Blu-ray movies to Chromebook 2 for playback with ease. 
  
How to play ripped video on Toshiba Chromebook 2 ? 

First plug the USB stick to your Chromebook 2. By default, Chromebook uses the built-in media player to play audio and video files. Just simply double-click the target video file in Files app and now you can enjoy your favorite Blu-rays on Chromebook offline!

Read More: 

Thursday, May 28, 2015

Free Windows/Mac DVD to MPEG Converter Review + Guide

Whats the Best DVD to MPEG Converter? 

Q: “ I'm looking for an easy to use all in one DVD to mpeg (or AVI) converter that has good quality. So i can just insert my dvd click some buttons then a couple of hours later come out with a new Mpeg of my film about 700-900 mb big. It is to back up my own films i own on DVD (want some small files so i can put a few movies on my laptops hard drive and carry around with me and watch them on my laptop instead of carrying a bunch of DVDs around with me that might get damaged and take up space). Any one know of some good software for this (i dont mind paying good money for it if its worth it?”   

Today, we’re going to help you solve this question. This article introduces three top and professional DVD to MPEG Converters, which can convert your favorite DVD movies to the MPEG formats, or other video files, so that you can backup and store DVD files to your computer, read this review and choose the suitable DVD to MPEG Converter. 

Now look at the top 3 Free DVD to MPEG Converter as below, see what's the difference and choose the best one now!

Top 1. Pavtube Free DVDAid (Win/Mac)


Free DVDAid/Free DVDAid for Mac offers you a fun, easy and fabulous way to rip DVDs, according to Pavtube, the giveaway version has all the features of regular DVD Ripper except it cannot output as MP4 nor does it have specific output profiles for electronic devices. 

The feature-rich yet Mac free DVD to MPEG converter also can assist you to clip video segment you favor from DVDs and choose the subtitle and audio track according to your personal use. After converting DVD to MPEG, you will never worry about scratching or losing a DVD again.

  • Rip DVDs to MOV, MKV, AVI, MPG, VOB, WMV, FLV, etc with fast speed.
  • Helps edit DVD and add SRT/ASS/SSA subtitles to DVD movies.

Pros: Easy to use; Editing features; Support dealing latest DVD disc
Cons: Can’t convert video to mp4 format
OS: Windows XP/2003/Vista/Windows 7/Windows 8/Windows 8.1

Upgraded full version -DVDAid (Alternative Mac version DVDAid for Mac)

Main features:
  • Best DVD ripping software on the market
  • Rip and convert DVD movies to MP4/AVI/MKV/WMV,etc with high quality.
  • Makes 1:1 copy of original DVD Disc without quality loss with all audio streams, subtitle tracks, extras, etc.
  • With CUDA/AMD GPU acceleration, and you will take short time of converting and get hours of enjoyments.
    It’s simple to use and well worth the investment.
  • Support latest DVD
  • Features with adding *.srt and *.ass subtitle
Tip:

Want to rip your Blu-ray/DVD movies to 3D videos for playback? Want to convert or backup your Blu-ray movies and DVDs with keeping original multiple audio tracks and subtitle , trying Pavtube Bytecopy (Win/Mac), which is the best Blu-ray/DVD Copying & Ripping softwar for you. 

Top 2: Pavtube Free Video DVD Converter Ultimate(Win)

Pavtube Free Video DVD Converter Ultimate is your all-in-one solution to rip, encode DVD and convert even edit videos in one place. With this best free Windows 10 video converter, you could effortlessly achieve all your multimedia demands and enjoy video/DVD anywhere and anytime you like. Plus, you can quickly convert virtually any video (including Tivo) and audio files to AVI, WMV, MOV, FLV, MKV, 3GP, MPEG, MP3, M4A, AC3, WMA, AAC and more. Meanwhile, it provides large amounts of DIY features including trimming, cropping, splitting, adding subtitle. And you are free to adjust video and audio parameters


Pros

There is nothing complicated about installing Pavtube Free Video DVD Converter Ultimate on a Windows PC. You will quickly figure out the application’s interface. Use this tool to convert videos and to rip DVDs. There’s a built-in player and video editor. It is quite easy to use Pavtube Free Video DVD Converter Ultimate. It will provide you high-quality videos with sync of audio and video

More highlights in upgrade version:

  • Full Disk Copy: DVD users can 1:1 backup of DVD with original structure and chapter marks preserved and use it to create ISO files or DVD discs.
  • Directly Copy: DVD collectors can backup the intact main movie of DVD removing menu and some promotional clips, which is helpful to save DVD in smaller size and enjoy DVD movies with less time.
  • Output MP4 files: Clients can put it onto many popular portable devices, like iPad, iPhone, Samsung Tablets, Nexus devices, etc, to carry them anywhere. On the long way to go to work or on boring railway in travel, watching a favorite DVD movie is the best way to kill time.
  • Conversion to various editing software: Clients can choose to output to Sony Vegas, Adobe Premiere for editing.
Top 3: FFmpeg (Mac)

Created specifically for Windows, this build of the popular FFmpeg conversion tool, an old-school command-line conversion tool, is extremely powerful. You can convert video formats like AVI, MKV, MOV, MP4, OGG, SWF, TP, WMV, and any other you can think of.

It makes up for its perceived lack of user friendliness by being extremely powerful. It supports one of the widest areas of video and audio codecs out there, and works really fast. What it lacks in visual power, FFmpeg makes up for in sheer strength.


Now, having your choice for the DVD to MPEG conversion for Windows or Mac? Hope your a happy DVD Tto MPEG entertainment!

Read More: 

Monday, May 25, 2015

Stream Blu-ray movies on Raspberry Pi 2 rasplex via Plex

Q: “ I need ripping my Blu-ray and DVD Collections to plex, I will use my plex server to play them on my Raspberry Pi 2 rasplex device, as well as tablets. I'm ripping my kids movies first, as they get more wear and tear on them. I was not pleased with DVDFAB. So,   Anyone can help me? Which is the Top Blu-ray ripper for Plex and also works on Raspberry Pi 2 rasplex. ” 


How to enable stream Blu-ray movies on Raspberry Pi 2 rasplex via Plex? At first, you need to use a DLNA app like XBMC or rasplex to enable streaming. Then, you can streamed from Raspberry pi 2 to your rasplex. What’s the point? Not all movies can be streamed from Raspberry pi 2, the MP4 is the best choice. So, if you have any video files, you need to use use Pavtube BDMagic to convert these files to MP4 format. 

Tip: Raspberry Pi 2 so tiny that many people choose to build a multimedia center at home with it and XBMC. Follow this guide to learn how to achieve it. 

Pavtube BDMagic – A top Blu-ray Ripper can help you to remove Blu-ray/DVD region lock convert them to multiple format like FLV, AVI, WMV, MKV, MOV, VOB, MTS, M2TS, TOD, etc for playback on your HDTV easily without any restriction. The process the straight forward. After launching, drag and drop your video files to the program, choose output format and then start the conversion. Free download and install it and below is the detailed guide. For Mac users, Pavtube BDMagic for Mac is a helpful app to encode videos for further usage.
Best Way to Convert Blu-ray to Raspberry Pi 2 rasplex via Plex 

Step 1. Run Pavtube Top Blu-ray Ripper for rasplex and Insert the Blu-ray disc you want to rip into your hard drive and run the program. Then load your Blu-ray movies to it for converting. As you can see, loaded files will be displayed on the left item bar and you can select your preferred audio track, subtitle, etc. ISO, IFO and DVD folder are also well supported.


Step 2. Click the dropdown menu between "Format" and "Settings" to choose target video format. There are various presets sorted of device model and programs. For Raspberry Pi 2, we need to choose "HD Video>H.264 HD Video (*.mp4)", Which is the Best formats for rasplex.  

 
Step 3. Click the Setting icon to have the Profile settings box. In the setting interface, you are allowed to adjust codec, bit rate, frame rate, sample rate and audio channel to optimize the output file quality. 

Step 4. Click the “Convert” icon, and the conversion will be started quickly. Once finished, you can get the output videos for your Raspberry Pi 2 rasplex via clicking on “Open” button effortlessly. Afterward, connect your Raspberry Pi 2 rasplex on PC and then transfer the videos to rasplex via Plex. 

Now, you can easily enjoy your all Blu-ray and DVD collections on Raspberry Pi 2 rasplex via plex. Have fun! 

See Also: 

Thursday, May 21, 2015

Stream iTunes DRM Movies on TV for Playing

Watching iTunes movies on TV can be a lot of fun especially with you family and friends for better measure. Who does not like to rent out or by movies from the iTunes store? Easy to access and even easier to watch and with absolutely high quality of image reception, this is the choice that a lot of people make when they have to sleep in on a weekend.  However, we realize that you have lots of stored movies in your fated iTunes library, which have either been downloaded or purchased. Is there any way to enable iTunes movies on your TV?  Follow these steps to get the biggest benefit. 

  
Method 1: Unlock iTunes Movies and Play iTunes Movies on TVs with Ease

Purchased or Rented iTunes movies are DRM protected so that you can not play them on non-Apple devices. The only way to unlock iTunes movies is removing DRM protection. The popular DRM removal- Pavtube ChewTune is the fatest and best iTunes DRM Removal you can find to remove DRM and convert iTunes M4V to TVs compatible videos.

This top iTunes M4V to TV converter can help you freely install it and try to enable TV play iTunes M4V movies without DRM limitation. Mac version is here. (Read the reviews) Below are the steps to change iTunes format to TV with ChewTune, only with a simple clicks, you will finish the conversion from iTunes M4V to TV acceptable format. 

Step 1. Load M4V files to the DRM Removal Tool.

Get this DRM Removal Tool downloaded and installed, drag and drop your iTunes M4V files to it directly.


Step 2. Choose output file format for playing via TV.

This iTunes m4v to TV Converter provides optimized presets for Any TV. Click the put down menu of "Format", and then hit "Common Video" preset to choose "H.264 Video(*.mp4)".


And “Settings” button provides you more customize options like video size, bitrate, frame rate, sample rate(Hz) etc. for output files.

Step 3. Strat removing DRM protection from iTunes M4V.

Now you can click “Convert” button to start removeing DRM protection and converting iTunes M4V for playing on TV smoothly. Wait for moments, then click “Open” to locate the converted video. 

Now you are ready to You can transfer them to USB Flash Drive, External Hard DriveSD Card or Chromecast to play on TVs. 

Method 2: Watch iTunes Movies on TV with the Help of Computer

Another way to watch iTunes movies on TV is to connect the computer and TV while you are playing the videos using iTunes on your computer. You can achieve that by an HDMI cable. In this way, what display on your computer will also display on your TV screen. And then you can use the TV remote control to switch the TV's input to the proper port, set the graphics adapter and choose TV screen as the primary monitor. In this way, when you are playing iTunes movies, the videos will show on the large screen TV. 

Method 3: Watch iTunes movies on TV with Apple TV

Apple TV can connect the movies from your iTunes library to the TV, on which you want to watch your movies. By choosing to sync the movies that you like from your iTunes library to the Apple TV box, you will have all the selected movies at your disposal to connect to a larger screen which is the basic discrepancy that one faces on iPods and iPads, even though they have superior video output. If you own an Apple TV then your problems will be decreased to a much smaller issue of merely connecting of cables. 

Besides, You will also require an internet connection to stream in the movies from Apple TV. For better picture quality you will also require a widescreen enhanced definition TV or high definition TV. The Mac or PC iTunes will suffice to stream all the required movies that you need to stream in. 

You may also be interested to transfer Blu-rayDVD and mkv video on Smart TV. 

Have you ever thought of watching iTunes movies on TV with family and friends for better video watching experience? After reading this guide with 3 methods to view iTunes videos and movies on TV with ease.

Read More: 

Monday, May 18, 2015

Rip Blu-ray Audio to lossless FLAC for playback using VLC on Mac

FLAC is a musical file format that offers bit-perfect copies of CDs at half the size, and is compatible with many phones (including the iPhone). It is basically a Blu-ray disc encoded as 24-bit/96kHzor 24-bit/192kHz audio recording in three lossless formats: PCM, , and DTS-HD Master. Want to listen the audio of the Blu-Ray movies on your portable players from Mac? You can extract the audio from the Blu-Ray disc, and convert Blu-Ray to lossless FLAC for playback using VLC on Mac. 
  
Output Audio Format: WMA (with 7.1 channels), AAC (with 5.1 channels), AC3 (with 5.1 channels), MKA (with 5.1 channels), MP3, WAV, M4A, OGG, WMA, AU, AIFF, MP2, FLAC


Part I: How to Free Converting Blu-ray HD audio to FLAC

As I mentioned in my first look at ripping Blu-rays, converting uncompressed PCM and lossless Dolby TrueHD and DTS-HD Master Audio to FLAC for use in XBMC carries a number of benefits. 


  • It's also lossless, so no quality difference.
  • FLAC is an open, well-documented format and so you're not reliant on reverse-engineered implementations.
  • XBMC can decode FLAC to PCM and output it over HDMI, whereas it currently can't for DTS-HD.
  • Hard drive space savings can be significant, especially for PCM soundtracks.

    There's little penalty in terms of the time taken to rip the disc either, as it's unlikely that your BD drive can copy data from the disc fast enough for the conversion process to become a bottleneck.What you need: This process still uses MakeMKV, with the feature enabled in by checking the advanced options box in the settings. TrueHD decoding is built in, but you'll need to find a separate DTS module and point MakeMKV to that. All you then need to do it choose the ‘FLAC’ preset when ripping a disc. Otherwise the process is identical.

    Part II: Use Top Blu-ray Audio to FLAC Ripper for VLC to Convert a pure audio Blu-ray Audio to FLAC audio files for VLC on Mac

    To extract Blu-ray discs to VLC accepted FLAC audio files on Mac, you could use Pavtube ByteCopy for Mac which is an effective Mac Blu-ray Audio Converter that could Convert Blu-ray music to lossless FLAC audio format. Still delivering an ultra-high quality listening experience on Mac. Even encoding Blu-ray to H.265 MP4 is supported. Read the review.  


    Hot News for all Mac users! Pavtube Studio has launched a user-requested upgrade for all its Mac BD/DVD and package tools: DVDAid for Mac, BDMagic for Mac, ByteCopy for Mac, iMedia Converter for Mac to version 4.8.5.1, which focuses on the addition of the H.265 encoders and decoders.

    Step 1: Install and launch the Mac Blu-ray Audio to FLAC Ripper (Windows version: Pavtube ByteCopy ); import your Blu-ray Disc or Backup saved on hard drive by clicking “Load File” icon. You can also convert a pure audio Blu-ray to FLAC/MP3 audio files for iPhone/iPad on Mac. 


    Step 2. Choose Lossless FLAC audio format. Here click the format bar to follow “Common Audio” and “FLAC-Free Lossless Audio Codec (*.flac).” as the output format. 


    Step 3. Convert pure audio Blu-ray to lossless FLAC

    Click the red button on bottom-right corner to realize conversion from high fidelity pure audio Blu-ray to lossless FLAC for VLC. After completing conversion from high fidelity pure audio Blu-ray to lossless FLAC, you can streaming the converted pure audio Blu-ray for VLC with Hi-res audio quality. 

    In addition, Pavtube ByteCopy for Mac can convert latest Blu-ray and DVD movies to any other formats like MP4, MOV , M4V, AVI, WMV, MPG, MKV, etc or MP4/MOV with multi-track audios for playback and it is also able to encode Blu-ray movies and DVDs to MKV container format with preserving chapter markers, multiple audio tracks and subtitles. 
       
    Related Articles: