Thursday, May 7, 2015

Rip Blu-ray to MKV with subtitles for using in VLC Media Player on Mac

“I've currently been ripping my collection of doctor who DVDs, tried doing a few blue-rays and gave up as it took so long (help?) I need a professional tool which can help me rip Blu-ray to MKV on an external Hardrive, it's just a easier format, I like the ability to do subtitles. I want to Watch them for using in VLC Media Player on Mac. Having them on file is handy for when traveling. I know someone who uses Pavtube a lot and found it to be the best ripping program. Any suggestion?” - read this Pavtube Softwares Comparison review to get more multimedia tools. 


While, no-one seems to know much how to import and play Blu-ray discs using VLC on Mac (even you've gotten rid of the copy protection and can actually make a backup!). So here's how we have done it: The first and easiest, upgrade VLC Media Player to recent version; Second solution: You'll need two files: keys database and AACS dynamic library; Alternative choice: Rip and Convert Blu-ray to MKV with subtitles for VLC on Mac. 

If you have not decided to upgrade your VLC, or the second choice seems to be a bit complex for you, there's an easy way to make it. You need rip Blu-ray disc to VLC friendly format such as .mp4, .mkv, .mpeg-2. Here comes withPavtube ByteCopy for Mac an easy of use copy-protection removal which is special designed for lossless conversion (DVD-R and Blu-Ray capability in one program) to rip Blu-ray and DVD movies with multiple audio tracks and subtitles keeping. 

Moreover, it’s also a professional Blu-ray ripper, allows you to rip and convert Blu-ray/DVD movies to any video format you like. What’s more, it can also help you to get Blu-ray Main Movie backup in original format without extracts and convert latest Blu-ray discs to your portable devices for playback on the way. Now download it and start the Blu-ray to VLC conversion on Mac. 

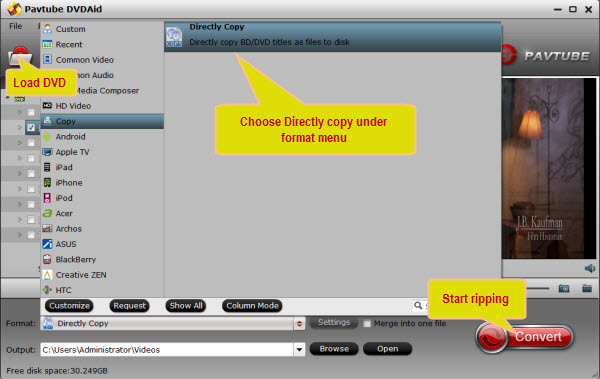
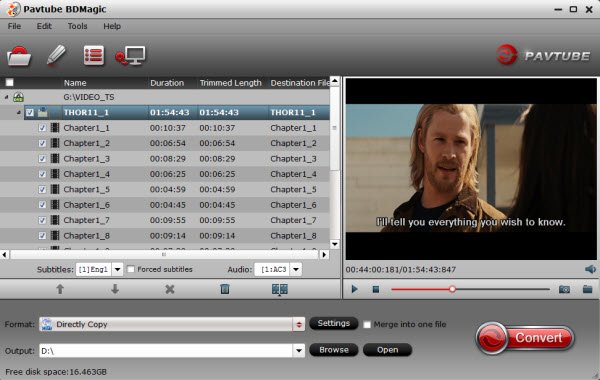
Step 1: Run Pavtube ByteCopy for Mac (Window version: Pavtube ByteCopy), and load Blu-ray files to it. You can click "Load Files" to load movie from BD drive or "ISO/IFO" Blu-ray ISO file. you can also load DVD discs. 


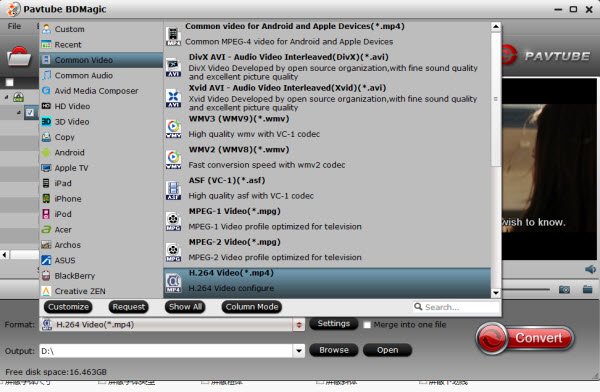
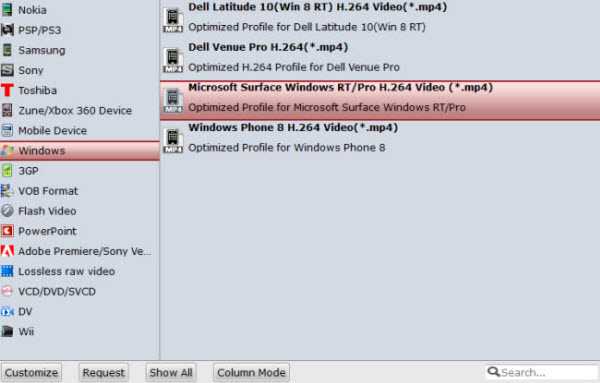
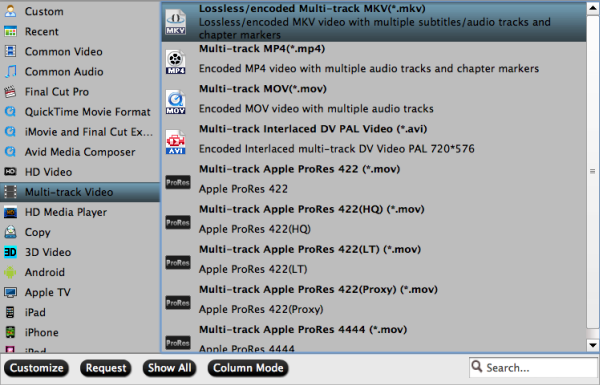
Step 2: Select output format for VLC.

Choose MKV format as output, here “Format > Multi-track Video > Lossless/encoded Multi-track MKV (*.mkv)” is recomended for you. Of course, you can choose mp4 as you wish. 


In addition, you can learn how to play Blu-ray ISO ImageMPV videos and other MKV/AVI/VOB/MPG/Tivo/FLV videos on PC/Mac.  

Tip: Pavtube ByteCopy for Mac let users control/customize output file quality. To improve video quality, simply click "Settings" and set video bitrate up.

Step 3: Start ripping DVD to MKV video.

Click "Convert" button to rip Blu-ray to VLC Media Player, once the ripping task is finished, you can click "Open" button at the bottom of the main interface to get the output MKV file for enjoyment on VLC via Mac. 

Tips: If you have 3D Blu-ray discs, and want to get them playable, you can choose “MKV Top-Bottom 3D Video (*.mkv)”, or “MKV Anaglyph 3D Video (*.mkv)” or “MKV Side-by-Side 3D Video (*.mkv)” which can retain the 3D effect. Read the Differences Between Anaglyph 3D and Side-by-Side 3D

Read More: 

Monday, May 4, 2015

Ripping DVD to DLNA server to watch on Smart TV

With the development of science and technology, Samsung at the same time Samsung has brought us many surprises. Samsung’s new smart TV lets you find and control exciting content in new and unexpected ways. Help you enjoy an exceptional picture and a TV experience like never before. Wouldn’t it be great to digitize all of your DVD movies for moving them to your DLNA server, so that you could watch them on smart TV without needing your DVD player? Let me share the solution. 


To rip DVD to DLNA supported video formats for watching on Smart TV so that you can stream DVD videos via DLNA with ease, a certain tool is needed. Here we highly recommend Pavtube DVDAid is such a DVD to NAS ripper which is used and recommended by a friend of mine. As alternative of AnyDVD and DVD43, this DVD ripping and copying tool can always catch up with the latest DVD copy protection variant and convert DVD to any common video format you want like MPEG-2, MPEG-4, WMV, MKV, MOV, FLV, AVI and more. With it, you can encode DVD video to DLNA supported video formats with ultra-fast encoding speed and least quality loss. 

Best of all, it allows you to copy your DVD to DLNA with original structure or main movie only. The equivalent Mac version is DVDAid for Mac. Read the reviews here. Just download the program and follow the steps below to fulfill your task. 

Step-by-Step: How to rip and copy DVDs to DLNA server friendly video for Smart TV

Step 1: Load DVD movies 

Run the DVD Ripping program and click “DVD disc” icon to load DVD movies for converting. You can also import movies files from DVD VIDEO_TS folder or ISO image files. 


Step 2: Choose output format 

1.If you’d like to copy only movie content and leave out the extras and commentary, the Directly Copy is exactly what you need, which copies intact .M2TS/VOB main movie from original BD/DVD disc without extras. 


2.The general format is "H.264 Video(*.mp4)" from "Common Video" option. (As you know, DLNA can support a wide range of format like MP4, WMV etc). What’s More? "“Common Video” > “H.264 High Profile Video(*.mp4)" it's the most widely used format which will be supported by your Samsung Smart TV.  


Step 3: Adjust video specs or change aspect ratio (Optional) 

If you have special requirements on target video, click “Settings” to customize video size, bitrate, frame rate and sample rate. 

Step 4: Convert DVD to MP4 for Smart TV

Click the "Convert" button to start converting DVD to DLNA Server as MP4 format. With the technology of CUDA acceleration it will provide you fast conversion speed. Once completed, go to "Open" the generated MP4 files for playback on your Smart TV. 

Read More: 

Thursday, April 30, 2015

Rip Blu-ray “Far from the Madding Crowd” on Windows 10/8/7/XP

Frequent travelers that enjoy watching movies on board tend to rip their Blu-rays on Windows PC 10/8/7/XP to take along with. Blu-ray Far from the Madding Crowd had been release in USA on May 1 2015 for sale online or in store. And you may want to know that how to backup Blu-ray The Longest Ride to MP4, AVI, WMV, MOV etc, or iPhone, iPad, Android, Windows 10 PC/Phone/Tablet, this article will guide you how to rip Blu-ray Far from the Madding Crowd by a Top Blu-ray ripper. 


Top Blu-ray Far from the Madding Crowd Ripper: 

Far from the Madding Crowd and Welcome to Me will release on the Same Day. Maybe you want to rip Blu-ray movie Far from the Madding Crowd by using popular free Blu-ray ripper online, so we recommended you Pavtube BDMagic. This is is just such a Blu-ray to Windows PC 10/8/7/XP Converter. It can convert both homemade and commercial protected Blu-ray movies on Windows WMV, AVI, ASF, WMA, MPG, etc. After the quick ripping, you will get high quality output videos and edit them in Windows (Live) Movie Maker, share the videos with family and friends online. 
  
Note: If you are a Mac user, you can use Pavtube BDMagic for Mac to accomplish converting Blu-ray movies to MP4, AVI, WMV, MOV etc on Windows (10/8/7/XP). Get the 30% OFF special offer in our official website and Facebook now! 

Step-by-Step: How to Rip Blu-ray Movie Far from the Madding Crowd on Windows PC 10/8/7/XP

Step 1. Run Best Windows PC 10/8/7/XP Blu-ray Ripper and import disc.

Click “Load Disc” icon to load your inserted Blu-ray and DVD disc, IFO/ISO or folder. I also noticed if you have a ISO file to import, it will recognize the ISO file automatically with no need to run virtual driver and mount ISO files firstly. Good design. 


Step 2. Set output folder and Choose format.

Click the “Browse” button to set output folder where you want to save the copied Blu-ray/DVD movies. Click “Format” drop-down list and choose proper format for different using. Here, you can choose “Common Video -> H.264 MP4 Video (*.mp4)” for putting Blu-ray and DVD to hard drive for playback. 


Step 3. Change video specs. (It does not work for directly copy)

If you are not satisfied with default specs, then click “Settings” to enter Profiles Settings windows. You can customize video frame rate, bitrate, size and other settings freely. 

Step 4. Start copying or converting

Click the big red “Convert” to start backing up or copying your Blu-ray disc on Windows Windows PC 10/8/7/XP Usually backup will be quicker because it does not need to do trancoding. After the conversion, click “Open output folder” to quick locate converted files. Connect your hard drive to computer and transfer them into it.

The good of Top Blu-ray Far from the Madding Crowd Ripper: You can import all kinds of Blu-ray sources: BDMV folder, physical Blu-ray/DVD disc, Blu-ray ISO, VIDEO_TS folder, DVD ISO and IFO file, protected Blu-ray Disc and unprotected Blu-ray Disc. Using the “Full Disc Copy” feature, you can preserve the Blu-ray’s original file structure, backup Blu-ray disc to PC with one click. Using “Directly Copy” feature, you can backup Blu-ray/DVD main movie in original format (m2ts or vob) without quality loss.

While this Top Blu-ray ripper can also support you convert Blu-ray/DVD to Android, Apple and Windows 10 device friendly formats (iPad Air, iPhone 6, Apple TV 3, Galaxy S6/S6 Edge, etc.), it takes longer. Supporting Dolby Digital 5.1/AAC 5.1 audio as a plus. Moreover, it allows you to trim a specific duration from a movie while allowing you to split movie/divide a movie evenly into multiple segments. Moreover, Pavtube programs support adding *.srt and *.ass subtitles into video and merge into one file for output. 
  
Now, you can start enjoy “Far from the Madding Crowd” Blu-ray movies for playback on any portable devices. 

Read More: 

Monday, April 27, 2015

News! Pavtube Video Converter for Mac 40% OFF Upgraded

Big news for all! Pavtube studio has announced that its hottest product Mac Video Converter has upgraded to latestversion 4.8.5.0. According to the official news, this updated product can decode the H.265/HEVC video codec well. In other words, it has become the hottest and comprehensive video converter for all Mac users!


What’s new in this upgraded version?
  • Fix the bug of breakdown when importing MXF and XAVC format.
  • H.265/HEVC decode well.
  • Solve the issues well for decoding basic codec
  • Support the VPx series codec perfectly

Main features:
  • Convert various video/audios as input and output.
  • So many popular editing tools and media players are available.
  • Easy operation workflow and faster conversion speed.
  • Extra acceleration function for Windows users.
  • Strong ability of setting and editing output vides.
Outstanding highlight for H.265/HEVC supported:

If you have more touched this new H.265 codec enough, you may know well about it. For H.264/MPEG-4 and H.265/HEVC, those two codec are said to double the date compression at the same level of video quality. This H.265 can be said as the Intro Time of 4K Generation. With the H.265 codec videos, we can get the higher definition and smaller vide size.

Pavtube Video Converter for Mac Version 4.8.5.0 ---Deserved to choose as your favorite!

Now this brand new video has updated to a more powerful one, new features like adding H.265/HEVC decode which can provide much higher quality than H.264, videos shooting under XAVC mode can be loaded flawless, more output items added to consider about the compatible with old system or devices. What’s more, we will not be disappointed with its’ original fast speed and easy operation.

Release Name: Pavtube Video Converter for Mac v4.8.5.0
Developer: Pavtube Studio
License: ShareWare
Language: English, Japanese, Chinese
Size: 31 MB
OS: Mac
Download: Pavtube Video Converter for Mac 4.8.5.0 Retail

Notes: Upgraded Windows version also provided for all Windows users

Another surprise for you! 

All of us can get 40% discount off on Pavtube Video Converter for Mac from FaceBook. before May, 1st, 2015. Come on!  

Learn More: http://www.multipelife.com/pavtube-video-converter-for-mac-upgrade.html

Thursday, April 23, 2015

Play Amazon Instant Video on Surface 3 without any issue

Not long ago Microsoft released the Surface 3 tablet, since it released it has attracted great attention, because it is powerful. it features 10.8, ClearType Full HD Plus Display, the resolution is 1920*1280, which is great for you to browse websites or watch movies. Have you ever think about playing Amazon Instant Videos on Surface 3 for Windows 10? Here in this article, we'll focus on how to get the Amazon Instant Video playback on Surface 3 tablet for Sharing. 


As is known to everybody, the WMV videos purchased from Amazon store, including music, videos, movies, and TV show etc. are usually format type unsupported by the Microsoft Surface 3. The problem is, those WMV videos you downloaded from Amazon are protected (by DRM), and can't be played on any Android/Windows tablet except for the Amazon Kindle Fire (HDX). So if you would like to transfer Amazon WMV videos to Note Surface 3 for playback, you have to remove DRM from Amazon Instant Video and convert/record it to Surface 3 compatible formats. 
   
No worries, it couldn't be simpler only if you find this professional and top DRM removal program: Pavtube ChewTune- a Amazon WMV to Surface recorder! Actually, it is nearly able to unlock all the DRM videos as long as your video is authorized and it's able to playback on this computer. 

This little application is specially designed to remove DRM from videos/audios purchased or rented from not only Amazon Instant Videos, but also iTunes Store, Zune Marketplace, BBC iPlayer, DVD/BD digital copies, or any other protected sources. This DRM Media Converter attains the goal of DRM removal through re-encoding the original, protected video and audio files. After that, you can play your Amazon Instant Video(WMV) on Surface 3 and Surface series smoothly. The Mac version is ChewTune for Mac.  
  
Simple steps to strip DRM restrictions from Amazon video and convert WMV to Surface 3 

Step 1. Download Pavtube ChewTune as the Best DRM removal software.

   (Click here for Mac OS X 10.5) 

There would be a command window pop up during the installation to install specific soundcard drive for DRM Removal, please do not shut down it and let it running until the installation completed. 


Step 2. Add video and choose target format.

Drag and drop your videos to it directly, or you can click icon to import them as below. 


Let's click the drop-down-list besides "Format" and choose "Windows -> Microsoft Surface Windows RT/Pro H.264 Video(*.mp4)". (Read Surface tablets supported format


Step 3. Customize target video specs. (Optional)

Click "Settings" to enter Profile Settings window, you can find settings for video size, codec, bitrate and frame rate. Change them according to your own needs.

Step 4. Start conversion.

Now click the big red icon to start converting DRM protected Amazon WMV videos to Surface 3 in batch; this converter will activate your media player automatically and start to play this video (let's keep it running). The player windows cannot be removed or closed.

In the meanwhile, it will start to record this video in MP4 real-time. After the conversion, click "Open output folder" to quick locate the converted video for copying to Surface 3 for playback. The conversion time is equal to the video length itself; you can do other tasks during the converting the process. 

Now, you can view the Amazon Instant Video on Surface 3 tablet for sharing with friends. 

Read More: