Tuesday, June 10, 2014

How to convert 2D to 3D video with 3D Converter?

This article walks you through the whole process of converting 2D to 3D with the top 3D Video Converter.

With 3D technology developing faster and faster, more 3D products including 3D television, 3D gaming console, 3D phones are available in the market. People who wish to enjoy 2D movies in a more realistic form can convert 2D to 3D which will bring a stimulating new experience to your favorite blockbusters. 


The article here would introduce a professional 2D to 3D Video Converter Ultimate helping you to convert 2D to 3D with ease! Only 3 steps, then you can get your own amazing 3D movies! Can't believe it? Well, you can figure the 2D to 3D conversion out by yourself. Just prepare a set of Blu-ray/DVD discs or other downloaded 2D video files and let’s start! 

What you need: 

1. A Blu-ray drive – to make your PC/Mac read this disc 

2. Pavtube Video Converter Ultimate – to roll off your Blu-ray/DVD protection and convert other videos and turn it into 3D (For Mac users, you can try Pavtube iMedia Converter for Mac)

Rip and convert your 2D to 3D videos with 2D to 3D video converter

1. Import 2D video files 

Insert your Blu-ray to external Blu-ray drive, then you can load BD/DVD disc or import your videos to this 2D to 3D Converter.


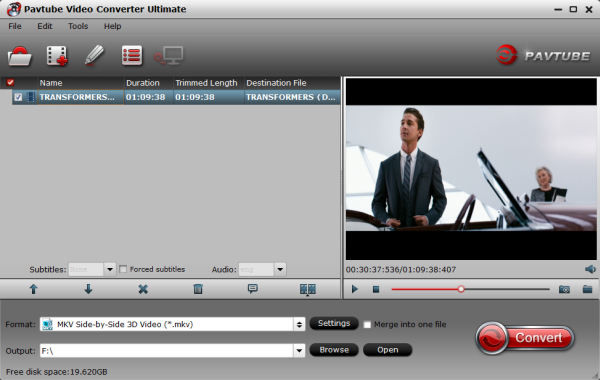
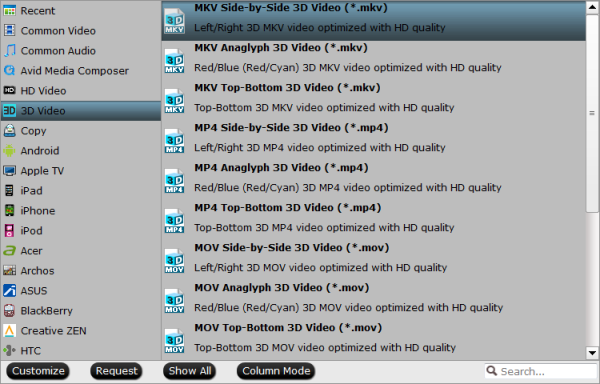
2. Set 3D as your output format 

Click "Format" and you will find many presets. There are three types of 3D effect: Anaglyph 3D, Side-by-Side 3D and Top-Bottom 3D. Here, you are suggested to choose the presets from "3D Video" option. 


Tip:
a. Adjust target video settings and 3D effect.

Click "Settings" which is next to "Format", free change your target video size, bitrate, frame rate and 3D depth. If you want to get best video quality, pls switch them to "original". 

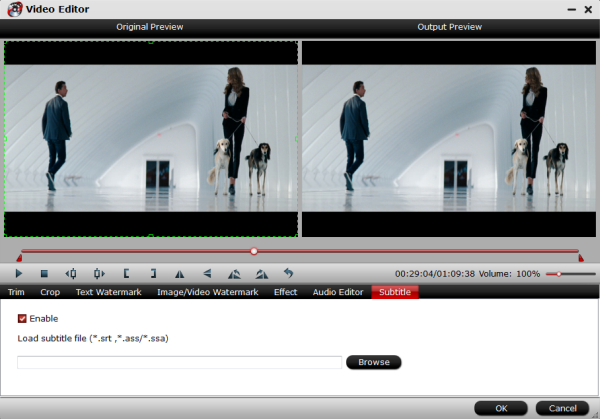
b. Useful edit functions for enhancing your video files.

Clik "Edit" button, you can apply cool effects to your videos. To get more information about this, go to the user guide of Video Converter Ultimate.


3. Start conversion.

Now hit the big red "Convert" to start converting videos to start converting 2D to 3D video on PC/Mac. After the conversion, click "open output folder" to quick locate the generated media file and play 3D video files as you wish! Have a nice time!

Related guides:

Wednesday, June 4, 2014

How to edit 2014 World Cup MXF recordings in Final Cut Pro X/iMovie/Avid/Premiere Pro on Mac

Follow the guide below and you will know how to edit 2014 World Cup MXF recordings in Final Cut Pro X/iMovie/Avid/Premiere Pro on Mac OS X without any other problems.

2014 Brazil FIFA World Cup will be the exciting memories for soccer fans. It’s great to watch recorded 2014 World Cup soccer match with your HD camcorders like if you plan to travel to Brazil for the 2014 FIFA World CupNow it's time to get your Canon, Panasonic P2 and Sony XDCAM MXF camcorders ready to record the 2014 FIFA World Cup footaball matches, and edit them on Mac in Final Cut Pro X/iMovie/Avid/Premiere Pro after coming back.


While, if you want to edit World Cup MXF videos, you may find the high quality MXF files are not recognized by most editing software even iMovie, Final Cut Pro, iMovie, Avid, etc, but sometimes to edit he raw MXF files in iMovie/FCP/FCE/Avid/Adobe Premiere Pro, etc is necessary to get a good visual effect, so, how to convert/import World Cup MXF recordings to Mac for editing? Is there software can do the job? 

The answer is positive. To convert and import 2014 World Cup MXF footage to iMovie/FCP/FCE/Avid, etc, you just need Pavtube iMedia Converter for Mac to help you. It is the solid tool to help users make the MXF transcoding on Mac OS X. It offers the optimal preset profiles for Final Cut Pro 6/7 and FCP X, Avid Media Composer, Adobe Premirere Pro, iMovie, FCE and more. And there is no need to worry about the quality loss. Becides MXF files, this all-in-one toolbox support converting other HD recordings and ripping Blu-ray, DVD for editing and playback.

Below is the simple guide about how to convert 2014 World Cup MXF footage into Avid, Premiere, iMovie, FCP on Mac.

Step 1: You need to download, install and run the smart World Cup MXF Converter Mac and transfer your MXF recordings to the program from the HD camcorder. Join MXF clips via checking the “Merge into one” box. 


Step 2: Click on the “Format”bar and choose a best editable format. 

a. Select Final Cut Pro > Apple ProRes 422 (*.mov) as the output format for Final Cut Pro. 

b. To edit World Cup MXF footage in Avid MC, choose Avid Media Composer->Avid DNxHD(*.mov).  

c. For iMovie, choose iMovie and Final Cut Express > Apple Intermediate Codec(AIC) (*.mov). 

d. For importing World Cup MXF to Premiere Pro, please select Adobe Premiere/Sony Vegas > MPEG-2 (*.mpg). 

PS:

1. You also can click “Settings” to set video frame rate, video size and Video Bitrate as you want. 

2. Want to upload recorded 2014 World Cup soccer match video to YouTube? You can trim, crop, add watermarks, even adjust video volume, you can click that pencil icon, go to the editing panel, then you can so some simple editing works.

Step 3: As soon as all things are finished, please click “Convert” button to start the 2014 World Cup MXF conversion on Mac OS X. 

Once the conversion is 100% completed, you can smoothly copy the converted files to FCP/Avid/Premiere/iMovie for editing. 
Now it's time to sharing your edited or reorganized 2014 World Cup soccer match with your friends and family and review all the wonderful moments on 2014 World Cup football game!
More tips for enjoying 2014 World Cup Video:

How to Downgrade Mavericks to Mountain Lion

Are you wanting to downgrade Mac OS X 10.9 Mavericks to Mac OS X 10.8 Mountain Lion? The good news is that you can roll back your Mac to the operating system that was first installed on it in two ways. Keep on reading.

Apple has introduced a number of very positive changes in OS X Mavericks – and we generally advice that the majority of users would be best served updating to the latest version of OS X. This is particularly true considering that Mavericks has the same list of supported systems as OS X Mountain Lion, and is a free upgrade. However, not all users are thrilled with Mavericks, for whatever reason. As such, at least a certain segment of users have found that they want to downgrade from Mavericks back to Mountain Lion as a result.  Is it possible? How to get it done?


Method 1: Downgrade with Time Machine back up

Note: Before you get started, we strongly emphasize making a thorough backup through Time Machine of a good OS X Mountain Lion install immediately before your proceed. Not only is this Time Machine backup necessary to complete the downgrade, it will prevent or minimize your data loss.

Once you have your backup, you’ll need to boot your Mac into Recovery Mode by holding down Command + R while your system boots. Then, once the Recovery Volume boots, select the Restore from Time Machine Backup option. Make sure you have your OS X Mountain Lion Time Machine backup volume connected to your Mac.

Next, make sure you read and understand the “Restore Your System” screen, select your Mountain Lion Time Machine backup, and click continue. Now, just select a volume you’d like to restore the backup to, and choose Restore. OS X will now completely restore your Mac to Mountain Lion, based on the latest backup you have for that operating system.

Once the restore is complete, you’re good to go! Your Mac will then boot into OS X Mountain Lion, and will be ready for you to use. 

Method 2: Downgrading by erasing disk and Internet recovery

Step 1: Get a copy of Mac OS X Mountain Lion


The first thing you need to do is get a copy of the Mountain Lion installation file. You may already have this if you’ve done an install before. Open the Applications folder and check for the Install Mac OS X Mountain Lion folder.

If you haven’t go this file, then you’ll need to go hunting for it. If you purchased it from Apple then you can open the App Store, and click on Purchases. Look for the Mountain Lion purchase and click on Download next to it. This will download the Installer file to your Applications folder.

If you haven’t purchased it you need to buy a copy from Apple. You can’t buy one from the App Store. Instead click on this link to buy a copy of Mountain Lion from Apple (for £14) You receive a code that you can enter into the App sTore to download the app.

Step 2: Download recovery Disk Assistant.


You can get a copy of Recovery Disk Assistant from Apple. Click here to get Recovery Disk Assistant (click Download). You’ll need this. Double click the Recovery Disk Assistant.dmg file in Downloads to continue.

Step 3: Create a recovery install disk


Now create a recovery drive. This is an external drive (usually a USB Flash drive) that you use to create a recovery disk. Follow these steps

Open Disk Utility (click on Go, Utilities and double-click Disk Utility)
Select the recovery drive in the sidebar and click on Erase
Ensure that the Format is Mac OS X Extended and click on Erase and Erase.
Click Partition and change Current to 1 Partain
Click options and select GUID Partition Table.
Make sure the format for the partition is Mac OS Extended (Journaled).
Click Apply.

Now open the Recovery Disk Assistant program. and click on Agree. Click and choose the external hard drive in the middle of the window and click Continue. Enter your password and click OK.

See: Apple Support: Erase and reinstall OS X


Step 4: Clone your hard drive

It’s important to make a clone of the whole hard drive and keep it around for a while. This can be useful in case of emergencies (you can boot from the hard drive) and you can re-clone it back to the main drive if there’s a problem. Also you can keep this around and pick files from it to copy over to the rolled back installation. The best way to do this is using a program like Carbon Copy Cloner or SuperDuper along with an external hard drive. Choose your main hard drive in the source, and your external hard drive in the Destination. Now click on Clone.

Step 5: Restart the Mac in Recovery Mode

First of all make sure you are connected to the Internet (open Safari and browse around). You need an internet connection to install Mac OS X. Restart the Mac by clicking on Apple > Restart and hold down the Command and R keys until the Recovery Mode Utilities window appears.

See: Apple Support: Mac OS X Recovery

Step 6: Erase the drive

Select Disk Utility and click on Continue. Now choose your Startup Disk in the sidebar on the left, and click on the Erase tab. If you want to securely erase the drive choose Security Zero Data One-Pass. Click Erase to delete the hard drive. Note that this permanently erases all data on the hard drive so don’t do this unless you’ve cloned the drive or are happy to never have to get something from that drive again. When Disk Utility has finished exit the program by choosing Disk Utility and Quit Disk Utility.

See: Apple Support: Disk Utility

Step 7: Reset and restore

Reset the Mac and hold down the Alt key and choose the Recovery USB drive. Install the OS X version that is provided with Internet Recovery, it depends upon what originally came on the machine (typically it will be either Lion or Mountain Lion). Note that if you have a Mac with an optical drive you can also use the installation disc to install direct to that operating system.

We hope you found this useful and that it works for you if you find yourself with the desire to downgrade! Enjoy!

Top 5 Best World Cup Apps for iPhone & Android

These apps are great for World Cup gossip, news, photos, and sports coverage. If you’re looking for the best World Cup apps, these are our top five picks.


1. ESPN FC Soccer & World Cup


(ESPN FC Soccer & World Cup)

The ESPN FC Soccer & World Cup app is a great resource for news about the 2014 FIFA World Cup. In addition to scores and news, this app captures the great sense of drama that great World Cup coverage should have.
Pros:
  • Up-to-the-minute scores and informative videos
  • Twitter integration pulls in info about Manchester United, Barcelona, Chelsea, Arsenal, Real Madrid, Bayern Munich, AC Milan, and Liverpool
  • Get news on the FIFA World Cup, UEFA Champions League, Europa League, European Championships, and more
  • Add or remove features to customize your experience
  • Keeps you abreast of rumors and transfer news
Cons:
  • Some features are US-only
  • Too many ads
  • App feels laggy at times
  • Boring, cluttered interface
  • Requires iOS 7.0 or later
2. SecondMic

Check out the video above to see SecondMic featured at DreamIt Austin 2014 Demo Day.

SecondMic is an app that allows fans, former players, teams, and sports reporters to provide alternative live commentary for sporting events. The app features great commentaries from comedians, sports reports, and other sports experts for all kinds of live events, including the World Cup. You can check out the SecondMic team’s World Cup predictions on their blog.
Pros:
  • Ideal for people who are bored with traditional sports commentary
  • Get commentary that suits your interests and personality
  • Wide array of commentators
  • App is simple to use
  • Users can become broadcasters themselves
Cons:
  • Does not appear to be available for Android
  • Requires iOS 7.0 or later
  • Depending on your home audio setup, the audio commentary may be too quiet or cumbersome to arrange
  • Great for World Cup coverage, but limited coverage for certain sports or entertainment events
  • Won’t appeal to people who prefer to watch sports alone, without a social aspect
3. FIFA Official App


(FIFA)

The official FIFA app is a must-have for any serious World Cup fan. It’s packed with info about players, leagues, and the FIFA organization itself. In addition, it has a great interface that is intuitively designed.
Pros:
  • Great UI
  • Extensive FIFA Tournament Coverage
  • Follow live coverage
  • Score updates for 102 of the world’s top leagues
  • Tons of photos and videos
Cons:
  • Some Android users have complained about frequent app crashing
  • Some users have reported delays with the news section
  • Limitations on the number of leagues you can follow
  • A few users have reported issues with calendar sync
  • Some users find that certain teams are getting too little coverage
4. FIFA 14 by EA Sports


Tired of waiting between matches to see some great action? Put yourself in the game with FIFA 14 by EA Sports. The game includes officially licensed 2014 FIFA World Cup Brazil national teams, kits, and even the Adidas Brazuca ball. If you want a video game that fully captures the spirit of the World Cup, this is it.
Pros:
  • Features 33 leagues, over 600 licensed teams, and more than 16,000 players
  • Listen to commentaries in English, French, German, Italian and Spanish
  • Solid graphics
  • Intuitive controls
  • Every injury, suspension, and change in team form is reflected in-game
Cons:
  • Requires at least 1.35GB of free space on your device
  • Some users have lost their squads after updating
  • Some users have experienced EXP bugs
  • Doesn’t sync with console version of the game
  • Some features/modes feature IAP
5. Adidas 2014 FIFA World Cup LWP


This live wallpaper and clock widget app for Android users is really cool. Every time you unlock your device, this app plays a short animation that flies you straight into Maracanã Estádio’s center circle, revealing the official match ball.
Pros:
  • Select between 32 qualifying countries
  • Cool audio notifications for texts, email alerts, and missed calls
  • Inlcudes custom clock widget
  • Time of day and weather detection in Maracanã Estádio
  • Easy controls for “kicking” the ball on the screen
Cons:
  • Not available for iOS devices
  • May get repetitive to all but the most fervent footie fans
  • Some users have reported freezes
  • Only five footballs can be on the screen at once
  • Does take up a good chunk of space, uses a lot of battery

Tuesday, June 3, 2014

Free Download Kid Pix Deluxe 3D for Mac

Kid Pix Deluxe 3D for Mac is a kids drawing and painting creativity software which integrated with Apple's iLife, making it easy to link animated projects with music which is in your iPhoto albums and in you iTunes playlist. This brand-new Mac OS X edition for Kid Pix Deluxe has everything your young artist needs to tell their stories and adventures on screen. 


The "3D" part of the name refers to the wonderfully rounded new 3D animations and 3D backgrounds, and the 3D paint that's so real you'll think you could touch it. Easy path animations let 3D characters hop, Jump and fly around the screen, and a hundred wonderful movie backgrounds, from the Golden Gate to Outer Space, add a touch of Hollywood. Using your Mac's built-in camera, and a variety of animated costumes, kids can have fun starring in their own digital documentaries. And with the new "FlipBook" button, kids can easily Create a 60-second animated short story all their own. 

Video narration lets them star in their own animated adventures, and easy path animations let 3D characters interact on screen. Eye-popping 3D backgrounds, and a hundred video backgrounds provide a Hollywood setting. For ages 4 and up. Includes two pairs of 3D glasses! 
 
Main Features:
 
- Create animated stories viewable with 3D glasses
- Multilayered 3D backgrounds and 100 video backgrounds
- Easy path animation tools let 3D characters interact
- Video narration lets kids star in their own animated productions

All in all, it offers everything that a kid needs to have a creative fun!