Friday, October 11, 2013

Put/Transfer Blu-ray ISO image file to Sony Xperia Z1/Xperia Z Ultra

Here I present the easiest method to put and play Blu-ray ISO image file on Sony Xperia Z1/Xperia Z Ultra with Top Blu-ray ISO Converter.

“I am trying to convert a Blu Ray ISO image file to MP4 so that I can wath it on my newly arrived Sony Xperia Z1. What’s the best tool on your mind can do that? Do you have any recommendations?”

Movie fans love to create ISO image files out of Blu-ray disks since it is considered the best way to prevent their expensive special editions from scratches or other accidental damages; meanwhile, created ISO files can be saved to computer or external hard drive which saves lots of physical space. While ISO wins the love of movie lovers, on the other hand, it has its limitation that most smartphones including Sony Xperia Z1/Xperia Z Ultra are not compatible with ISO, so you cannot directly watch Blu-ray ISO image file on your portable device. Therefore, you should convert Blu-ray ISO file to Sony Xperia Z1/Xperia Z Ultra playable video format in advance, they have their own video specs. They usually supports MP4 format.

Top Blu-ray Ripper or Blu-ray Ripper for Mac (from pavtube.com) can be the best and top Blu-ray ISO to Sony Xperia Z1 Converter in the market. It works quickly and easily. You don’t need to set any parameter value and just need to select the optimized pre-setting for your new phone. After that, this great Blu-ray ISO to Sony Xperia Z1 Converter can automatically help you convert Blu-ray ISO image files to play on Sony Xperia Z1/Xperia Z Ultra 6X faster without any quality loss.

(More options: 2013 Top 5 Blu-ray Ripper Review: Pavtube vs Leawo vs Aiseesoft vs Xilisoft vs Aimersoft)

free download top blu-ray ripper             free download blu-ray ripper for mac

This guide below will teach you how to do this great job step by step. First, download and install this great Kindle Fire HD video converter.

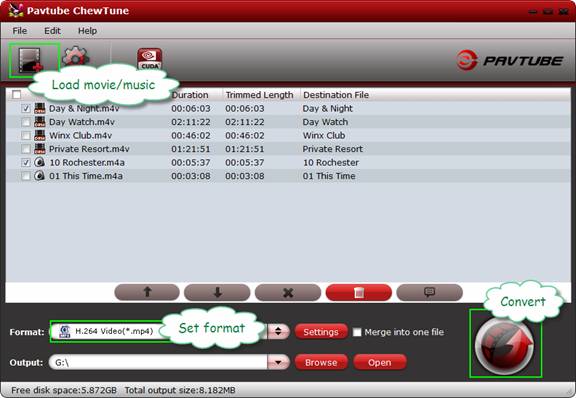
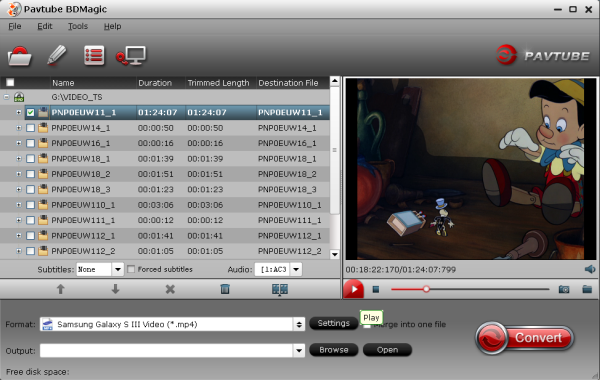
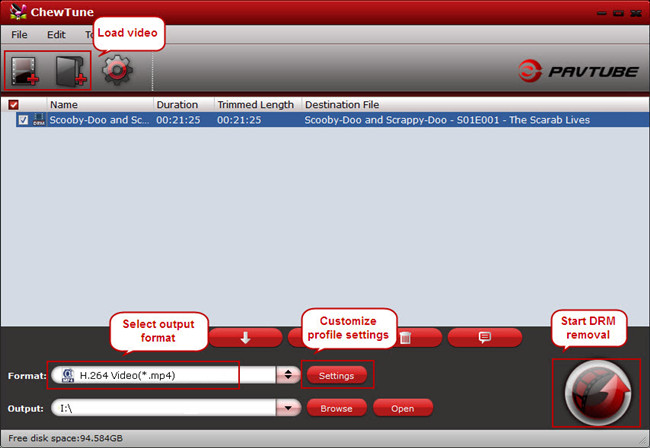
Step 1: Run the best Blu-ray ISO to Xperia Z1 Converter on your PC or Mac, click the “Load IFO/ISO” button to import your Blu-ray ISO file.

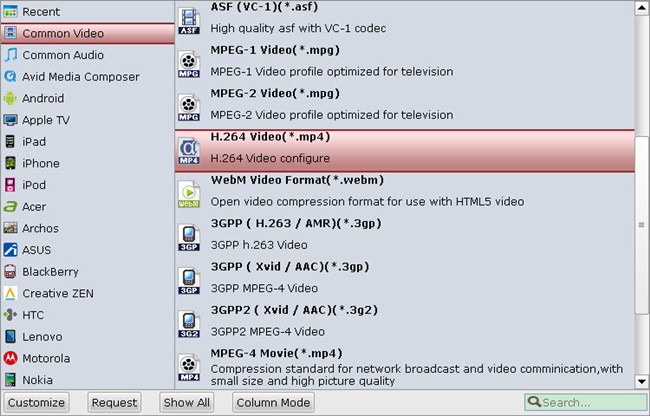
Step 2: Choose one wanted audio track and subtitles for output on program main UI. Then from “Format” drop-down list, choose the suitable profile for Sony Xperia Z1/Xperia Z Ultra playback.


Step 3: In the Top Blu-ray ISO to Sony Xperia ripping tool, you are allowed to customize profile settings to get better video and audio quality. You could adjust profile presets including video codec, bitrate, frame rate, etc for Sony Xperia Z1/Xperia Z Ultra.

video settings for sony xperia z1

Step 4: Double check above steps and hit the “Convert” button to start ripping Blu-ray ISO to Sony Xperia Z1/Xperia Z Ultra MP4 format. After it completes, click the “Open” icon to locate the created MP4 movie, and you are ready to watch Blu-ray ISO file on Sony Xperia Z1/Xperia Z Ultra.

Related Articles:

Thursday, October 10, 2013

Amazon WMV DRM Removal: Play Amazon Instant Video on Nexus 10

If you have problems about playing Amazon Instant Video on your Nexus 10  tablet, you can check out the tutorial to Remove DRM from Amazon WMV and record Amazon Instant Video(.wmv) to your Nexus 10.

Have you purchased lots of WMV videos from Amazon store and want to put these Amazon Instant videos to your Google Nexus 10? As is known to everybody, the WMV videos purchased from Amazon store, including music, videos, movies, and TV show etc. are usually format type unsupported by the Google Nexus 10. The problem is, those WMV videos you downloaded from Amazon are protected (by DRM), and can't be played on any Android/Windows 8 tablet except for the Amazon Kindle Fire (HD). So if you would like to transfer Amazon WMV videos to Nexus 10 for playback, you have to remove DRM from Amazon Instant Video and convert/record it to Nexus 10 compatible formats.

Refer to Google Nexus 10 supported codecs
  • Video codec: H.263, MPEG-4 SP, H.264 AVC
  • Audio codec: AAC LC/LTP, HE-AACv1 (AAC+), HE-AACv2 (enhanced AAC+), AMR-NB, AMR-WB 9, MP3, MIDI SMF, Ogg Vorbis, WAV

To do it, Pavtube ChewTune is a great help. It is an all-in-one DRM Removal Program to help you convert/record Amazon WMV videos effortlessly to Nexus 10 supported MP4 format in high quality. After that, you can play your Amazon Instant Video(WMV) on Nexus 10 very smoothly. Now, let's start to convert and transfer Amazon WMV to Nexus 7. (Note: For the common WMV videos, Pavtube Video Converter is recommended to you).

The screen is undoubtedly one of the standout features of the Nexus 10. As the name suggests, it measures 10 inches on the diagonal but more importantly packs an astounding 2,560x1,600-pixel resolution. We were previously blown away by the pin-sharp display of the new iPad with its 2,048x1,536-pixel resolution. The Nexus 10 casually swans past that, to offer an even more refined viewing experience.

Now you want to put some Amazon Instant videos to the Google Nexus 10? Wait a minute. The Amazon Instant videos, though mainly .wmv format, are not supported by Google Nexus 10. The problem is, those WMV videos you downloaded from Amazon are protected (by DRM), and can't be played on any Android tablet except for the Amazon Kindle Fire. To get the Amazon WMV playable on Nexus 10, you'll have to remove the DRM protection first. 

The tools you need to transfer Amazon WMV movies to Nexus 10: A powerful Amazon WMV video DRM remove tool and a WMV to Nexus 10 converter. Pavtube ChewTune combines these two tools together and makes it possible to watch purchased DRM videos on Nexus 10.

ChewTune for Windows | ChewTune for Mac

Read more: Top 5 Best DRM Removal Programs Review for Android, Windows 8 Tablets/Phones

To convert videos to Google Nexus 10 with best settings, you can download profile patch for the software(Windows only).

Remove DRM protection off Amazon video and convert WMV to the Nexus 10 for playing

Step 1: Load Amazon WMV video files to Pavtube ChewTune.

Install and launch the Pavtube WMV to Nexus 10 Converter, then click the add button to load the WMV video files to the program.


Step 2: Choose H.264 codec format for the Google Nexus 10 playing.

Click "Format" and select an output format for the Google Nexus 10. Here I choose "Android -> Google Nexus 10 H.264 Video (*.mp4)".


Step 3: Optimize the settings for Amazon video to Nexus 10 conversion.

If you find the default settings may not satisfy your need, can click the "Settings" button to change the settings by yourself.

For Mac users, it is necessary to custom profile settings, since there's no profile patch for OS X. Similarly, you can choose Nexus 7 format and custom the profile for Nexus 10 by clicking "Settings" and set the recommended settings as it shows below:


Video
  • Codec: h264
  • Size (pix): 1920*1080 /  1280*720
  • Bitrate (kbps): 2000 ~ 3000
  • Frame Rate (fps): original

Audio
  • Codec: aac
  • Sample Rate (hz): 44100
  • Bitrate (bps): 128000
  • Channels: Stereo

Step 4: Convert Amazon video to Nexus 10 video format.

Having finished the settings? OK, just click the convert button and start to convert Amazon video to Google Nexus 10 format with ease.

When the conversion task is finished, you can click "Open" button to get the final output files for your Google Nexus 10 and transfer the converted videos to Google Nexus 10.

If you have music and videos to watch on the tablet, here's a guide for copying local videos to Google Nexus 10.
1. Use the USB cable that came with your 16 GB or 32 GB Nexus 10 to connect the tablet to your PC, and you'll receive a notification that the USB is connected.

2. Open the Notifications panel and touch USB connected. Then touch Turn on USB storage in the screen that opens to confirm that you want to transfer files. The Nexus 10 tablet is connected as USB storage, and the screen will indicate that USB storage is in use and you receive a notification. The Nexus 10 is mounted as a drive on your computer.

3. You can now copy videos from PC to the Google Nexus 10. During this time, you can't access the SD card from your Nexus 10 or share your tablet's data connection with your computer via USB.

4. When the videos are copied to the 16 GB/32 GB Nexus 10, you can disconnect your Nexus tablet from PC.

Like the Nexus 7, it does not include an SD card slot for additional storage, so you may need a Video Converter to compress very big file to smaller file size. (Learn more on Nexus 7 Column)

Tips: MKV, MOV, TS, MPG, Tivo, FLV, F4V and some AVI videos are not accepted formats and you have to convert HD Videos to Nexus 10 MP4 for playing before downloading them to the device.

Good news! Pavtube is offering Money-saving Tips, Up to 35% Off, Saving Up to $35. such as:

Video Converter Ultimate($65) + Vidpie($29) = Only $74.9, Save $19.1
BDMagic($49) + Vidpie($29) = Only $49.9, Save $28.1
ByteCopy($42) + Vidpie($29) = Only $54.9, Save $16.1
DVDAid($35) + Vidpie($29) = Only $49.9, Save $14.1

Plus, Like Pavtube on Facebook and you would get Free DVD Ripper, DVD Ripper for Mac, Video DVD Converter Ultimate! 

If you have any problem to buy or use Pavtube, pls feel free to contact support@pavtube.com (for windows user), macsupport@pavtube.com (for Mac users).

Wednesday, October 9, 2013

Transfer Blu-ray/DVD ISO Files to Galaxy Note 3 on Mac

Want to enjoy high quality HD Movies on your new Galaxy Note 3 phone? This article shows you how to rip Blu-ray/DVD ISO image files to Galaxy Note 3 playable video format for watching on the go. 

What’s the hottest Android smart phone in 2013? Samsung Galaxy Note 3 should be no doubt to be listed among the Top 5 which carrying a sharp 1080*1920 HD display.

Blu-ray, DVD and kinds of video files boost your multimedia life, if you have a large Blu-ray/DVD ISO files collection, it should be such a cool thing to enjoy them on Galaxy Note 3 anytime and anywhere. But how to make it happen? What should we do to transfer BD/DVD ISO image files to Galaxy Note 3 for playback?

Samsung Galaxy Note 3 supported video format:
  • Codec: MPEG4, H.263, H.264, VC-1, DivX, WMV7, WMV8, WMV9, VP8
  • Format: 3GP(MP4), WMV(ASF), AVI, FLV, MKV, WebM
  • Full HD(1080p) Playback & Recording

Samsung Galaxy Note III supported audio format:
  • Codec: MP3, OGG, WMA, AAC, ACC+, eAAC+, AMR(NB,WB), MIDI, WAV, AC-3, Flac
  • Music Player with SoundAlive
  • 3.5mm Ear Jack
This professional Mac Blu-ray/DVD ISO to Galaxy Note 3 Converter (only $34.3) is just designed to help you convert Blu-ray/DVD ISO image files to Galaxy Note 3 MP4 for playback and you don’t even need to run virtual drive to mount the ISO file, just simply import. With its clean interface, fast converting speed and good video quality, converting BD/DVD ISO to Galaxy Note 3 will be simply finished within a few clicks.

FYI: If you want to keep all the audio tracks (language) and soft subtitles, here’s another choice for you: Blu-ray/DVD ISO Converter Pro.

3 Steps to Rip Blu-ray/DVD ISO image files to Galaxy Note 3 support video format 


Step 1. Run this Top Blu-ray Ripperfor Mac, as the Blu-ray DVD ISO to Galaxy Note 3 Converter.

Click “Load file” to choose Load IFO/ISO file. It will recognize the ISO image file automatically so that you will not have to run virtual drive to mount the ISO any more.


Step 2. Select Samsung Galaxy Note 3 compatible format.

Click the drop-down list and choose “Samsung -> Samsung Galaxy Note(*.mp4)” as the best profile for Galaxy Note 3. 

Tips: Customize video specs. (Optional)

Click “Settings” to free choose output video size, bitrate, frame rate and other specs. Remember the file size and video quality is based more on bitrate than resolution which means bitrate higher results in big file size, and lower visible quality loss. According to my experience, for watching Blu-ray/DVD (ISO/IFO) movies on Galaxy Note 3, 720p with 1500~2500kbps is just all right.

Step 3. Start the BD/DVD ISO conversion.

When everything is OK, just press the "Convert" button to start the Blu-ray/DVD ISO to Galaxy Note 3 MP4 conversion. It will not take much time. Just wait for the conversion process to get done. 

Note: Keep in mind that some of the settings can be tweaked to improve the video quality but it's a balance between quality and size. Using the settings we suggested, a 120-minute Blu-ray encoded to about a 1.3GB MP4 file. 

After the conversion, you can click “Open output folder” to quick locate the converted video.
(PS. For Windows users, refer to the guide: How to transfer media files from PC to Galaxy Note 3?)

Additional Tips: 

If you are looking for a powerful all-in-one ultimate video converter software to convert various 1080p/720p videos, Blu-ray and DVD movies to your tablet or phone for enjoying, simultaneously saving time and effort, the Top Blu-ray Video Converter Ultimate program will be a nice choice for you. If you are running a Mac OS X computer, iMedia Converter Mac is the alternative.

Samsung Devices: Galaxy Note 3, Galaxy Note 2, Galaxy Tab 3 10.1/8.0, Galaxy Tab 2 10.1/7.0, Galaxy S4/S3, etc.

Apple Devices: iPhone 5S, iPhone 5C, iPhone 5, iPhone 4S, iPhone 4, iPad 4, iPad 3, iPad Mini, iPod 5, etc. 

Google Devices: Nexus 7 2nd Gen, Nexus 10, Nexus 7, Nexus 4, Nexus, etc.

Microsoft Devices: Surface 2, Surface Pro 2, Surface RT, Surface Pro

Asus Devices: Fonepad 7, Transformer Book T100, MeMO Pad Smart 10, MeMO Pad HD 7, MeMO Pad ME172V, Transformer Pad Infinity TF700(T), PadFone 2, Transformer Prime, Transformer Pad TF300, etc.

Sony Devices: Xperia Z1, Xperia Z Ultra, Xperia Tablet Z, Xperia ZR, Xperia S, Xperia SP, Tablet S, etc.

Amazon Devices: Kindle Fire HD 7.0, Kindle Fire HD 8.9, Kindle Fire

Acer Devices: Iconia A3, Iconia W3, Iconia Tab A1, Iconia Tab B1, Iconia W700, Iconia W510, Iconia Tab A700, Iconia Tab A210, Iconia Tab A200, etc.

Motorola Devices: Droid Mini, Moto X, Droid Ultra, Droid MAXX, DROID RAZR MAXX, Xoom 2, Xoom, etc.

And BlackBerry, HTC, LG, Toshiba, Lenovo, HP, Nokia, Vizio, Archos, Coby, Nabi, Nook, Kobo, etc.

You may also want to read our tablet/phone columns to get more solutions:

Tuesday, October 8, 2013

VLC won't play my Blu-ray Movies? Rip Blu-ray to VLC support formats on Windows 8

Question: Can VLC play Blu-ray films?

"I just tried to play a Blu-ray disc and VLC says Your input can't be opened: VLC is unable to open the MRL 'dvd://E:\'. Check the log for details.

I have a disc in the drive!
  • Will it not play because my monitor is in 4:3 view or something?
  • What can can I use to play it?
  • Any simple programs?
  • Any quality software I can use now? Or is everything paidware?
I have an LG drive on an HP computer using Windows 7."

Some users want to play Blu-ray movies via VLC media player, but, the experience isn't smooth. Wonder how to get your VLC  to play encrypted blu-ray discs? Read the following article carefully, you will find the answer.

Required Software:
How to compress Blu-ray movies to VLC playable video?

Step 1. Import Blu-ray movies.

Insert the Blu-ray disc to external Blu-ray drive and click the "Load Disc" button to add the Blu-ray movies you want to play on your VLC. Select subtitles you want keep with the output video from the option.


Step 2. Choose output profile.

Choose output format via clicking the Format bar. Here you can select MPEG-4, MPEG-2, MKV from the Common Video profile list as the target format.

Tip: You can also check the "Settings" box , and set video codec, video size, Bitrate, frame rate to get a decent video you want on your VLC player.

Step 3. Start converting Blu-ray for VLC.

Finally, hit the "Convert" button to start to rip 1080p Blu-ray movies to VLC readable videos.

After conversion, you can click the "Open" button to find the converted Blu-ray files. Mow you can add and play the BD contents with VLC player at ease.

If you want to rip Blu-ray for VLC player with multiple audio tracks and subtitles, Bytecopy will help you with special multiple track profiles. (Refer to the Blu-ray to VLC with Multi-track Guide)


Read More:

Sunday, October 6, 2013

Top DRM Video Recorder Review + Guide: Record purchased and rental DRM-protected M4V/WMV video

This article is a Review of the Top DRM Video Recorder, we will cover its conversion theory, main features, compatible OS, supported input and output formats, pros and cons, etc. with the intent to help you find the best DRM Video Recorder Guide to get all your iTunes/Digital Copy/Amazon/BBC iPlayer etc. videos DRM free.

What is DRM?

Digital rights management (DRM) is a class of controversial technologies that are used by hardware manufacturers, publishers, copyright holders, and individuals with the intent to control the use of digital content and devices after sale. And basically there are two kinds of DRM files: iTunes M4V and Digital Copy. 

Apple uses M4V encode video files, such as TV episodes, movies, and music videos, in its iTunes Store to protect its copyright. To play a protected M4V file, the computer needs to be authorized (using iTunes) with the account that was used to purchase the video.

As Digital Copy, it is an extra copy of the movie you bought on Blu-ray/DVD disc that enables you to download or stream your movie to a computer, mobile device, or Internet-connected TV, Blu-ray player or set top box. If your Blu-ray Disc or DVD has the "Digital Copy" logo on the back it will have either a Digital Copy disc inside of the box or a link to a Digital Copy web site. Follow the instructions on the insert inside of your box to redeem your Digital Copy using the disc or the web site.

Why need strip off DRM protection?

It’s probably that you have downloaded a few purchases from iTunes, Windows Media Center, Zune Marketplace, BBC iPlayer, Amazon Video on Demand, CinemaNow, Blockbuster, Napster, Pandora, Spiralfrog, Bearshare, iMesh, iMeeM, etc, or get some free digital copies of movies with the Blu-rays that you purchased so that you could watch them freely on your smartphone, tablet or computer that is not authorized. But the problem is neither iTunes M4V videos nor Digital Copy movies can be watched on portable devices or other unauthorized computer. You need a Top DRM Removal Tool to free your iTunes M4V videos and Digital Copy movies from DRM protection and you can freely play them anywhere you like.
Why choose Pavtube DRM Video Recorder – ChewTune?

Pavtube ChewTune is an easy-to-use DRM removal tool that can legally produce DRM-free videos from M4V/WMV. Besides bypassing DRM protection, this DRM Media Converter tool is also good at recording your authorized videos or movies downloaded from a Digital Copy, iTunes, Amazon Instant Video, WB Digital Copy, BBC iPlayer, etc. to many other commonly used audio and video formats, so that you can use the DRM-free copies on practically any compatible electronic device, such as Samsung Galaxy Note 3, Galaxy Tab 3 10.1/8.0, Apple iPhone 5S/5C, Sony Xperia Z1, Xperia Z Ultra, LG G-Pad, Motorola DROID Mini, Moto X, Droid MAXX, Asus MeMO Pad HD 7, Fonepad 7, MeMO Pad Smart 10, Acer Liquid S2, and more.


Pros:
  1. Instead of transcode/encode/decrypt DRM files, Pavtube ChewTune records your source DRM files to any video and audio format you like for multiple portable devices.
  2. Latest ChewTune abandons the old way to encode DRM videos; instead, it is a DRM Removal Recorder now.
  3. Since ChewTune records DRM videos to strip off DRM protection, it performs in a much stable way so that each recorded iTunes video or Digital Copy movie is available and valid for your computer hard drive and portable device.
  4. The recorded movies using ChewTune are included with better video quality than any other DRM Converter since it legally frees DRM files with 1:1 video and audio quality of the originals.
Cons:
  1. A given audio driver has to be installed to enable ChewTune remove DRM protection, which may sound a little complicated and troublesome.
  2. A complete DRM free file will not be created unless you do not abort during ChewTune whole DRM recording process, otherwise no file will be generated.
  3. When DRM removal process starts, a window will pop up and play the source DRM file. This window would be persistently exist and show at the left right corner of your computer desktop the whole recording time, which cannot be minimized or closed; meanwhile, your computer would be muted till ChewTune finishes the work.
  4. When converting iTunes DRM files, you can minimize the iTunes window, but cannot move or close it.
How to free from DRM protection with Pavtube ChewTune?

Step 1: Authorize your computer

Authorize computer for iTunes M4V files:

1. Open iTunes on your computer, click the Store menu, and then select Authorize This Computer.

2. A window will pop up and prompt you for your Apple ID and password. Fill in the appropriate information, and then click Authorize.
  
3. After your submission, the whole authorization process completes and now your computer will be authorized for playback. If you have reached your 5 computers limits, you can deauthorize another machine.

Authorize and transfer Blu-ray Digital Copy to computer hard drive 

1. Insert the Digital Copy disc into your computer’s DVD drive.
2. Wait for the DVD icon to appear on your computer. Do double-click and it will take you to the digital copy interface.
3. Decide whether to transfer Digital Copy to iTunes or Windows Media Player. Note that it requires iTunes 9 or Windows Media Player 11 and later version to download digital copy movies to PC. Here I choose Windows Media Player.
4. Put in the unique Digital Copy redemption/registration code, which you will find on an insert inside of your Blu-ray/DVD packaging. The computer must be connected to the Internet in order for the Digital Copy code to be verified.
5. Choose source movie and target folder to transfer Digital Copy to. Then start syncing movies from Digital Copy to computer.
It usually takes less than 5 minutes to download a Digital Copy movie to hard drive.
After Digital Copy transfer completed, the movie can be played instantly with Windows Media Player.

Step 2: Load the DRM video

Run Pavtube DRM Video Recorder, drag and drop the source DRM video from local computer to ChewTune. Or hit the “Add Video” button to import your iTunes, Amazon, or Digital Copy, etc.


Step 3: Select output format

Pavtube ChewTune includes various profiles under “Format” list and you could always find the optimized one for your need.


Meanwhile, you can enter “Settings” option to adjust profile parameters, such as video codec, bitrate, frame rate, size, etc to get better video and audio quality.

Step 4: Start DRM-free recording process

Click the “Convert” button on software main UI to start recording DRM video. When it completes, click the “Open” icon to locate the DRM-free movie, and transfer it from PC to anywhere you like for playback.
  
Tips:

1. To ensure the stability of Pavtube ChewTune trial version, make sure you have turned off iTunes before running this app.

2. Because of 1:1 video recording, it takes as long as the source movie length to finish the whole ChewTune DRM-free process, it’s better to select a small sample video for testing.

3. Since Pavtube ChewTune supports batch processing facility, you could import more than one DRM videos and run overnight, and you would get all videos recorded the next morning. Don’t forget to set up Windows power options to never turn off monitor or never let the computer system standby.

Related Articles: