MP4 is a digital multimedia format that is most commonly used to store videos, audio tracks, as well as still photography images. Many movie editing software programs, like iMovie use the Mp4 format as the go to compression for making movies. If you are interested in making Mp4’s on iMovie check out Udemy’s Tutor for iMovie course. It will introduce you to the basic principles of the software so you can get started making great movies. Want to export videos in iMovie to save in .mp4, a widely used video formats? For this purpose, this article offer two best options to convert iMovie to MP4 on OS X, including iMovie 10.0, iMovie '11, iMovie '09, iMovie '08, and even iMovie HD.
Hot Search: iMovie Tips | Share iMovie Videos | Get iMovie for free | iMovie VS FCP | iMovie Alternatives | Exporting iMovie projects
Method 1.Convert iMovie to MP4 for Mac OS X QuickTime
Firstly, we are going to teach you how to transfer iMovie videos to MP4 via using the features of iMovie itself---QuickTime item. Follow the steps to learn the instructions on converting iMovie to MP4 nicely on Mac OS X.

Launch the iMovie and get into the main interface. Click "Share > Export using QuickTime" at the top menu bar.
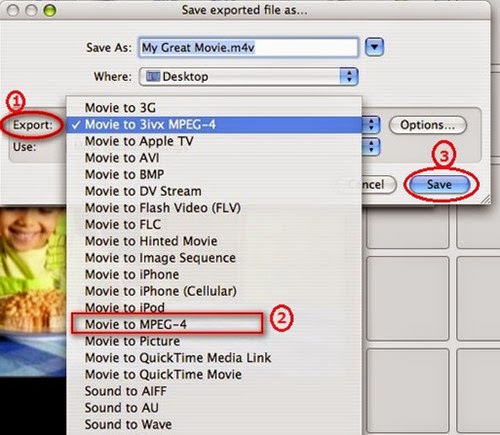
Then a window named "Save exported file as…" pops up. Click "Export" option and find "Movie to MPEG-4" in the drop-down menu. If you need to make some settings to the file video format, you can click Settings button; if not, directly hit on "Save" button to export a mp4 file from iMovie.
Method 2. Pavtube Video Converter for Mac---Easily convert iMovie to MP4 for Mac OS X El Capitan
If you have used iMovie to export iMovie video to MP4 and the converted iMovies files still can't be recognized by your device or are rejected by the video sharing websites, you can use third-party iMovie converter software to help you.
In this way, if the exported files still cannot recognized by your devices or are rejected by the video sharing websites, we here highly suggest you to use this professional iMovie to MP4 Converter on Mac. It can convert iMovie to MP4 in HD, as well as AVI, WMV, etc. so that you can watch them on Windows computer, android devices, and more. What’s more, this program can also works well with different videos from other NLEs like FCP, Premiere Pro, etc. Let’s together see how to convert iMovie to MP4 for Mac OS X.
Steps Guide on Converting iMovie videos to MP4 on Mac OS X:
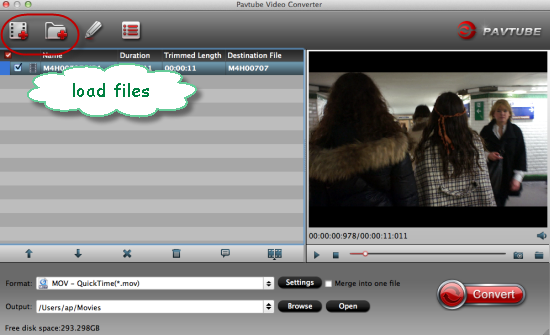
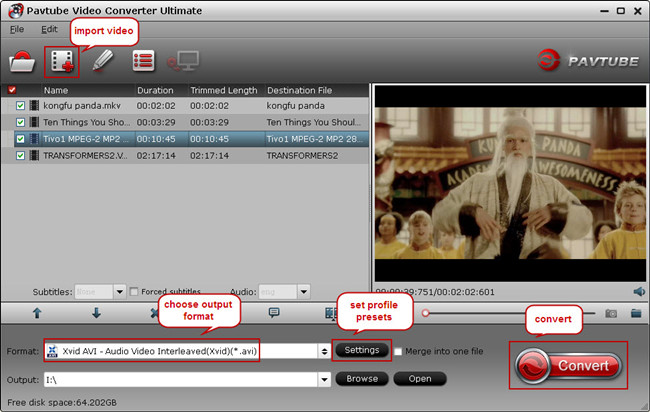
Step 1.Click on Add button and go to the folder to find the videos that you want to convert to MP4 as soon as you open the main interface. Here you can import multiple videos.
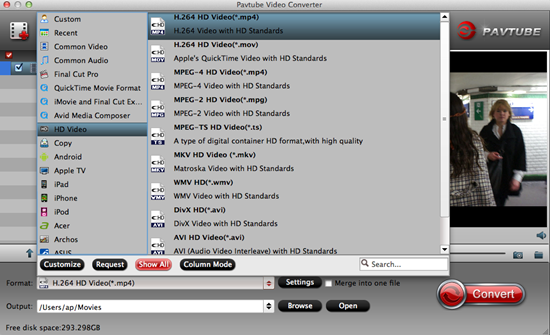
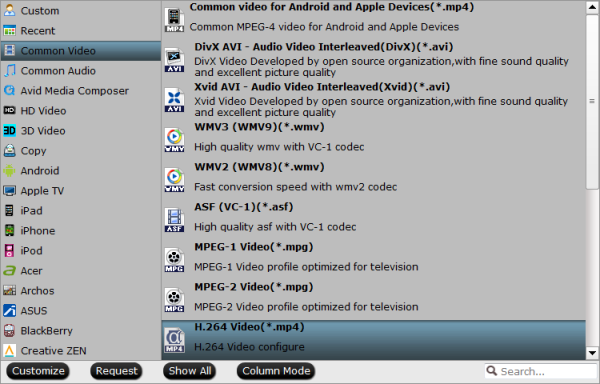
Step 2. When you come to the output list, just drop down the list and select the ‘HD Video’>>’H.264 HD Video (*.mp4)’ as the best output one with the high quality preserved. Or in the common column, you can also find the similar one.
Tips - Adjust audio and video settings
The Mac Converter enables users to adjust audio and video settings before transcoding iMovie files to MP4. Click "Settings" button, then you will enter the following interface, on which you are allowed to customize size, bit rate, frame rate, sample rate, and audio channel to your required ones.
Step 3. Start the conversion process. When specifying the output format, click the big "Convert" button at the bottom right corner of the primary window to start converting iMovie export video to MP4.
Conclusion: Above are two best solutions to how to save and convert iMovie to MP4 file, so that you can play on iPad/iPhone/iPod, HDTV or other portable devices more conveninetly and freely. In general, you can use the first way to achieve it. But if the first way can't meet your need, the software introduced in the 2nd part can help you as well. Let’s just have a try!
Read More:
Summary: What's the available workflow for getting Sony Vegas and AVI files to play nicely? If you're confusing about this, you've come to the right place. The article tells you an easy way to fix the issue.
Most guys have a painful experience while they are trying to import and edit some avi files (divx/xvid codec, h.264 codec etc.,) in Sony Vegas Pro 10/11/12/13. Thus you may come across lots of problems, such as nothing shows up on the screen, or there is only image or you only get sound in Sony Vegas Pro. Here shows you two solution for "Sony Vegas Can't Import AVI" error on your computer screen".
Why We can't import some AVI file to Sony Vegas?
AVI is a multimedia container format which may carry audio/visual data inside in virtually any compression scheme, including Full Frame (Uncompressed), Intel Real Time (Indeo), Cinepak, Motion JPEG, Editable MPEG, VDOWave, ClearVideo / RealVideo, QPEG, and MPEG-4 Video. From Sony Vegas official website, we clearly know that AVI is one of the supported formats of Sony Vegas. What are the causes of the above-mentioned problems? As we all know, AVI is a multimedia container format that means this format includes a variety of video codecs and audio codecs. When the imported AVI file contains video or audio codec that Sony Vegas unrecognized, the issue arises.
Solution One: Solve Sony Vegas Won't Import AVI files with a Professional Tool:
To get the work done, you simply need an AVI video converter to convert AVI to Sony Vegas-friendly format. Here is a step-by-step guide to covnert and import AVI videos to Vegas Pro by using the Top AVI to Sony Vegas Converter. The Mac
Make Preparation: The top AVI to Sony Vegas Converter:
In order to save you time, we here directly shows you Pavtube Video Converter (Windows 10 supported) to solve your problem as quickly and easily as possible. The program is very easy to use and has all the important features that you may need. It can help in customizing the videos through using the basic tools for editing available while its speeds are very high with no quality loss at all. With it, you can easily convert AVI to Sony Vegas editable formats with super fast speed. What’s more, it also can convert other videos like SD/HD/4K (GoPro Hero 4K), H.265, AVI, MOV, MP4, MKV, MXF, MTS/M2TSetc to Sony Vegas friendly formats and other popular NLEs friendly formats. (read review).
Besides Sony Vegas, this software can also export DNxHD for Avid, MPEG-2 for Adobe Premiere Pro/Premiere Element, AVI for Pinnacle Studio, WMV for Windows Movie Maker and more NLE systems for native editing.
Free download the best AVI to Sony Vegas converter:


Other Download:
- Pavtube old official address: http://www.pavtube.com/video_converter/
- Amazon Download: http://download.cnet.com/Pavtube-Video-Converter/3000-2194_4-75734821.html
- Cnet Download: http://download.cnet.com/Pavtube-Video-Converter/3000-2194_4-75734821.html
How to Convert AVI to WMV/MPEG-2 for Sony Vegas 13/12/11/10
Step 1. Import AVI files
Click File > Add Video Files to add the AVI movies you want to convert for Sony Vegas Pro. Or simply drag your videos to the left item bar for converting. Batch conversion is supported so you can add many files at a time to save the conversion time. And as you see, added files can be previewed in the right Preview window and you can take snapshots of your favorite video scenes.

Step 2. Set Sony Vegas supported format
Click "Format" bar to determine output format. Follow "Adobe Premiere/Sony Vegas" and select "MPEG-2(*.mpg)" as the output format. Besides, you can also choose WMV (VC-1) (*.wmv) if you want to get a relatively smaller output file.

Step 3. Video/Audio quality settings
Adjust video and audio parameters, including the Bitrate of Video and Audio, the Codec of Video and Audio, Video Size, Sample Rate, Frame Rate, Audio Channels, etc., in the Profile Settings.
Step 4. Convert AVI to Sony Vegas Pro format
Click "Convert" button to finish the AVI to MPG for Vegas format conversion.
Once the conversion completes, you can click "Open" button to get the output files effortlessly. Now you have got it right, just to import and edit kinds of AVI files within Sony Vegas Pro 13/12/11/10 at ease.
Solution Two:Solve Sony Vegas Won't Import AVI files:
------ Download and install the missing codecs on your computer
With the right codec, Sony Vegas 13/12/11 will not have any problems functioning with AVI file as you may wish. There are very many online sites from where you can download the codec. Here AVI Codec Pack Pro is suggested.
Download and install it, then open Sony Vegas to import AVI files. Make sure you close and reopen Sony Vegas if it already opens when you installing the codecs.
If installing AVI Codec Pack Pro can't solve your problem, you will need to download DivX H.264 Decoder and FFDShow MPEG-4 Video Decoder.
Note: You can also use Pavtube Video Converter Ultimate / Pavtube iMedia Converter for Mac for adding AVI files to Sony Vegas Pro. Much wonderful software bundled with Video Converter Ultimate will provide you more amazing experience in converting videos. Go to Money Saving Software Bundles to get special offer for more software, such as ByteCopy + Video Converter Ultimate = Only $79.9, Save $27.1, Video Converter Ultimate($65) + ChewTune($29) = Only $74.9, Save $19.1 and so on.
Read More:
SUMMARY:You must have probably had the worst experience when using Windows Movie Maker because one of the notable errors is "Windows Movie Maker Codec Issue". This guide will help you out! Do you have any problems about "Windows Movie Maker Codec Issue"? If you have been through that, don’t get concerned since you are not alone. Many people have gone through the same problem as below, but it’s time to understand the problem and possible solutions. “Alright, so i have been working with WMM for a couple of months and one day my computer didnt have the right codec to import my videos of my video camera. I found the codec before when i had this problem but i cannot find it! This is what the program says when i try to import a file. The file C:\Documents and Settings\Pat\My Documents\My Videos\HP You on You.mpg cannot be imported because the codec required to play the file is not installed on your computer. If you have already tried to download and install the codec, close and restart Windows Movie Maker, and then try to import the file again. Same thing with me. Except it’s mp4. Now, help me with this. WITHOUT THE STUPID VIRUSES! I’M USING WINDOWS 8.1!!!! “ Part I. Solutions for Windows Movie Maker Codecs Errors We can take the MP4 files as the example: Well, this is a common problem encountered by many Windows Movie Maker users. This problem occurs because MP4 is incompatible with Windows Movie Maker. WMM supports .WMV, .asf, .AVI, .mpe, .mpeg, .mpg, .m1v, .mp2, .mp2v, .mpv2, and .wm codecs and you can find that MP4 is not in the list. Fortunately, there is an easy way to fix the issue. The easy workaround is to change MP4 to Windows Movie Maker acceptable file format like WMV before importing. Actually, it’s not as difficult as you imagine. What you need is a just a common video converter like Pavtube Video Converter Ultimate. It supports creating high quality WMV video for your Windows Movie Maker, no matter what’s the format of your source video files. It can convert almost any video to WMV so you can import your video to Windows Movie Maker for editing. Plus, it comes with all regular video editing tools like Trim, Crop, Effect, Subtitle, Watermark. For basic video editing tasks, you can even replace your Windows Movie Maker with it. Here is review. Free Download and trail: 
 Other Download: - Pavtube old official address: http://www.pavtube.cn/blu-ray-video-converter-ultimate/ - Cnet Download: http://download.cnet.com/Pavtube-Video-Converter-Ultimate/3000-2194_4-75938564.html Hot Search: Get Windows Movie Maker to import .mov | Editing Open Broadcaster Software(OBS) Files in Avid, Sony Vegas Pro, Windows Movie Maker Part II. Common Codec Errors When Using Windows Movie Maker In the process of using Windows Movie Maker, these are the common codec issues that you will encounter to hamper your experience: 1. No Auto-recovery/Auto-save. You will be unable to save your editing as you progress with Windows Movie Maker once you encounter such a problem. All changes made will be lost once something happens and the computer goes off. You will have to begin afresh. 2. No Video Clip Export. With Windows Movie Maker, it will be difficult highlighting a video or audio file to export. That is a basic function for video editing that you cannot afford to miss out on but this problem will deny you. 3. In-built DVD Burning Lacks. If you are looking for a program to help you export video to DVD, it cannot be Windows Movie Maker. It lacks that ability and will only frustrate you. Unless you come up with your own software, Windows Movie Maker will not allow you to burn files to DVD. 4. Dysfunctional Audio Anchors. You will be looking for a program with functioning audio anchors but those in Windows Movie Maker don’t function well. The only option will be making slight adjustments but everything else you have on the storyboard will be a in complete mess. 5.Storyboard View Missing. The storyboard in Windows Movie Maker has a lot of limitations thus regulating you on what you can view. It will bring you frustration if you have enjoyed previous versions that allow for storyboard viewing. Much wonderful software bundled with Video Converter Ultimate will provide you more amazing experience in converting videos. Go to Money Saving Software Bundles to get special offer for more software, such as ByteCopy + Video Converter Ultimate = Only $79.9, Save $27.1, Video Converter Ultimate($65) + ChewTune($29) = Only $74.9, Save $19.1 and so on. Read More:
SUMMARY: Here, we offers you two parts about how to convert videos to iMovie supported format on Mac OS X and how to Edit Video by using iMovie on Mac, enjoy!
Why Do I Failed to Edit Videos with iMovie on Mac OS X El Capitan? Without doubt, you may have come across the same puzzle as above. The problem is that the OS is currently in beta, so Apple is still working on fixing the bugs. Until the final version is released later this year, you don’t have a choice but to either wait it out, or find an alternative to iMovie. If waiting isn’t an option, luckily for you, there’s a pretty decent substitute that you could use.
Whether the problem is that your audio isn’t in sync with the video, you have trouble converting videos to another format, can’t add background music or you have a different issue, a lot could go wrong with using iMovie in El Capitan. Just sustain your attention on the following.
Hot Search: VOB to iMovie | DVD to iMovie | Blu-ray to iMovie |
According to Apple, iMovie supports these video formats: MPEG-4, QuickTime MOV, MPEG-2, AVCHD, DV (both standard and high-definition videos). And iMovie supports most of the commonly-used video codecs, including H.264, MPEG-2, MPEG-4, DV, and AIC. If your videos are in the above mentioned formats and the right video codec, it could be very easy to import these videos into iMovie. See the steps from Part II for how to import video to iMovie.
Part I: Convert Videos to iMovie Supported Format on Mac OS X with Pavtube
However, when videos recorded by your camcorders or the movies you've downloaded online are not just in the iMovie-friendly formats. you need the right video format for iMovie. If you are not lucky enough, there is a way to fix it. You can convert the videos to iMovie compatible formats by using the professional app, iMedia Converter for Mac(Snow Leopard, Lion, Mountain Lion, Mavericks, Yosemite and El Capitan included). It is your best bet to do video conversion.
Step 1. Add Video files to the program
Launch this Video to iMovie converter and import any format videos. For saving your time, you can drag your video files to the program in a batch.
 Step 2: Choose iMovie supported video format
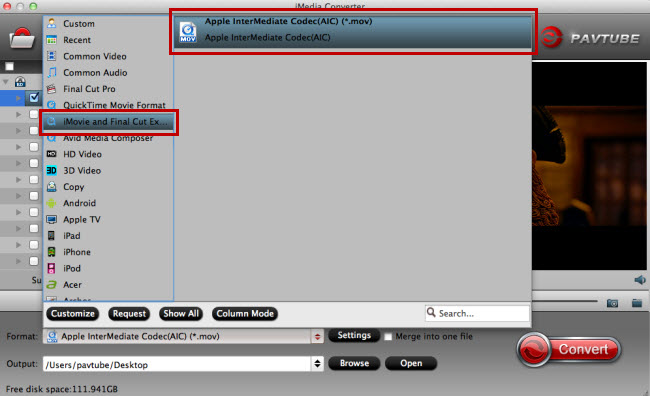
Apple Intermediate Codec (AIC) is a high-quality 4:2:0 video codec which is well supported by iMovie. So click the format bar, follow "iMovie and Final Cut Pro..." to choose "Apple InterMediate Codec (AIC) (*.mov)". Learn>>Best File Formats for iMovie.
Step 2: Choose iMovie supported video format
Apple Intermediate Codec (AIC) is a high-quality 4:2:0 video codec which is well supported by iMovie. So click the format bar, follow "iMovie and Final Cut Pro..." to choose "Apple InterMediate Codec (AIC) (*.mov)". Learn>>Best File Formats for iMovie.
 Step 3. Edit MKV files with the built-in video editor (Optional)
You can use the video editor to do some pre-editing work like adding watermarks for Copyright. Just click the watermark button to do what you want.
Step 3. Edit MKV files with the built-in video editor (Optional)
You can use the video editor to do some pre-editing work like adding watermarks for Copyright. Just click the watermark button to do what you want.
 Step 4. Start converting MKV files.
Click the big red "Convert" button in the main UI. This program will start converting your mkv video to iMovie perfectly. To find your videos, just click "Open" button.
Part II: How to Edit Video by using iMovie on Mac
iMovie comes with a built-in library, which can organize your videos automatically. Thus, all the movies you have created and all the video clips you have captured will be displayed in sequence. With its creative interface, iMovie enables you to create new project and view your library easily and quickly. iMovie provides a platform for sharing videos. With few clicks, you can upload movies to websites, like YouTube and make versions for iPhone, iPod, Apple TV, etc. In a word, editing movies on iMovie is a nice and ideal choice. Here is the basic information for how to edit videos on iMovie.
Step-by-step guide on how to edit video using iMovie for Mac OS X (Lion, Mountain Lion, Mavericks, Yosemite)
Step 1: Create a New iMovie Project
After running iMovie, go to File> New Project, and give a name to the project. Then click Create to start a new project..
Step 2: Connect Your DV Camera to Mac
Connect your DV camera with Mac using a USB cable. Turn on your camera and set it to PC connect mode..
Step 3: Import Video to the Project
After getting the "Camera Connected" notice, click "Import" button. Then iMovie will import your videos and play the videos. If you want to stop adding videos, just click "Import" button again. To delete video clips, just drag and drop your added video clip(s) from the clips pane to the editable timeline along the bottom of the iMovie main interface. The difference between iMovie and other applications is that once you have deleted a clip from iMovie, you will not be able to get the clip back.
iMovie allows you to add videos in formats like: MOV, MPG, AVI, MP4, DAT, 3GP
If you have got videos in FLV, MP4, VOB, MTS, MXF and AVI format, which are not supported by iMovie, you can adopt iMedia Converter for Mac, a useful conversion tool, to convert these videos to iMovie compatible format first.
Step 4: Edit Video on iMovie
-To Split a Clip: Put the cursor under the viewing window where you would like to split the clip into two. Move to "Edit" menu, then click on the "Split Video Clip at Playhead" option.
-To Crop a Clip: Click "Crop" and drag the small triangles to the timeline to select the wanted portions.
-To Add Effects: Choose "Effects" tab in the menu at the bottom of the clips pane. In the editing area, choose a clip that you want to add effect. Select an wanted effect. It allows you to adjust the effect under the preview window. You can preview the result in the preview window. iMovie supports to change the parameters of the effect. When done, click the "Preview" button again so that to load the new settings for the effect. Then click "Apply," button and wait until it finishes effect rendering. After the effect is being added to the editing region, you can view the effect rendering process by the red progress bar that appears in the clip. After that, save your edit.
Step 5: Save the Project
In the main interface, click the "File" and then select the "Save Project" option.
That's all. Hope the article editing video on Mac using iMovie can do some favor for you.
Much wonderful software bundled with Video Converter Ultimate will provide you more amazing experience in converting videos. Go to Money Saving Software Bundles to get special offer for more software, such as ByteCopy + Video Converter Ultimate = Only $79.9, Save $27.1, Video Converter Ultimate($65) + ChewTune($29) = Only $74.9, Save $19.1 and so on.
Read More:
Step 4. Start converting MKV files.
Click the big red "Convert" button in the main UI. This program will start converting your mkv video to iMovie perfectly. To find your videos, just click "Open" button.
Part II: How to Edit Video by using iMovie on Mac
iMovie comes with a built-in library, which can organize your videos automatically. Thus, all the movies you have created and all the video clips you have captured will be displayed in sequence. With its creative interface, iMovie enables you to create new project and view your library easily and quickly. iMovie provides a platform for sharing videos. With few clicks, you can upload movies to websites, like YouTube and make versions for iPhone, iPod, Apple TV, etc. In a word, editing movies on iMovie is a nice and ideal choice. Here is the basic information for how to edit videos on iMovie.
Step-by-step guide on how to edit video using iMovie for Mac OS X (Lion, Mountain Lion, Mavericks, Yosemite)
Step 1: Create a New iMovie Project
After running iMovie, go to File> New Project, and give a name to the project. Then click Create to start a new project..
Step 2: Connect Your DV Camera to Mac
Connect your DV camera with Mac using a USB cable. Turn on your camera and set it to PC connect mode..
Step 3: Import Video to the Project
After getting the "Camera Connected" notice, click "Import" button. Then iMovie will import your videos and play the videos. If you want to stop adding videos, just click "Import" button again. To delete video clips, just drag and drop your added video clip(s) from the clips pane to the editable timeline along the bottom of the iMovie main interface. The difference between iMovie and other applications is that once you have deleted a clip from iMovie, you will not be able to get the clip back.
iMovie allows you to add videos in formats like: MOV, MPG, AVI, MP4, DAT, 3GP
If you have got videos in FLV, MP4, VOB, MTS, MXF and AVI format, which are not supported by iMovie, you can adopt iMedia Converter for Mac, a useful conversion tool, to convert these videos to iMovie compatible format first.
Step 4: Edit Video on iMovie
-To Split a Clip: Put the cursor under the viewing window where you would like to split the clip into two. Move to "Edit" menu, then click on the "Split Video Clip at Playhead" option.
-To Crop a Clip: Click "Crop" and drag the small triangles to the timeline to select the wanted portions.
-To Add Effects: Choose "Effects" tab in the menu at the bottom of the clips pane. In the editing area, choose a clip that you want to add effect. Select an wanted effect. It allows you to adjust the effect under the preview window. You can preview the result in the preview window. iMovie supports to change the parameters of the effect. When done, click the "Preview" button again so that to load the new settings for the effect. Then click "Apply," button and wait until it finishes effect rendering. After the effect is being added to the editing region, you can view the effect rendering process by the red progress bar that appears in the clip. After that, save your edit.
Step 5: Save the Project
In the main interface, click the "File" and then select the "Save Project" option.
That's all. Hope the article editing video on Mac using iMovie can do some favor for you.
Much wonderful software bundled with Video Converter Ultimate will provide you more amazing experience in converting videos. Go to Money Saving Software Bundles to get special offer for more software, such as ByteCopy + Video Converter Ultimate = Only $79.9, Save $27.1, Video Converter Ultimate($65) + ChewTune($29) = Only $74.9, Save $19.1 and so on.
Read More:
Summary: Wondering a MP4 Merger that can join MP4 files and audio clips without re-encoding? If you want to do a further step to split video in MP4 format, guide is also shared here.
Do you have the same or similar requirement to need of the best video splitter for MP4 file format? Tying to merge a few MP4 files into one but only to find that there are countless MP4 Joiners on the market so that you have no clue which one suit you best? Or combine MP4 files as well as convert the merged MP4 files to other video formats?Yes, you will always enjoy a free option for editing MP4 video as far as merging is concerned.
Over the internet, several websites offer free downloads for popular software programs that you can use to merge your videos. With a good market consideration, you will stand a good chance of securing free software to merge MP4 video in a stress-free way.
Hot Search: Blu-ray to MP4 | MP4 Movies on Kodi | MP4 to Xbox | MP4 to DVD Player |
To do that you should do is to find an easy-to-use split and join software. In fact, there are some choices of video splitters/merge MP4 files software:
Free Video Joiner: easily joins various video files and outputs to: avi, wmv, mov, mp4 and other file formats based on your selected multimedia device. Re-encoding is needed with frame size following the first video file you add, and the quality loss can't be avoided.
Format Factory: software for converting multimedia MP4 files from one format to another. It has options for cutting or joining videos but the process is slow as a result of its slow re-encoding.
Well, if you want an all-in-one solution for splitting and joining MP4 video files losslessly and very fast, Pavtube Video Converter Ultimate will be the best choice.
# No One: Best MP4 Splitter for PC/Mac - Basic Features:
1. Split all kinds of video formats, such as split MP4, MKV, AVI, MOV, WMV, VOB, FLV, 3GP, MTS, etc.
2. Clip audio files, like split MP3, WMV, AAC, AC3, FLAC, WAV, and so forth.
3. Split large-sized MP4 files in segments and compress MP4 to small-sized WMV, FLV or other formats.
4. Split unlimited MP4 files and join several MP4 files into one.
5. Cut off unwanted parts of MP4 video file and only keep the desired ones.
6. 6X faster to convert the split MP4 segments in batch.
7.Preview the split MP4 segments.
Free Download and trail:
Other Download:
- Pavtube old official address: http://www.pavtube.cn/blu-ray-video-converter-ultimate/
- Cnet Download: http://download.cnet.com/Pavtube-Video-Converter-Ultimate/3000-2194_4-75938564.html
How to Split MP4 Video File on PC or Mac with Top MP4 Splitter
Part 1: How to join multiple MP4 videos
1. Drag & drop video files MP4 or MOV, AVI, DivX, MPEG... to the program. Or click the Add video button to locate the files you want to add.
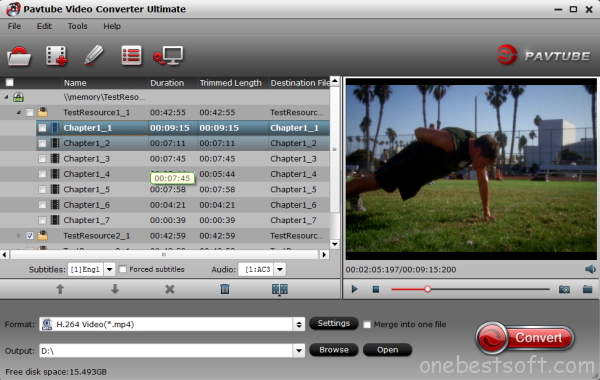 2. Select the output file location, format and set the necessary parameters (frame rate, codec, video size, etc).
3. Check "Merge into one file" at the bottom under the preview window and then click the "Convert" button. You'll get a continuous movie.
Part 2: How to split a large MP4 video
1. Import the video files you want to cut into the video split tool.
2. Tap the Video Split button and enable the Video Split function. Now choose the way you want to split- Split file count; split time length; split file size.
3. Select the output file location, format and set the necessary parameters (frame rate, codec, video size, etc).
4. Click the "Convert" button to start splitting video files. After the process, it's easy to locate the split files in one video folder.
Conclusion
With Pavtube MP4 Joiner, what you can do is not just joining MP4 and other video files, but also converting and playing video and audio files and downloading movie and music online. It can make a difference in your digital life. Don't hesitate to give it a shot now.
Read More:
2. Select the output file location, format and set the necessary parameters (frame rate, codec, video size, etc).
3. Check "Merge into one file" at the bottom under the preview window and then click the "Convert" button. You'll get a continuous movie.
Part 2: How to split a large MP4 video
1. Import the video files you want to cut into the video split tool.
2. Tap the Video Split button and enable the Video Split function. Now choose the way you want to split- Split file count; split time length; split file size.
3. Select the output file location, format and set the necessary parameters (frame rate, codec, video size, etc).
4. Click the "Convert" button to start splitting video files. After the process, it's easy to locate the split files in one video folder.
Conclusion
With Pavtube MP4 Joiner, what you can do is not just joining MP4 and other video files, but also converting and playing video and audio files and downloading movie and music online. It can make a difference in your digital life. Don't hesitate to give it a shot now.
Read More:
MOV is the video format for Apple QuickTime player. It is the Apple video format which is the most popular video type for Apple devices like iPad, iPhone, iPod and even Apple software iMovie. And as we all know that, DVD videos are always with nice video quality. But if we want to share the DVD videos on Apple devices, we may have to rip DVD video to MOV first. Today we take a look at ripping DVD to MOV file format using DVD ripping software, which makes the process as simple as possible.Then, how to convert DVD to MOV or rip DVD to MOV is the problem we have to face and solve. Why We Have to Convert DVD Video to MOV?As we all know that, MOV is the Apple video format. For being compatible with Apple devices better, converting DVD video to MOV is necessary. Besides, MOV is also the container which could ensure the video quality (keep the least loss of video quality). So, for good video quality, rip DVD content to MOV is a good choice. Then, base on such reasons, the WonderFox DVD Ripper Pro is also a good choice for how to convert DVD to MOV. Basic Product Info of Pavtube DVD to MOV ConverterPavtube ByteCopy is the professional and powerful DVD ripper software for converting DVD to Video Format (AVI, MP4, MOV...). It is easy to use but it contains excellent features (fast conversion speed, nice video quality with the least loss, video edit - trim, crop and effect...). The ripper software allows users to convert DVD videos to the popular video format. Besides, it also supports all popular portable devices such as iPad, iPod, iPhone, Android based devices, BlackBerry and Nokia... All in all, it is the reliable assistant for ripping DVD content. Read the review. Furthermore, the Pavtube DVD to MOV Converter supports to rip/convert DVD to all Apple devices - rip DVD to iPhone, convert DVD to iPad, convert DVD to iPod... The DVD to video converter is really a good choice for us to rip/convert DVDs to the target video formats as we need. Eager to have a try now? Take it easy! You are able to free download our software! And we are prepared to offer you the tutorial to convert dvd to mov, just follow it!Free Download Top DVD to MOV Ripper: Other Download:- Pavtube old official address: http://www.pavtube.cn/bytecopy/- Cnet Download: http://download.cnet.com/Pavtube-ByteCopy/3000-7970_4-76158512.htmlStep 1: Import files to the programThis DVD to MOV Converter has a user-friendly interface, it supports two ways for you to import your files. Just drag and drop operation to add or move the DVDs in and out the program, or Click the "Load file(s)" icon to import DVD disc, DVD ISO image files and DVD folder. You can also change the order of the file.  Step 2: Choose the output formatTo convert DVD movies to MOV files, please click "output settings" icon in the main interface, and then select "Common Video" and choose "MOV" as the output format Or Click the "Format" drop-down list and choose "Multi-track Video > Multi-track MOV(*.mov)" for IOS devevices. By the way, this software also enables you to convert DVD to many other popular video and audio formats like MOV, MKV, M4A, WMV, VOB, 3GP, AVI, ASF, MP3, M4A, WAV, etc.
 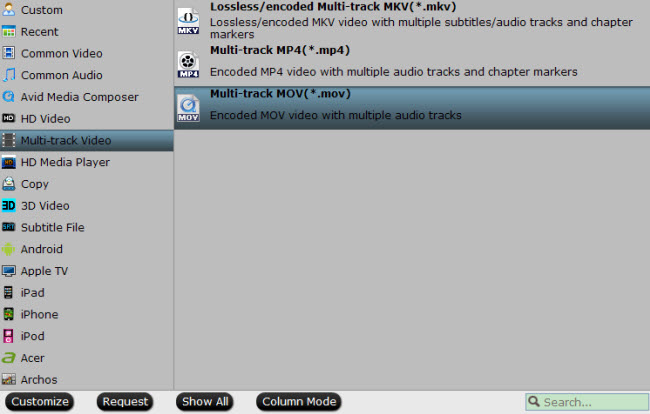 Tips of this DVD to MOV Converter: For Mac users, you can turn to Pavtube BDMagic for Mac, and you can choose the output videos are highly compatible with iPhone, iPad, iPod, Apple TV, Android devices, etc through Mac OS X El Capitan. You can enjoy your DVD movies anytime and anywhere you want. Besides, this Mac DVD to MOV Ripper enables you to edit videos, just click "video editing" icon in the main interface. Step 3: Convert DVD to MOVAfter finished all settings, click "Convert" button in the main interface, you can convert multi-DVDs to MOV files. This DVD Ripper will give you high quality output files.Read More:
Windows Media File can be Windows Media Video File or Windows Media Audio file. Windows Media Video File (WMV) is a file type which can contain video in one of several video compression formats developed by Microsoft. If you have some WMV files and want to have a video converter to convert WMV to MP4 to get them work on your iPhone/iPod/iPad, or play on your PSP MP4 player. Need to know how to convert your WMV videos to MP4 format on your PC or Mac? You can easily convert WMV to MP4, which is a high compatible format. This article will provide you with different options of WMV to MP4 converter.
Why Do You Need to Convert WMV to MP4 Video Format
MP4 is the most commonly used format perfectly compatible most of the application or portable devices. So What is MP4? An ISO/IEC standard 14496 developed by the Moving Picture Experts Group (MPEG).MP4 is a new container format, a container format allows you to combine different multimedia streams into one single file. MP4 is streamable and supports all kinds of multimedia content. To get WMV files worked in any condition, in other words, to enjoy, play, share,edit and burn WMV freely, the only solution is to find 3rd party applications to convert WMV to MP4.
Part 1: Best Desktop WMV to MP4 Converter
Most video converters work in a similar way, requiring the user to upload their files and select an appropriate output setting before choosing a save location within their computer’s directory. However, some falter when it comes to speed and conversion quality, while others pave the way with intuitive features that go well beyond your typical video converter and push the software into an entirely different realm — one where video editing and multimedia players intersect.
Here Pavtube Video Converter Ultimate or iMedia Converter for Mac, which is the best tool to accomplish your goal by converting WMV to MP4. Good News: These two programs that are both on sale with 20% off.
Overall, the all-in-one program can easily convert Blu-ray DVD disc, DVD folder, DVD IFO/ISO file and various videos inluding the BDMV files to any video format for different devices including iPad Air, iPhone 5S, iPhone 5C, Kindle Fire HDX, Apple TV 3, Samsung Galaxy Tab Pro, Galaxy Note 3, Google Nexus 7/10, WD TV, WD TV Live, and more.
Why Choose Video Converter Ultimate (Windows / Mac)
- 1. Almost all video/audio formats supported
- 2. Output playable videos/movies for all popular devices
- 3. 6x Faster Conversion Speed
- 4. You can make a stunning Hollywood movie to wow your friends by editing videos.
Free Download This Top WMV to MP4 Converter:
Other Download:
- Pavtube old official address: http://www.pavtube.cn/blu-ray-video-converter-ultimate/
- Cnet Download: http://download.cnet.com/Pavtube-Video-Converter-Ultimate/3000-2194_4-75938564.html
Guide: How to Use Pavtube Video Converter Ultimate to convert WMV to MP4 with Ease in Win/Mac (Windows 8.1/Mavericks included)
Step 1. Run the best WMV Converter, click "Add Video" to add your WMV files.
Step 2. Clicking the "Format" menu, here you are suggested to choose "Common Video > H.264 Video(*.mp4)" for playback or editing.
 Step 3. If you like, modify profile settings such as video size, bitrate, frame rate, etc to get optimized video and audio playback.
Step 4. Return back to Video Converter Ultimate main interface, and hit the "Convert" button to start encoding WMV to MP4 format. Once it finishes, open output folder, locate the created file and you can transfer them to your MP4-compatible media players for watching.
Part 2. Best Free Video Converters for help you Convert a WMV Movies to MP4
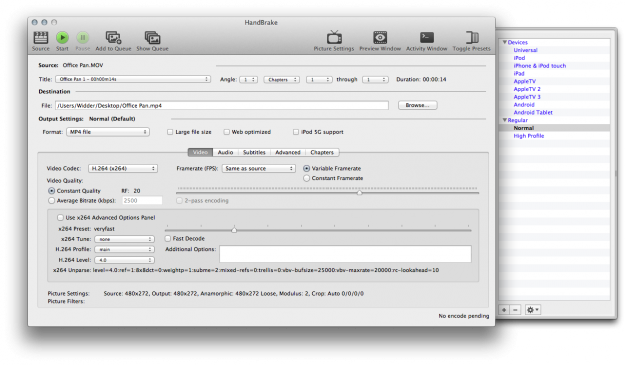
1. Handbrake (Windows/Mac OS X)
Handbrake seemed on its last legs back in 2006 when the software’s initial creator, Eric Petit, dropped off the face of the Earth, but development carried on with the help of a few ambitious folk who were driven to update and revise the existing software for a changing world. The open-source video converter now boasts one of the most expansive software packages for ripping and converting video files for playback on number of popular devices such as iPods, AppleTV, and Android tablets. The interface is sleek and well-designed, yet intimidating, offering a variety of customizable, borderline-advanced features that take a bit of getting used to before you can really capitalize on their capabilities and intuitive uses. However, the HandBrake guide and forums are always available if you need help without having to spend ample time fumbling with the program.
Handbrake also doesn’t feature any ads or bundled malware – a welcome touch – but conversion speeds can drag and the software isn’t light on system resources. Other noteworthy features include an abundance of video editing tools for splicing, adjusting framerate, and adding subtitles and assorted video effects before viewing the results in a live preview window. Experienced users can even queue multiple encodes for quicker batch processing and expedited results sans tedious manual input. Handbrake simply can’t be topped when converting files to MP4 or MKV format, but it also isn’t for beginners unwilling to learn the software.
Step 3. If you like, modify profile settings such as video size, bitrate, frame rate, etc to get optimized video and audio playback.
Step 4. Return back to Video Converter Ultimate main interface, and hit the "Convert" button to start encoding WMV to MP4 format. Once it finishes, open output folder, locate the created file and you can transfer them to your MP4-compatible media players for watching.
Part 2. Best Free Video Converters for help you Convert a WMV Movies to MP4
1. Handbrake (Windows/Mac OS X)
Handbrake seemed on its last legs back in 2006 when the software’s initial creator, Eric Petit, dropped off the face of the Earth, but development carried on with the help of a few ambitious folk who were driven to update and revise the existing software for a changing world. The open-source video converter now boasts one of the most expansive software packages for ripping and converting video files for playback on number of popular devices such as iPods, AppleTV, and Android tablets. The interface is sleek and well-designed, yet intimidating, offering a variety of customizable, borderline-advanced features that take a bit of getting used to before you can really capitalize on their capabilities and intuitive uses. However, the HandBrake guide and forums are always available if you need help without having to spend ample time fumbling with the program.
Handbrake also doesn’t feature any ads or bundled malware – a welcome touch – but conversion speeds can drag and the software isn’t light on system resources. Other noteworthy features include an abundance of video editing tools for splicing, adjusting framerate, and adding subtitles and assorted video effects before viewing the results in a live preview window. Experienced users can even queue multiple encodes for quicker batch processing and expedited results sans tedious manual input. Handbrake simply can’t be topped when converting files to MP4 or MKV format, but it also isn’t for beginners unwilling to learn the software.
 2. MediaCoder (Windows/Mac OS X)
MediaCoder is a capable program loaded with terrific conversion features. The interface, though bewildering at first glance, is relatively straightforward once you learn your way around, offering a boatload of customizable features for converting video to a specified output format of your choice. Whether you want to batch process a number of AVI files to MPEG or compress files for a reduced memory footprint, MediaCoder can handle it. You’ll find additional settings for modifying the output –including the ability to convert video to grayscale, quarter-pixel, cartoon, or high-quality mode – as well as bitrate adjustments for both the audio and video components of your file. Speed and resulting quality are grade A, with quick conversions and an emphasis on maintaining the original quality across formats.
MediaCoder is an exceptional piece of software, but it’s geared more towards the tech aficionado instead of the first-time user trying to make a zippy conversions without all the frills that come associated with some of today’s more capable, feature-packed programs. There are other basic tools bundled in the software, such as a direct audio extractor and a CD burner, but they are merely bonuses given the software’s focus on transcoding and output compatibility.
2. MediaCoder (Windows/Mac OS X)
MediaCoder is a capable program loaded with terrific conversion features. The interface, though bewildering at first glance, is relatively straightforward once you learn your way around, offering a boatload of customizable features for converting video to a specified output format of your choice. Whether you want to batch process a number of AVI files to MPEG or compress files for a reduced memory footprint, MediaCoder can handle it. You’ll find additional settings for modifying the output –including the ability to convert video to grayscale, quarter-pixel, cartoon, or high-quality mode – as well as bitrate adjustments for both the audio and video components of your file. Speed and resulting quality are grade A, with quick conversions and an emphasis on maintaining the original quality across formats.
MediaCoder is an exceptional piece of software, but it’s geared more towards the tech aficionado instead of the first-time user trying to make a zippy conversions without all the frills that come associated with some of today’s more capable, feature-packed programs. There are other basic tools bundled in the software, such as a direct audio extractor and a CD burner, but they are merely bonuses given the software’s focus on transcoding and output compatibility.
 3. Format Factory (Windows)
Format Factory straddles the line between Any Video Convert’s intuitiveness and MediaCoder’s complex power. This fully featured software has much to boast about including multiple format outputs for audio, video, and images, as well as an elegant interface that lets users seamlessly transition between three multimedia types without awkward interruptions or having to navigate away from the main window. Conversions can be as basic or extensively customized depending on need, but even the default settings work wonders. Video size, bitrate, aspect ratio, and the encode can all be changed in the output menu, along with a slew of options for adjusting the audio components and quality, adding watermarks, rotating video, and inputting subtitles.
There’s no option for saving presets, and the software can be a bit buggy from time to time, but Format Factory is equipped with step-by-step instructions for performing basic tasks and it produces videos as intended without straining system resources. Remain alert during the installation process, as the software will attempt to install a few unwanted search tools and browser modifications without you noticing.
3. Format Factory (Windows)
Format Factory straddles the line between Any Video Convert’s intuitiveness and MediaCoder’s complex power. This fully featured software has much to boast about including multiple format outputs for audio, video, and images, as well as an elegant interface that lets users seamlessly transition between three multimedia types without awkward interruptions or having to navigate away from the main window. Conversions can be as basic or extensively customized depending on need, but even the default settings work wonders. Video size, bitrate, aspect ratio, and the encode can all be changed in the output menu, along with a slew of options for adjusting the audio components and quality, adding watermarks, rotating video, and inputting subtitles.
There’s no option for saving presets, and the software can be a bit buggy from time to time, but Format Factory is equipped with step-by-step instructions for performing basic tasks and it produces videos as intended without straining system resources. Remain alert during the installation process, as the software will attempt to install a few unwanted search tools and browser modifications without you noticing.
 4. Cloud Convert (Web-based)
Not everyone wants to download a standalone application to fulfill their video converting needs. Luckily, Cloud Converter is one of the best online tools for simple file downloads and conversions. Although still in the beta phase, the free-to-use site lets users select files – ranging from FLV and MLV files to 3GP and MPEG4 – from their Google Drive or Dropbox account, or drag them directly into the browser window from their desktop. The entire conversion process takes place “in the cloud,” and output settings – like aspect ratio, codec, bitrate, and resolution – can also be tweaked from the Web app’s sparse interface prior to converting the files. Cloud Convert can email the resulting file. It can also drop the file into your Google Drive or Dropbox account if you prefer.
The web-based service lacks the feature set and speed of standalone programs for Windows and Mac OS X, but it’s proficient in converting a range of files without deviating from its intuitive interface. It would have been nice to see a few additional features, such as direct audio ripping or a more advanced editing utilities, but it’s a video converter at heart – and that’s precisely what it intends to be. Plus, no ads!
4. Cloud Convert (Web-based)
Not everyone wants to download a standalone application to fulfill their video converting needs. Luckily, Cloud Converter is one of the best online tools for simple file downloads and conversions. Although still in the beta phase, the free-to-use site lets users select files – ranging from FLV and MLV files to 3GP and MPEG4 – from their Google Drive or Dropbox account, or drag them directly into the browser window from their desktop. The entire conversion process takes place “in the cloud,” and output settings – like aspect ratio, codec, bitrate, and resolution – can also be tweaked from the Web app’s sparse interface prior to converting the files. Cloud Convert can email the resulting file. It can also drop the file into your Google Drive or Dropbox account if you prefer.
The web-based service lacks the feature set and speed of standalone programs for Windows and Mac OS X, but it’s proficient in converting a range of files without deviating from its intuitive interface. It would have been nice to see a few additional features, such as direct audio ripping or a more advanced editing utilities, but it’s a video converter at heart – and that’s precisely what it intends to be. Plus, no ads!
 Part 3. How to use VLC Player to convert .wmv to .mp4?
Actually, not just .wmv but any video files that the VLC Player can play it can convert to .mp4! The list includes popular video format such as VCD’s .dat/.mpg, DVD Video’s .vob, etc. The process is technically call Transcoding, and it’s simple, fast and best of all, free-of-charge.
Part 3. How to use VLC Player to convert .wmv to .mp4?
Actually, not just .wmv but any video files that the VLC Player can play it can convert to .mp4! The list includes popular video format such as VCD’s .dat/.mpg, DVD Video’s .vob, etc. The process is technically call Transcoding, and it’s simple, fast and best of all, free-of-charge.
- Launch VLC Player and select the “Streaming/Exporting Wizard…” from its File menu.
- Select the “Transcode/Save to file” option.
- Click the “Choose…” button and select your .wmv file.
- Tick “Transcode video” and select the “H.264” codec and 1024 kb/s.
- Tick “Transcode audio” and select the “MPEG 4 Audio” codec and 192 kb/s.
- Select “MPEG 4/ MP4” as the Encapsulation format.
- Click the “Choose…” button and Save As “NewFileName.mp4” to your Desktop.
- Click “Finish” to begin transcoding.
In Step 7, tick the “Local playback” option if you want to watch and transcode your .wmv in real-time. Needless to say, do not tick it for speedier transcoding.
You can further use MPEG Streamclip Alternative to process the .mp4 to an iPod compliant copy.
Now, just pick up one way as you like to solve the “WMV to MP4” or “Windows Media Files to MP4” issues on Windows 10/8.1/8/7 or Mac OS X El Capitan issues.
Read More: