Showing posts with label Google. Show all posts

Tuesday, September 17, 2013

How to Play AVI videos on Google new Nexus 7 (2013)?

Cannot play AVI videos on Google Nexus 7 (2013)? Wanna watch AVI videos smoothly on your New Nexus 7? This article will provide a quick and effective solution.

Since new Nexus 7 has been released by Google joint with Asus, it is favored by those who watch movies a lot especially for HD movies. That is because of the sharpest 7 inch screen and 1920x1200 high-resolution and more. So it has become one of the most popular Android portable devices.

But it supports limited videos formats such as H.264 AVC, H.263, MPEG-4, VP8 and AVI video is not included. AVI is a multimedia container format mainly using DivX and XviD codecs. So you it is not easy to play AVI on new Nexus 7 (2013) directly. 

Although you may have got a powerful MXplayer installed, there are still some AVI videos that cannot be played well on new Nexus 7. Maybe the player can’t support the full HD video very well or maybe it’s because of the Nexus 7 processor. The most effective way is to convert AVI to new Nexus 7 natively supported formats. It is not so complicated. Find easy-to-use third-party software to convert AVI to new Nexus 7 quickly and smoothly.

If you use Pavtube AVI to Nexus 7 Video Converter (AVI to Nexus 7 Video Converter for Mac) to resolve this problem, it’ll be a breeze. It will provide you an optimized preset for Google New Nexus 7 and fast conversion speed. If you need, you can adjust video and audio parameters like bitrate, resolution, channels to change the videos size or to make it fit Nexus 7 best. In a word, it will make AVI videos fully compatible with New Nexus 7.

How to convert and smoothly play AVI videos on New Nexus 7 (2013)?

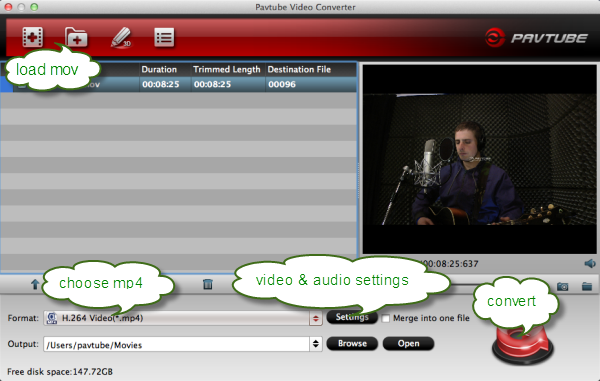
1. Add AVI videos to the Nexus 7 Video Converter.

Launch the popular Nexus 7 Video Converter you will be brought to the main interface. Then click “Add Video” or “Add from folder” button on the top left to import AVI source files, or directly drag and drop the AVI files into the software. And you can preview the whole video in the preview window on the right.


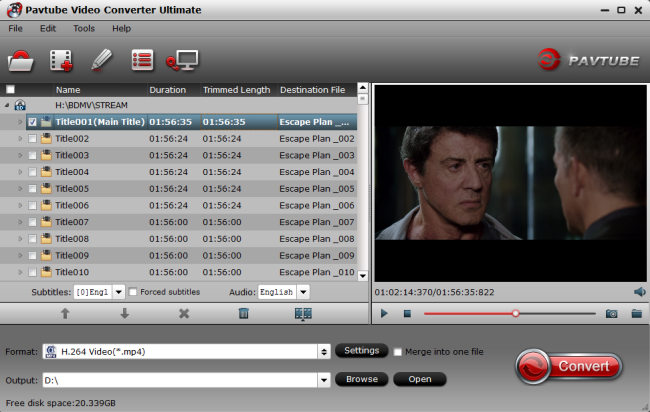
Tips: If you want to combine several AVI videos into one big output video, select the titles you desired and check the “Merge into one file” for conversion. 

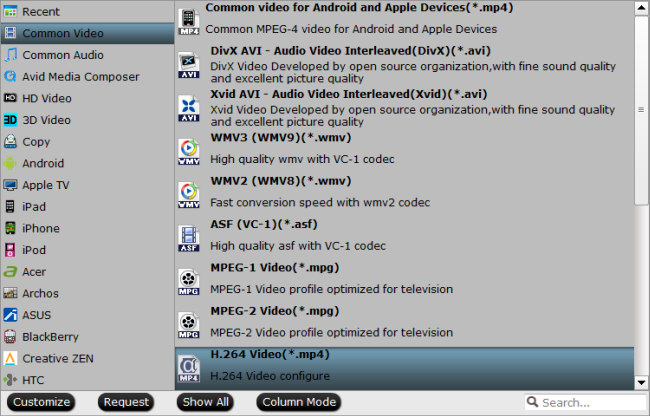
2. Choose the preset format for Nexus 7.

Open the “Format” dropdown list to go through various output formats. Hit the “Android” catalogue to select “Google Nexus 7 H.264 Video (*.mp4) ” as the output format. It is the optimized preset format that is fully compatible with Nexus 7.


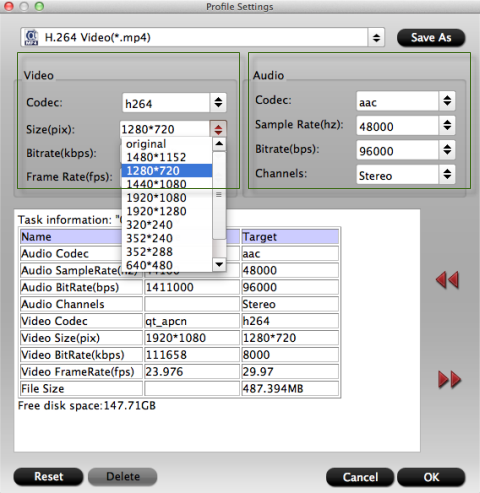
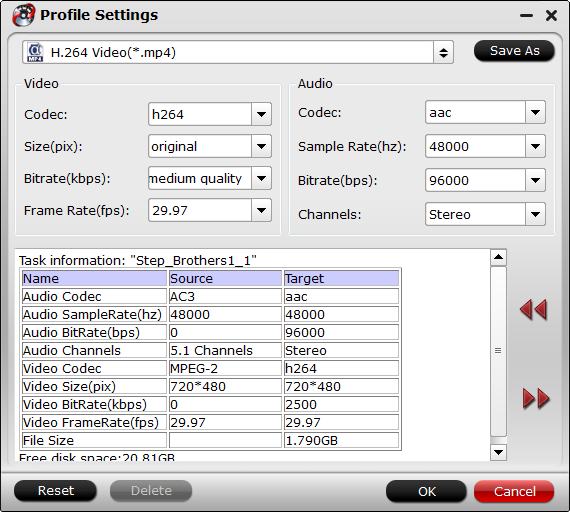
When you want to check and change output video parameters like bitrate, frame rate, size, etc, go to press “Settings” button on the interface. There you can adjust the output file size and picture quality by adjusting bitrate and size. Keep in mind that the default setting is all right for output as well.


3. Convert AVI files to new Nexus 7.

Click the big “Convert” button to get conversion started. If you do not like the default path for output files, just click “Browse” button to find a new folder that is convenient for you before conversion.

4. Transfer output videos to new Nexus 7 for playback.

Simple click “Open” button to quickly find the output files, and then get your Nexus 7 connected to the computer via USB cable. Drag or copy the output files from the output folder to Nexus 7. Now you can fully enjoy AVI videos on your Nexus 7 as you like.

More features about the Pavtube Video Converter:
  1. Support convert nearly all HD/SD video and audio formats
  2. Support convert MKV, AVI, Tivo, VOB, WMV, MPG, FLV, F4V, etc. Videos for playing on Android, Apple and Windows RT/Pro tablets and phones
  3. Support transcode any media files for playing back on HD Media Players
  4. Support encode any HD Videos and Camera Videos for editing in Avid Media Composer, Xpress, Pro, Adobe Premiere Pro, After Effects, Sony Vegas, Pinnacle Studio, CyberLink, Windows Movie Maker, MAGIX Movie Edit Pro HD, etc.
  5. Support add srt, ass and ssa subtitle to any videos or movies.
  6. Capable of editing videos like trim, merge, crop, video effect, etc.
 

Thursday, September 12, 2013

Watch Star Trek Blu-ray movie on Google Nexus 10, Nexus 4, Nexus 7 & New Nexus 7

Description: A easy, quick and reliable Blu-ray Ripping workflow to let you enjoy Star Trek Blu-ray movie on Google Nexus 10, Nexus 7 & New Nexus 7 and Nexus 4 with perfect audio and video synchronization.

Question 1: 

  • "I have created several ISO image files from my Blu-ray collections. Recently I bought a Google Nexus 7 (2013 version). I would like to copy these Blu-ray ISO files to my Nexus 7 so that I can watch them easily. But it seems Nexus 7 would not work with a Blu-ray ISO file; how can I do this?" 
  
Question 2: 
  • "We just received my Star Trek into Darkness Blu-ray and can't wait to enjoy it. But the problems is we are heading for Europe on vacation tomorrow, and we'd rather not to take discs, Blu-ray drive and my Macbook Pro – all of these on board. I was wondering if I take my new Nexus 10, is that possible to watch Star Trek Blu-ray on Nexus 10?"

Not a long ago, Google and Asus released the second generation of Nexus 7 (2013); any of you already got it yet? Google Nexus series is so hot after releasing and it's sough-after by Google fans and Android fans for super-sharp screen, powerful processor present us excellent performance from a dual-core chip, and most of the importance - the high reputation of Google itself.

With such a portable smartphone or tablet in high resolution, watching videos could be such a big enjoyment especially when you have Blu-ray collections. Maybe not all of you know how to playback Blu-ray movies on Nexus 4/7/10, so we share our experience here:


Blu-ray to Google Nexus Mac Workflow: How to watch Blu-ray on Nexus 4/7/10? 

Most commercial Blu-rays are heavily encrypted by film studio and the distributors, so that if you want to move Blu-ray movie to Google Nexus Tablet or Phone, the key point is to remove the disc protection. After testing several Blu-ray protection removing programs, we choose the Pavtube BDMagic for Mac for its simple interface, easy workflow and reliable video quality. Surprisingly we found it's on 30% off atm; are you still waiting?

Download a free trial version here 


Step 1. Load Blu-rays to this Mac Blu-ray to Google Nexus Ripper.

Firstly you need to get a Blu-ray drive to make Mac recognize your Blu-ray discs; the built-in drive in Mac is only able to play DVDs.

After that, let's launch Blu-ray Ripper for Mac, click the top left icon to import disc.

It will detect and show all the Blu-rays that connected to Mac, click the disc name to import them directly. And no worries if you only have Blu-ray ISO files, Pavtube will recognize the ISO files directly so that you don't need to run virtual drive to extract videos from ISO image file firstly.


Step 2. Choose video format.

For Google Nexus 4/7/10, the most compatible video format is MP4. Now click the drop-down list besides "Format", choose Android and find presets for Google Nexus. Another way to quick locate these presets is to submit "Nexus" in the search box.

Step 3. Edit video before conversion. (Optional)

Click the pencil-like icon on the top to edit videos before conversion. You can trim, crop, edit audio, add subtitles here.


After editing video, let's back to the main interface. Have you noticed the red "Settings" besides Format drop list? Click it, you can customize video size, bitrate, frame rate, sample rate(Hz) at your needs.

Step 4. Start conversion.

Click the big red "Convert" to start converting Blu-ray to MP4 for playback on Nexus 4/7/10. Wait for moments, and quick locate the converted video by clicking "Open Output folder".

Tips: Please keep the Internet connected during importing and converting, so that the whole process would be successfully managed.
  

Google Nexus Tablet and Phone related guides:

Tuesday, September 10, 2013

New Nexus 7 Flash Player-Play Flash FLV/F4V video on new Nexus 7

Description: Most of Flash videos are in FLV/F4V format and not supported by new Nexus 7. This article introduces the way to how to play Flash videos well on new Nexus 7.

The Powerful and portable new Nexus 7 from Google is thinner, lighter, and faster and features the world’s sharpest 7" tablet screen putting over 2.3 million pixels in the palm of your hand. 

With 323 pixels packed into every inch, you can read text that’s sharper than the printed page, see images more vivid than the highest quality photo magazine, and what’s more, watch videos come to life in vibrant 1080p HD. It is made for what matters you. 

When you have downloaded many flash videos usually in FLV or F4V format from video sharing websites like YouTube and want to watch them on Nexus 7, you may find that it cannot be accepted by new Nexus 7. Because many video sharing webs use Adobe flash technology, which is not supported by new Nexus 7. 

There is a very easy way to get Flash FLV/F4V videos played on Nexus 7. Install a Flash Player on new Nexus 7 without any more complicated steps. This tip will help to enable flash videos with Nexus 7 quickly. 

However, if you still have problems, you should turn to the following solution, which is the most reliable and effective solution. Turn to third-party software to convert flash FLV/F4V to new Nexus 7 MP4 format, the most compatible format for most Android devices.

A professional Flash Video Converter: Pavtube Flash Video to Nexus 7 Converter is recommended. With it you can download any Flash videos for enjoying it with new Nexus 7 anytime and anywhere. It has the user-friendly and easy interface and superfast conversion speed especially with CUDA acceleration. And it supports to import a variety of videos besides FLV/F4V and output various videos with high quality. Moreover, it will get conversion done in few clicks.  

Download and install the software to learn how to convert FLV/F4V to MP4 format for playback on New Nexus 7. (New Nexus 7 Mac Video Converter is right for Mac users)

Step 1. Import Flash videos to Flash video to New Nexus 7 Converter.

There are two ways for loading files: 

1. Find the flash videos on your computer and then directly drag and drop it to the software, and you can pick several files you want and import them at one time.

2. Click “Add video” or “Add from folder” button to locate the flash videos on your computer and then import to the software.


Step 2. Choose H.264 MP4 format for new Nexus 7.

A mass of video formats for output is listed in “Format” menu. You are recommended to choose the “Google Nexus 7 H.264 Video (*.mp4)” under “Android” catalogue for output.


If you want to customize the video parameters, just click the “Settings” button on the main interface. In order to get the best view effect, you can set display resolution to 1280×800 pixels for get full screen

Tips: You can edit the videos like trim, crop, add effect and watermark, etc. If you want to edit, click “Edit” button to achieve it.


Step 3. Convert Flash FLV/F4V to new Nexus 7.

“Borwse” your computer to find a convenient folder for output video, then click “Convert” button to start conversion. Once completed, you can press “Open” button to get the output files quickly.

Tips: If you want to watch the online flash videos in YouTube, Google videos, etc, Youtube Converter is the best helper for you and it will detect, download and convert flash FLV/F4V videos to MP4 format for Nexus 7. You can have a try.

Since everything is done, you can go to transfer the output video to new Nexus 7 for watching at any time.

Related articles:
           

Wednesday, September 4, 2013

DVD to Nexus 7-Free Put DVD movies to new Nexus 7 with best quality

Description: Do you ever think about converting DVD to Google new Nexus 7 for playback? Go ahead, this article will show you how to convert DVD movie to new Nexus 7 compatible format with best video quality.

The new Google Nexus 7, Claimed as the world's highest-resolution 7" tablet, is thinner, lighter and faster. It is an amazing device for e-book, music as well as  videos when traveling or being at home. However, the new Nexus 7 tablet cann't play DVD movies because of lacking DVD drive. If you want to free play DVD on your new Nexus 7, this guide will tell you how to do it.

Given that the New Nexus 7 lacks a DVD drive, there does seem to be one big question. Take it easy. There are many DVD ripping software available on the market. In this guide, Pavtube DVDAid would be highly recommended. As a professional DVD to Google new Nexus 7 Converter, makes it easy to convert and move DVD movies to New Nexus 7 recognized format. The synchronization of audio and video and superfast conversion speed are also wonderful.

Just a few clicks, you can enjoy your favorite DVD movies on Google Nexus 7 at will.

Download DVD to New Nexus 7 Converter trial version.


(Good news: Pavtube Studio release Free DVD Ripper and Free DVD Ripper for Mac)

How to rip DVD movies for playback on Google's new Nexus 7?
  
1. Load DVD to the DVD to Nexus 7 (2) Ripper.

Insert DVD movies into your DVD drive, then click "Load file" button to navigate to DVD movies you want to convert. And it is able to find and pick the actual main movie up automatically.

After importing successfully, you can go to select subtitle and audio track on the main interface for output.


Tips: If you want to watch Blu-ray movies on New Nexus 7, you arrive a right place. We recommend you the best Nexus 7 (2) Blu-ray Ripper with 30% off to you.

2. Select Nexus 7 (2) compatible format.
  
Click "Format" menu to find the optimized video format for Nexus 7 in the dropdown list, Choosing the built-in "Google Nexus 7 H.264 Video (*.mp4)" under "Android" option is perfect for Nexus 7.

new nexus 7 playback format

Tips: You can press "Settings" button on the interface to adjust the video and audio parameters like codec, size, bitrate, etc. The output videos quality is based on bitrate than resolution. The higher bitrate will result in lower picture quality loss but a larger file size. But there is a balance between quality and size. I think 1500kbps~2000kbps is all right for 720p movies on Nexus 7.

new nexus 7 video settings

3. Start DVD to Nexus 7 (2) conversion.
  
It's time to click "Convert" button to start converting DVD to Nexus 7 (2) compatible format. With the help of technology of CUDA acceleration, you can get 6X faster conversion speed. Just wait for a while, then you can click "Open" button to quickly get the generated files for Nexus 7.

Note: With great decrypting capability, high quality video output and specific format list for versatile portable devices including iPad 3, iPhone 5, Apple TV 3, Xbox, PS3, Android tablets and phones, etc,. Pavtube DVD Ripper ranks top on the list of DVD ripping application. And it also provides lifetime free upgrade of product and technical support.

Now you can watch DVD on that gorgeous screen of Nexus 7 anywhere you like. Just enjoy it now.

Related Article:
               

Friday, August 16, 2013

Free Convert DVD movie, HD Videos, Tivo shows to MOV, MKV, AVI, FLV, WMV, MPG, etc. with Free Video DVD Converter Ultimate

Summary: This article mainly introduces a free software: Pavtube Free Video DVD Converter Ultimate, it can rip the latest DVD movies, convert various HD videos and Tivo shows to MOV, MKV, AVI, FLV, WMV, MPG, etc. for playing tablets, phones, tvs, hd media players, or  for editing, burning, sharing etc. If you are looking for software for free, here is right for you.

           
Now we are in a world with a variety of digital videos. Sony, Panasonic have released many HD camcorders for both professional and amateurish videographors to record every memorable moment in their life. So HD videos have make up a necessary part of your digital world. At the same time, Tivo show and DVDs also play an important role. But they are not a friendly companion to edit or smoothly playback. You may want to convert DVDs to MOV/FLV/MKV for playback or sharing with friends, convert HD videos to AVI/WMV/MPG for further editing, or convert Tivo shows to an easy-to-play format. 

You may have search a lot and find that there are many software with cost, which can help you. If you want free software, Pavtube Free Video DVD Converter Ultimate is right for you. It is integrated software combined with converting both DVD and videos. It can convert any DVD including commercial DVD with copyright protection, various videos in different formats and support Tivo conversion. And it will support converting them to MKV, AVI, WMV, MOV, MPG, etc.

Go to download Free Video DVD Converter Ultimate and install it. Then follow me to learn how it works.

Step 1. Import source files.

Click “Add Video” icon to load video, or you can drag and drop it to the software directly. “Load files” icon will allow you to load DVD disc, ISO/IFO and DVD folder.


Note: If you want to import Tivo video for convering, you should import the Media Access Key first.


Step 2. Select output format.

Many video formats in the Format dropdown list, you can choose the one you need.


Step 3. Video Editing (optional).

Powerful edit function including Trim, Crop, Add subtitles, etc will give you great experience for conversion. For example, you can use Trim to cut off the prevue of DVD that you don’t want to retain in output videos. 


Step 4. Start conversion.

Click “Convert” button to start conversion. Click “Open” button you can find the generated files. 
And with the help of CUDA Accelerationand full use of cores, you will have a fast speed.


If you want to convert to more popular portable devices and editing software, Updrade version will give you more great features. You can 1:1 backup DVD or 100% backup the main movie of DVD. Also you can choose to output MP4/M4V files for all portable devices to enjoy videos anywhere. 


Like us on Facebook you can get 20% OFF upgrade discount. Do not miss it. Hurry up to try the upgrade now.

Good news, especially for DVD collectors. We have released Free DVD Aid for Windows and Mac. Now you are free to backup your DVD collection to MOV/MKV/AVI/MPG, etc. Go to try it now.  


Friday, June 28, 2013

How to Free Rip a DVD movie with MakeMKV and Handbrake?


Hollywood wants you to buy its movies on DVD and Blu-ray, but it also wants to control what you do with them once you get home. That doesn't sit well with us, so we're going to show you how to do something that Hollywood most definitely does not want you to do: Rip movies and copy them to your computer's hard drive so you can enjoy them without ever having to get up off your couch to drop a disc in the DVD player.

Once you've got a movie onto your hard drive, you can do all kinds of other cool stuff with it: Transcode it into a different format so that it'll play on your smartphone or gaming console, or maybe just delete those annoying FBI warnings that tell you how much trouble you can get in for doing exactly what we're about to show you.

While we fully acknowledge that the movie industry has the right to protect it's intellectual property, we also believe that consumers have the right to enjoy the property they purchase. It's called fair use - if you buy a movie on a disc, then you should have the right to make a back-up copy, or transfer the content to another medium, like a hard drive. Of course, you don't have the right to distribute or sell copies of the movies you buy, but you probably knew that already.

How to Free Rip a DVD disc with MakeMKV and Handbrake?


What you'll need:

1. DVD-ROM drive. Most modern PCs will come equipped with optical drives that can read DVDs, but many of the newest ones (ie, ultrabooks) have ditched them to save space. If you don't have a DVD-ROM drive, you can pick up an external one that connects to your PC via USB up for around $30 on Newegg.

2. MakeMKV. You'll need this program to break the disc's copyright protection and perform the initial rip. It's free, open source.

3. HandBrake. After the initial rip, you might want to make the file smaller or change its format so you can watch it on your phone or media center. Handbrake is a free video encoder that lets you tweak just about everything after you've got the movie on your hard drive.


Step 1: Defeat copyright protection with MakeMKV

There are a lot of other software programs out there that make this a very involved process, but MakeMKV makes it extremely simple. Just open the program and pop your DVD into the disc drive. Once the program recognizes the disc, click on the big "Open Disc" button and MakeMKV goes to work.

Step 2: Rip the movie with MakeMKV

After you've vanquished the AACS encryption, MakeMKV will return a list of chapters and segments that you can rip. Find your movie (usually the longest title or biggest file) and uncheck all the other boxes. Next, designate an Output Folder where you'd like the file to end up once it's been ripped. When you're all ready to go, hit the "MakeMKV" button. This process can take anywhere from two minutes to half an hour depending on your computer's processing power, but when it's done you should have a nice big MKV file waiting for you in the folder you specified.

Step 3: Transcode with HandBrake

Once you're done using MakeMKV to subvert the DVD's copyright protection and save the movie to your computer, you'll probably want to transcode the file to make it smaller and ensure that it's in the format you want. This is where HandBrake comes in. It's got TONS of settings and tools you can use to tweak your video, and comes with an extensive collection of presets (displayed in the right-hand column) that make the ripping process relatively foolproof. The developers have already created presets for most Apple products, including the iPhoneiPad and iPod Touch, and Apple TV; the PS3 and Xbox 360 gaming consoles; and several other platforms. You can also modify any of these presets and save them with new names or create custom presets from scratch.

Play around with the settings until you've got everything just right, then go ahead and click Start. This part will take a while, so sit back, relax, and let HandBrake do its thing.


Did something go awry?

Don't worry, there are still many top DVDAid tools used to rip DVD discs on Windows or Mac. Refer to the guide for beginners:


If you have any problems, we highly recommend hitting www.multipelife.com, here's the right place to share ideas, ask questions, report problems, and give feedbacks. Or you can contact their customer service Support Center, believe that can solve your any problems.

If you like the article, please share it with your friends. Thanks.     

Wednesday, June 26, 2013

Convert H.264 MOV to MP4 on Mac for playing on Android, iOS, Windows 8, HD Media Player and more

Cameras are becoming more and more popular among common people, many people not only buy a DC but also buy DSLR to take photos and record high-definition videos. In the latest cameras, video recording format mainly is H.264 MOV format, like Canon DSLR and Nikon DSLR.

Maybe you have bought a DSLR or a DC that records H.264 MOV videos, MOV is not supported by many portable devices, like tablets and smartphones, it's not well for playback. In this case, you may need to convert H.264 MOV to MP4 format on Mac OS for watching or editing.

MP4, originally MPEG4, is a file format that is commonly used to store media types defined by the ISO/IEC Moving Picture Experts Group. Being an international standard, has more support. Especially true on hardware devices, such as Apple TViPhone, iPod, iPad, Android tablets/phones, PSP, various DVD players, etc.

Here I'll introduces a viable solutions for converting H.264 MOV to MP4 on Mac for playback on portable devices. Of course, at the very beginning of the task, you need a professional assistant - Pavtube Video Converter for Mac - to help you. The Mac program used here would do the most of work by adjusting H.264 MOV to MP4 on Mac (Mac OS X Leopard 10.5, Snow Leopard 10.6, Lion 10.7, Mountain Lion 10.8 included) so that you needn't do much but several clicks by yourself. Easy to use, efficient in conversion, excellent in quality are the three basic but necessary features of the software:


Just free download, install and run it, then start the trip of converting now!

How to convert H.264 MOV to MP4 on Mac OS X?

Step 1. Load H.264 MOV files into the program.

Click "Add video" or "Add folder" to load your MOV files you want to convert. Or directly drag and drop the MOV files to the Mac MOV to MP4 Converter program.

Batch conversion is supported by this Mac software, so you can convert several H.264 MOV files to H.264 MP4 at one time.


Step 2. Click "Format" column to choose the best video format for output.

You can click and choose "Common Video -> H.264 Video (*.mp4)", if you need to convert MOV files to other formats, just click and choose the corresponding formats according to your device.


Tips:

1. You can click "settings" button to customize the resolution, bitrate and other parameters as you want. If you want to play videos on tablet, you can change the resolution to the same as tablet's screen definition, what's more, higher the bitrate, you can get higher quality, but it also requires higher hardware support. such as:


The default setting works well.

2. Edit function is easy in the Mac H.264 MOV to MP4 Converter, you can trim, crop, add watermark or adjust effect to the footages before conversion. Details in the online help of Video Converter for Mac.

Step 3. Start H.264 MOV to MP4 conversion on Mac OS X.

Click the "Convert" button in the main interface, and let the rest be finished automatically by the professional Mac H.264 MOV to MP4 Converter. The converter also works on MacBook, MacBook Pro, MacBook Air, iMac.

With this Pavtube Mac Video Converter, you can easily transcode camera or camcorder H.264 MOV files to MP4 or any other formats you want. Pavtube HD Video Converter for Mac will help you convert H.264 MOV video to MP4 on Mac at a fast speed, just have a try.

Read More:

Friday, May 24, 2013

Penguin 2.0: What Likely Changed and How to Recover

It's that time again. After a long series of mini updates for Penguin 1.0, the newest version, referred to by Matt Cutts as Penguin 2.0 will be implemented into Google's algorithm. The new update was just announced by Matt Cutts on May 22nd, so we don't know exactly what changed yet. However, based on what Cutts has said leading up to the update, as well as what we learned from Penguin 1.0, we can make some likely assumptions. Please note that what follows is solely my best guess at what Google has changed with Penguin 2.0, and how to recover. New data may be revealed as tests get underway that changes the SEO community's collective knowledge.

Ever since the first Penguin turned the SEO world on its head, any major changes are often met with anxiety and even dread by many webmasters. If your website has felt the backlash and there's been a noticeable drop in rankings, don't panic. Fortunately, there are several steps that can be taken to recover and get back on track.


The Basics

According to Matt Cutts, the new version of Penguin is primarily designed to penalize websites that utilize black hat SEO techniques and reward websites that offer genuine value. Webmasters who create content that people naturally want to share and websites that visitors want to explore and return to shouldn't be affected negatively. He also stated that Penguin 2.0 should help many small to mid-sized businesses that play by the rules and avoid black hat SEO. It should also help authority sites gain traction while decreasing the rankings of sites that merely provide generic fluff.

The ultimate goal is to cut back on link spamming and hacking, while providing webmasters with the tools to fix hacked sites. Since "cluster results," where a cluster of results from the same website have been somewhat of a problem, they have also addressed this issue. Consequently, search results should be more balanced where one particular site doesn't dominate the first page of a search term.

They are also targeting certain search queries that have a reputation for being affiliated with spam (for example, "payday loans"). Sites that go overboard with advertisements or try to sneak them in under the nose of visitors may also be penalized.

In reality, it doesn't appear that Google is reinventing the SEO wheel with Penguin 2.0, but simply tightening their algorithm to provide users with the most high-quality and relevant content possible. Of course, this isn't fool-proof and some legitimate webmasters may get caught in the crossfire.

Here are some factors to consider when building links in the new, Penguin 2.0 environment.

Link Value

Although it's helpful to have a large volume of links, it won't do much good if they're from "bad neighborhoods." That's why it's so important to focus on acquiring links from reputable sites. One great way to do this is via guest blogging. As long as the vast majority of links are from trusted sites, they should act as a shield that protects from future updates.

Otherwise, an abundance of links from bad neighborhoods that use manipulative techniques can have a negative impact. If you're unsure of a website's credibility, use as tool like PR Checker. This simple tool will quickly display a domain's page rank. Websites with a page rank of 4 or higher are generally suitable for backlinks, but the higher the better.

However, Page Rank isn't always fool-proof. It's best to look at the content on the website and evaluate how useful, relevant, and interesting it is. Also, check the website's social channels like Facebook and Twitter, and see how many followers they have in each. A higher follower count is generally a good indication of quality and credibility.

Link Velocity

Another issue that Google has addressed is the rate at which a site acquires links. Except for a few select cases with viral implications, they know that quality sites usually accumulate links organically and gradually over time. If a newer website suddenly experiences spikes where numerous links are acquired over night, this serves as a red flag to Google, making it more likely the site will get "sandboxed." Search Engine Watch demonstrated this phenomenon on a line graph where any more than 75 links a day were ignored by Google.

For this reason, it's best to be somewhat conservative in a link building campaign and not create huge quantities at one time. Instead, it's better to space them out over time in a more natural manner. Basically, the velocity should be consistent or increase slightly over time.

Avoid Exact-Match Anchor Text

After analyzing a ton of data, Google and most SEO professionals have recognized the correlation between exact match anchor text and web spam. Accordingly, they have taken measures to penalize sites that have excessive links with exact match keywords in the anchor text. Since this is likely to keep tightening in the future, it's smart to keep this practice to a minimum. If your site has an excessive amount of links with exact match keywords in anchor texts, it's a good idea to edit those keywords so that they are not exact matches.

Instead, use sentence fragments and branded anchors. I recently wrote an overview of all the different types of anchor text, along with an analysis of each one and recommendations for how to properly use anchor text in a Penguin 2.0 environment.

Link Relevancy

As most webmasters with basic SEO knowledge already know, relevancy plays a big role in link quality. Links from completely irrelevant sites can hurt a site's rankings (or, at best, provide negligible value), while links from highly relevant sites should help as long as they're reputable. If you've been accumulating links from a hodgepodge of sites that have nothing to do with your industry, this could account for a decrease in rankings from Penguin 2.0. Keep this in mind in future SEO campaigns.

Here are some ways to improve your rankings if you've been adversely affected by Penguin 2.0. 

Step 1. Understand Your Link Profile

One of the most effective ways to recover from Penguin 2.0 and protect yourself from future issues is to have a full understanding of your link profile. Start with a link profile audit to identify bad links which could have caused your website to get hit by Penguin 2.0. If you're the do-it-yourself type, try data tracking tools like Majestic SEO and Open Site Explorer.

These platforms are designed to create an in-depth picture of your link profile. Some common features include backlink reports, inbound link analysis and daily rank tracking. While this wasn't all that necessary a short while ago, these tools are becoming more and more important. After understanding your link profile, you can take the necessary steps to solve any problem areas. 

Step 2. Run Backlink Checks on Sites Linking to You

In addition to checking the backlinks of your website, it's a good idea to investigate the primary sites that link back to you. This can also be done via Majestic SEO, but there are other tools like Backlink Watch and Analyze Backlinks that are also effective. This is important because if a particular site is getting links from bad neighborhoods, it will lower their link equity. In turn, this can have a negative impact on your SEO. If you find a site with poor link equity, backlinks from this site should be removed.

Step 3. Remove and Disavow Harmful Links

By all accounts, the consensus is that a website can recover and improve its ranking in time through the removal and/or disavowal of bad inbound links. Since Google's algorithm will eventually re-crawl and re-index content, a website can reclaim its position in the rankings, in most cases. While this process is usually frustrating and often time-consuming, it's necessary to get rankings back on track and climb the SEO ladder once again.

But the question is, how do you know which links to remove or disavow? You can either get assistance from a professional SEO firm to analyze your link profile and provide a spreadsheet of which links to remove, or you can try following this step-by-step guide.

Step 4. Build New, High-Quality Inbound Links

If you've been hit by Penguin 2.0, the best way to prove to Google that your website belongs in the rankings is by getting other credible, high-quality websites that Google trusts to vouch for you. You can do this by getting inbound links from these websites. There are lots of ways to ethically build high-quality, powerful links, but my favorite is through guest blogging. If guest blogging isn't an option, then here are 8 other ways to build links.

Conclusion

Penguin 2.0 is a tightening of the algorithm Google originally launched back in April of 2012. The principles are the same, as are the goals Google is trying to achieve with the release of the next iteration of it. If you've been hit by Penguin 2.0, follow the steps above to recover from it, and be sure to tread carefully as you move forward with your SEO initiative. Don't go for the short-term gain if it sacrifices your brand in the long-term. Otherwise, Penguin will be making a very unpleasant visit to your website.

Google Penguin 2.0 related tips