DVD to External HDD Frequently asked questions:
“Need a tool which can help me direct copy of DVD films I own? as per my question above I'm not sure which format to use. I will mainly watch at home or if on holiday. I would like the ability not to be restricted to media player. I have windows 10 laptop, Apple TV, saying smart TV & smartphone also Apple iPad mini. I Eventually store on external hdd, would like to back these up to cloud (currently this will be too expensive due to the space I will require) I will watch the ripped movies. Any good suggestions? Can I get my DVDs to External HDD for watching everywhere?”
Hot Search: DVD to Premiere - Rip and Import DVD to Premiere Pro CS6 | DVDs to Dropbox | 500 DVDs to Seagate Wireless Plus | Stream DVD to 4K TV
The great of a dream is the possibility of achieving it. So how can we carry our DVD movies wherever? Whether for backup, transfer, or just making space on your main hard drive, there are times when we want to move files to an external drive. These are inexpensive, and available online and at many computer and electronics stores. In this guide, we will show you the best way of backup all DVDs to External Hard Drive for Various Purposes via Windows 10? Get the best DVD Ripper to make a copy of all DVDs now, then you can view movies everywhere and everytime with original quality.
As we all know, DVDs are usually hard to be backed up due to region code and disc encryption protection, you’d better to use Pavtube DVD copying program to remove the disc protection and copy source disc to External Hard Drive/Thumb Drive with same structure preserved. (Learn why choose this Best DVD Copying and Ripping Tool).
Pavtube DVDAid for Mac
Full guide: Directly Copy of DVDs to External Hard Drive on Windows 10
Step 1. Install Pavtube DVDAid on your Windows/Mac.
Pavtube DVDAid for Windows/Mac is an excellent DVD backing up tool that can make 1:1 copy of your source DVD with original structure including extras and menus. Meanwhile, this app is regarded as a great DVD ripping program to help users convert DVD collections for new how tablets and smartphones including like iPad Pro, iPad Air 2, iPad Mini 4, and iPhone 6S/6S Plus, iPod Touch 6, Apple TV 4, Samsung Galaxy Tab S2, Kindle Fire HDX, Google Nexus 7/10 and more.
Full disc copy and Main title copy - On the hand, it can copy your DVD disc with all information with audio streams and subtitle tracks. And on the other hand, it can backup the main movie content out of DVD disc with smaller size.
Conversion acceleration - With technology of NVIDIA CUDA and AMD APP, you can accelerate conversion process by using H.264 codec.
Preview before conversion - There is a preview window on the interface of DVDAid where you can take a preview of your movie before conversion.
Support adding subtitles and output multi-track video - Pavtube DVDAid supports to add *.SRT and *.ASS subtitlesinto video with built-in editing and can output multi-track video.(Best DVD Ripper with multi-track function)
Wide range of output formats - Except for common video formats, like MP4, MOV, H.264, AVI, M4V, etc, this professional DVD Ripper supports to output M3U8 and H.265 video.
Support converting 2D to 3D - With Pavtube DVDAid, you can convert your 3D DVD movies to Side-by-Side(SBS), Top-Bottom, or Anaglyph 3D in MKV/MP4/MOV/WMV/AVI format and enjoy them on your 3D TV or Media Players.
Lifetime free update- Pavtube DVDAid provides customers lifetime free upgrade of product and technical support. Users can contact the support staff via email for help and suggestion.
Below is the picture about the review of the users:
 Containing these excellent features, would you like to try this professional DVD Ripper for External HDD?
Free download and install:
Containing these excellent features, would you like to try this professional DVD Ripper for External HDD?
Free download and install:

 Other download:
Pavtube Old Site Download: http://www.pavtube.cn/dvd_ripper/
Cnet download: http://download.cnet.com/Pavtube-DVDAid/3000-7970_4-76158510.html
STEP 1. Load DVD Films/Movies
Launch Pavtube DVDAid and click “Load Disc” button to load DVD discs; you can select the main title and set subtitles/audio language you'd like to preserve.
Other download:
Pavtube Old Site Download: http://www.pavtube.cn/dvd_ripper/
Cnet download: http://download.cnet.com/Pavtube-DVDAid/3000-7970_4-76158510.html
STEP 1. Load DVD Films/Movies
Launch Pavtube DVDAid and click “Load Disc” button to load DVD discs; you can select the main title and set subtitles/audio language you'd like to preserve.
 STEP 2. Choose an output format
a. Click quick button "Copy the entire disc" to starts copying the DVD disc to hard drive maintaining the original structure.
As soon as the copying task finished, you can click "Open" button to get the output videos. The backed up DVD movie is usually saved as a directory file structure within which there are VIDEO_TS and AUDIO_TS folder. The VIDEO_TS folder contains main movies (.vob) and lots of system files (.ifo and .bup).
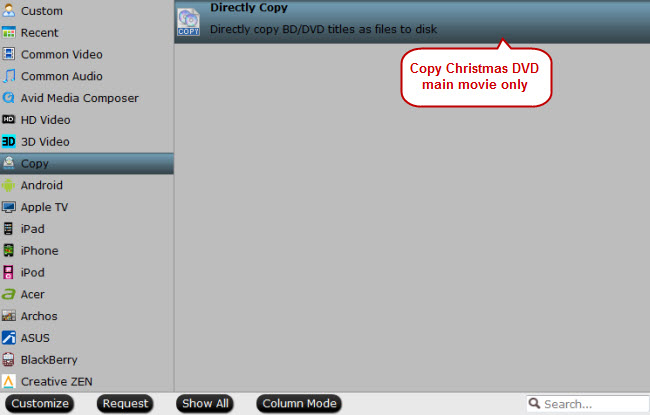
b. If you just wanna do movie only copy, you can choose "Copy" > "Directly Copy" from the Format menu to copy the . vob files only. After that, do remember clicking "Start conversion" button to do Movie-only copy. When the copying work is done, you are able to click "Open" button to get the output .vob files without any other extra contents.
STEP 2. Choose an output format
a. Click quick button "Copy the entire disc" to starts copying the DVD disc to hard drive maintaining the original structure.
As soon as the copying task finished, you can click "Open" button to get the output videos. The backed up DVD movie is usually saved as a directory file structure within which there are VIDEO_TS and AUDIO_TS folder. The VIDEO_TS folder contains main movies (.vob) and lots of system files (.ifo and .bup).
b. If you just wanna do movie only copy, you can choose "Copy" > "Directly Copy" from the Format menu to copy the . vob files only. After that, do remember clicking "Start conversion" button to do Movie-only copy. When the copying work is done, you are able to click "Open" button to get the output .vob files without any other extra contents.
 c. If you want to store hundreds of DVD's on external hard drive, then rip the DVD to .avi, .mp4, .mkv, etc format. And click Settings bar, you can adjust the level of compression to suit the quality you want.
d. While, if you wanna transfer and play DVD copy on portable devices like Galaxy Tab S2, iPad Mini 4, iPad Pro, Nexus, Galaxy S6 Edge, etc, you need to further convert the backed up DVD movies.
Note: Pavtube ByteCopy provides hundreds of video/audio format. You should select the one according to your devices. If your multimedia players supports MKV, the best choice for you must be lossless MKV which can keep multiple subtitle/audio track and all chapter markers.
Step 3. Change video specs. (Optional)
If you are not satisfied with default specs, then click "Settings" to enter Profiles Settings windows. You can customize video frame rate, bitrate, size and other settings freely. (It does not work for directly copy)
Step 4. Start conversion.
Click the big red "Convert" to start backing up or converting your DVDs. Usually backup will be quicker because it does not need to do trancoding.
After the conversion, click "Open output folder" to quick locate converted files. Connect your external hard drive to computer and transfer them into it.
Read More:
c. If you want to store hundreds of DVD's on external hard drive, then rip the DVD to .avi, .mp4, .mkv, etc format. And click Settings bar, you can adjust the level of compression to suit the quality you want.
d. While, if you wanna transfer and play DVD copy on portable devices like Galaxy Tab S2, iPad Mini 4, iPad Pro, Nexus, Galaxy S6 Edge, etc, you need to further convert the backed up DVD movies.
Note: Pavtube ByteCopy provides hundreds of video/audio format. You should select the one according to your devices. If your multimedia players supports MKV, the best choice for you must be lossless MKV which can keep multiple subtitle/audio track and all chapter markers.
Step 3. Change video specs. (Optional)
If you are not satisfied with default specs, then click "Settings" to enter Profiles Settings windows. You can customize video frame rate, bitrate, size and other settings freely. (It does not work for directly copy)
Step 4. Start conversion.
Click the big red "Convert" to start backing up or converting your DVDs. Usually backup will be quicker because it does not need to do trancoding.
After the conversion, click "Open output folder" to quick locate converted files. Connect your external hard drive to computer and transfer them into it.
Read More:
DVDs are trapped on physical platters. If you want to watch something, you have to find the disc, slide it into a DVD player—or a computer with a DVD drive—and flip your TV to the proper input. However, once you convert your DVD movie library to digital files, you can store those files on a server like Plex Media Server and stream them anytime, from anywhere. So have a bunch of DVD movies, ever attempted to copy some of your DVD to WD My Cloud EX4100 (NAS) for streaming to PC, tablet, game console via Plex? Well, this article will give you some hint how to backup DVD to WD My Cloud EX4100 for Plex Media Server streaming and playing.Hot Search: Play M2TS with Plex | Stream DVD to 4K TV | 3D Blu-ray to ATV 4 | Upload DVDs to Dropbox | In fact, you just need get some help from a DVD to Plex tool, rip the DVD to WD My Cloud EX4100/Plex supported format and then stream them to WD My Cloud EX4100, in this way you can watching them on TV from WD My Cloud EX4100 Via Plex. Here I recommend you a power ripper–Pavtube ByteCopy, it can remove the copy protection easily and rip the format of Blu-ray/DVD to WD My Cloud EX4100/Plex supported h.264 .mp4, then you can watching them on TV using WD My Cloud EX4100 from Plex smoothly. In addition, you can also rip the Blu-ray to the other format for your other portable device for watching on the go. Read review. If you are a Mac OS X El Capitan user, the Mac version is available here–Pavtube ByteCopy for Mac. Just download the tool given below and begin.Free Download Top DVD to WD My Cloud EX4100 Ripper:
 Other Download:– Pavtube old official address: http://www.pavtube.cn/bytecopy/– Cnet Download: http://download.cnet.com/Pavtube-ByteCopy/3000-7970_4-76158512.htmlRip DVD to WD My Cloud EX4100 for Streaming to TV using PlexStep 1. Load DVD movieRun DVD to WD My Cloud/Plex converter, and click “File” and “Load from disc” to import your DVD or Blu-ray movies with BD drive. Another way to import Blu-ray/DVD movie is to click the file icon on upper-left corner.
 Step 2. Choose Lossless MKV-WD My Cloud EX4100 supported formatFind the format bar below your DVD items, and click it to get to the format list where you need to follow “Multi-track Video” > “Lossless/encoded Multi-track MKV (*.mkv).” The lossless property will maintain the multiple audio tracks and subtitles.
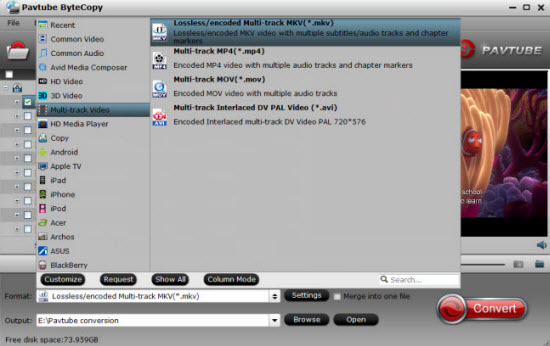 Step 3. Convert DVD to WD My Cloud EX4100.Hit the button “Convert” to start conversion from Blu-ray to WD My Cloud EX4100 for Plex Media Server.Step 4. Transfer the converted DVDmovies to WD My Cloud EX4100.Once the DVD to My Cloud EX4100 conversion is over, keep your PC and WD My Cloud EX2 in the same network surrounding, then sync the converted Blu-ray movies to WD My Cloud EX2 server.Step 5. Play DVD movies on WD My Cloud EX4100Still keepign your WD My Cloud EX4100 and Plex in the same home network. Connect your Smart TV and use the remote control to find the Plex media server, and choose the converted Blu-ray movies and the next thing you have to do is just embracing sheer enjoyment. Pavtube ByteCopy Pros for WD My Cloud EX4100/Plex users: 1. All-in-one. Do crack and convert DVD and Blu-ray.2. Lossless. Keep multiple original video, audio, subtitle streams without changing.3. Fast. Single layer DVD copied to MKV in 10 mins, BD around an hour under lossless mode; 1.5 -5 hours under compressive mode. GPU acceleration(CUDA) ready.4. Easy operation. 2 steps process for lossless BD/DVD to MKV ripping.5. Flexible. You decide which streams to keep, what codec to use, and what quality to export. Can I Play DVD/Blu-ray on PC With Multiple Audio Tracks/Subtitles? You wanna have subtitles displayed on HDTV when playing ripped Blu-ray? Choose ByteCopy also. It converts the PGS subtitles to DVD subtitle format, which is definitely acceptable by HD media players. It also lets you extract .srt subtitles for MKV file, including forced subtitles. Read More:
Want to find an easy solution to backup Blu-ray/DVD to MKV with subtitle for NAS Streaming? Sometimes it is not so convenient to play blu-ray with hardware blu-ray player, so many users like to backup Blu-ray/DVD to MKV with subtitle and then transfer to NAS devices for playback, these NAS devices are popular, include the Lenovo IX2, WD My Cloud EX4 Diskless, WD My Cloud 4TB, Synology DiskStation, Thecus NAS, WD My Cloud EX2, Drobo 5N, Synology America DiskStation, BUFFALO LinkStation Pro Duo, NETGEAR ReadyNAS 104, etc. But how to do it? Hold on reading...
Hot Search: Blu-ray to iTunes | Encode Blu-ray to MPEG | Upload DVDs to Dropbox | Sync Blu-ray to iTunes with forced subtitles| Subtitle adding and Tips To copy dozens of Blu-ray and DVD movies to NAS device, you need to convert Blu-ray and DVD library to NAS MKV format with subtitles for media player like PS3. In this case, powerful third-party software for backup Blu-ray/DVD to Synology NAS is what you need. To achieve this goal, Pavtube ByteCopy is perfect for you. Ease of use and Very Intuitive UI and a large variety of encoding options. It can not only backup Blu-ray/DVD to MKV format in multi-track, but also convert BD/DVD to any video format you like. This software is designed to backup Blu-ray/DVD or other video sources to MKV or any other formats with all information including subtitles, chapters, audio tracks and movie languages included. You can backup your Blu-ray/DVD to MKV with subtitle preserved and store them on NAS devices for free playback on different devices. For Mac users, you can turn to Pavtube ByteCopy for Mac on Mac OS X El Capitan. Firstly, this Blu-ray to MKV app can copy Blu-ray to MKV with chapter markers in 1:1 high video quality. And with NVIDIA CUDA
technology (only for Windows version and in H.264 codec) and continuously upgrade, it can rip the latest Blu-ray to lossless MKV in 5.1/7.1 audio with ultra fast speed. ByteCopy Mac Version
also supports to output lossless MKV with chapter markers.Secondly, it offers Blu-ray Full Fisc Copy with original structure including chapter markers and Directly Copy with intact Blu-ray main movies. Thirdly, not just lossless MKV, this Blu-ray to MKV app can virtually backup Blu-ray to any other formats, like H.265,M3U8, H.264 MP4, MOV, AVI, etc. Fourthly, with the built-in video editing tool, you can trim video footage, crop black area, add SRT/ASS subtitles into video. What’s more, it enables you to extract FLAC/WAV audio from Blu-ray audio disc and extract SRT subtitle from Blu-ray movies. Pavtube ByteCopy Pros:1. All-in-one. Do crack and convert DVD and Blu-ray.2. Lossless. Keep multiple original video, audio, subtitle streams without changing.3. Fast. Single layer DVD copied to MKV in 10 mins, BD around an hour under lossless mode; 1.5 -5 hours under compressive mode. GPU acceleration(CUDA) ready.4. Easy operation. 2 steps process for lossless BD/DVD to MKV ripping.5. Flexible. You decide which streams to keep, what codec to use, and what quality to export.How to backup Blu-ray/DVD to MKV with subtitle for NAS Streaming Free Download and trail: Other Download:- Pavtube old official address: http://www.pavtube.cn/bytecopy/- Cnet Download: http://download.cnet.com/Pavtube-ByteCopy/3000-7970_4-76158512.htmlStep 1: Load Blu-ray/DVD moviesInstall and launch Blu-ray/DVD to MKV/MP4 Converter, and then click the disc icon to import your source movies to this program. Set your wanted subtitles and audio track from the drop-down box of “Subtitles” and “Audio” tab.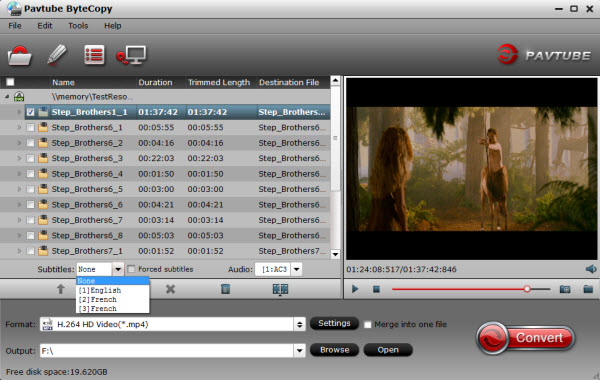 Step 2: Select an output formatTo convert Blu-ray/DVD to MP4, MKV for NAS storing and streaming, just click on the dropdown menu of “Format”, and then choose MKV, H.264 MP4 from Common Video profile list. If you want to keep 1080p resolution as source movie, you can choose HD Video > H.264 HD Video(*.mp4) or MKV HD Video(*.mkv) as output format.
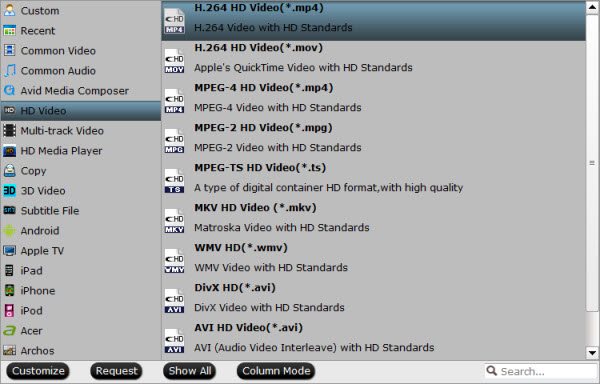 Tip: If you like, you can click “Settings” to change the video encoder, resolution, frame rate, etc. as you wish. Keep in mind the file size and video quality is based more on bitrate than resolution which means bitrate higher results in big file size, and lower visible quality loss, and vice versa. Step 3. Add External Subtitles (srt/ass/ssa) If you want to trim, crop, edit audio/subtitles of the source video, just click the pencil-like icon on the top to enter video editor.Click "Edit" button on the interface to find "Subtitle" option, check "Enable" then go to "Browse" to find your download subtitles in srt format. Click "OK" button to load the subtitles. Please note that subtitle in SRT/ASS/SSA format can be supported.
  Step 4. Rip BD/DVD movies to NASClick the convert button under the preview window, and the Blu-ray/DVD ripper will start the conversion from Blu-ray/DVD movies to MKV/MP4 for NAS and media player.After the conversion, you can hit “Open” to quick locate the converted video; now you can stream converted Blu-ray/DVD files through NAS to HDTV, Android tablet, DLNA device or other HD media player for wide sharing.Read More:
QuickTime MOV movies are often found on the Internet or produced by some digital cameras and can be viewed in QuickTime player. Sometimes you may want to convert QuickTime to USB sticks so that you can watch QuickTime movies on your big screen TV. Do you have some amazing MOV (QuickTime) files but can't play them on the TV after trying all the efforts? Actually, there is a smarter way to get rid of the incompatibility issues quickly. - Copying .mov files to USB drive is a convenient way to back up your MOV files or bring them with you while away from home or when you don’t have access to your personal computer. This guide use the top professional MOV to USB converter software to create a computer file copy of your mov files and then transfer this file to a USB flash drive. You can then enjoy movies and TV shows anywhere you have access to a computer.
Hot Search: Sony TV Supported formats | TOP 10 4K Ultra HD TVs | Best Smart TV Brand Reviews | 1080p Camera Video on 4K Smart TV |However, you may find that TV doesn't support MOV files via USB Sticks. Since Most TVs best video format is H.264 codec MP4 format. If you have a collection of movies encoded with .MOV format, it should be converted to HDTV/4KTV more regular file format like MP4. To view MOV files on Television via USB, you'd better convert .mov to .mp4 for USB. In order to perform this conversion task, you'll need the Pavtube Video Converter Ultimate to help with MOV to MP4 conversion with just few clicks. Pavtube's software gives users the incredible way to video conversion. Here is review. This is an easy-to-use yet powerful tool to convert MOV video to DVD with wonderful output quality and fast burning speed. Besides MOV, it can also convert other popular video formats like AVI, MP4, WMV, MKV, MPEG, FLV, 3GP, ASF, etc. to your TV. No technical knowledge is required! Now just download the right version of the top rate MOV to MP4 converter software and follow the guide to transform MOV files from to suitable formats without any hassles. The guide given below is highly descriptive and easy to follow. It will help you perform the entire process of conversion in the easiest way. Download MOV to USB converter: Other Download:- Pavtube old official address: http://www.pavtube.cn/blu-ray-video-converter-ultimate/- Cnet Download: http://download.cnet.com/Pavtube-Video-Converter-Ultimate/3000-2194_4-75938564.html How to Transfer .mov to USB mp4 for TVs - Get MOV to USB MP4 for Television ConverterStep 1. Add QuickTime Movie (.mov)Install and run MOV to TV Video Converter on your computer. Add QuickTime Movie to TV Video Converter by clicking “Add Videos”. You can directly drag and drop the videos to the converter. This TV Video Converter supports batch conversion, so you can add several files at one time. 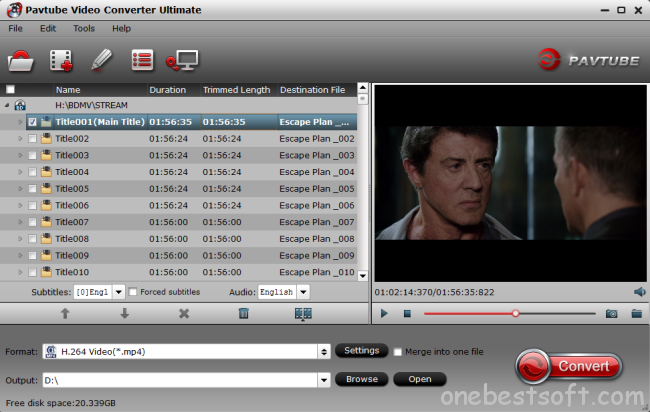 Step 2. Set output video format as H.264 MP4 under Format > Common Video. In general, mp4 is a well-accepted file format for its ability to save memory storage and keep up the video quality. Or, you can click the drop-down button on the right side of the “Format” to select suitable formats from “TVs” Category.
 Note: Tip: Before start the MOV conversion for Television, you can click the Settings icon and adjust the video bitrate, codec, frame rate, audio sample rate, etc parameters. Note: For playing 1080P QuickTime Movie on your TV, you need to click “Settings” to adjust video/audio codec name, video resolution and audio channel in the following window. Step 4. Hit the Convert button; this video converter will start to convert .mov to mp4 for playback on HDTV through USB drive in no time.After the conversion is over, connect the USB drive with computer and head to the destination folder where the converted files are stored, transfer the files to the USB drive then plug the drive in the TV. Enjoy.This Ultra HD MOV to USB Video Converter works with popular Ultra HDTVs as below:Samsung: UN65HU8550F, UN55HU8550F, UN65HU9000F, UN55HU9000F, UN85S9VF, UN65F9000AF, UN55F900AF, UN85S9AFXZA;Sony: XBR-55X900A, XBR-65X850A, XBR-65X950B, XBR-49X850B, XBR-65X850B, XBR-65X900A, XBR-55X850A, XBR-79X900B, XBR-70X850B, XBR-65X900B, XBR-55X850B, XBR-55X900B, XBR-85X950B, VPL-VW600ES, VPL-VW1100ES;LG: 84LM9600, 65LA9650, 65LA9700, 55LA9650, 55LA9700, 84LA9800, UB8500, UB9500, UB9800;Toshiba: 58L9300U, 65L9300U, 84L9300U;Hisense: 50XT880G3DU, 58XT880G3DU, 65XT880G3DU, 65XT900, 84XT900, 110XT900;Seiki: SE39UY04, SE50UY04, SE65UY04;Others: Panasonic TC-L65WT600, Sharp LC-70UD1U, TCL LE50UHDE5691, Philips 84PFL9708, VIZIO XVT701d, etc.Read More:
When you travel or just have time to kill, everybody pulls out a smartphone or tablet to surf the Web, watch a video, or listen to some tunes. But what if you have a huge digital library of movies and music? Those phones and iPads only come with so much space, which easily gets filled up when you download apps and take a lot of photos or videos. This is where the Seagate® Wireless Plus device comes in. If you have a Seagate Wireless Plus 1TB/2TB device, you probably would like to add your MKV,AVI,WMV,FLV,M2TS videos to store in Seagate Wireless Plus 1TB/2TB to allow you to view via streamers like PS4, WD TV, etc. Here is how to. Hot search: Blu-ray to Seagate Central 3TB | | Blu-ray/DVD on Windows Home Server | Blu-ray/DVD to Seagate Wireless Plus | DVD to PlexYou can put many kinds of purchased movies to Seagate Wireless Plus in various formats, but your portable devices maybe can’t play all kinds of videos like iPad, iPhone, Android Smart Phone, tablet, etc. For example, your Android phones and tablet can’t play the movies ripped from purchased Blu-ray/DVD discs for copy protection. Or too high-resolution file maybe cause a choppy viewing experience or fail to play on your iPad for the too much bandwidth desire. For resolving these issues, you maybe should use a software on your computer to change the file format/codec to one that is supported by general portable devices or modify the file to a lower quality to prevent playability issues. Here, for Mac and Windows users, I recommend Pavtube Video Converter Ultimate and Pavtube iMedia Converter for Mac. Store Purchased HD/Blu-ray/DVD movies to Seagate Wireless Plus 1TB/2TB for EnjoymentPavtube Video Converter Ultimate is the best video transcoding solution for Windows users to rip and backup Blu-ray/DVD movies, transcode H.265/HEVC, TiVo, MXF, MOV, M4V, and other HD videos to regular H.264 MP4, AVI, MKV, etc and to devices, like iPad, iPhone, Android phones, Windows phones, game consoles, HD media players, and more. Here is review. This Ultimate Converter can help you to remove Blu-ray/DVD region lock as well as batch convert HD/SD videos in multiple format like FLV, AVI, WMV, MKV, MOV, VOB, MTS, M2TS, TOD, etc to playback on your LG WebOs HDTV easily without any restriction. Free download and install Other Download:- Pavtube old official address: http://www.pavtube.cn/blu-ray-video-converter-ultimate/- Cnet Download: http://download.cnet.com/Pavtube-Video-Converter-Ultimate/3000-2194_4-75938564.htmlStep 1: Load HD Video files to the program. Start the program on your computer and click”Add Video/Audio” from”File”drop-down list to add the files you desire to convert to the application. Step 2: Choose output file format.From the”Format” drop-down option, you can select a format that’s widely support by many portable devices such as”H.264 Video(*MP4)” format as the output profile.
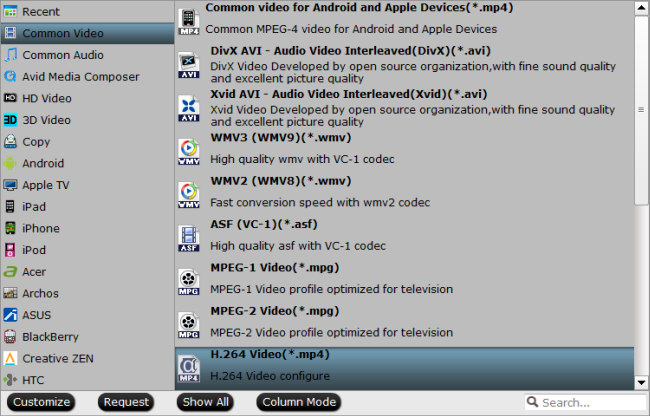 Step 3: Adjust output profile parameters.For smaller size and better playback your purchased movies via Seagate Wireless Plus, you can adjust the output video parameters. Remember, lower bitrate leads to lower storage space.
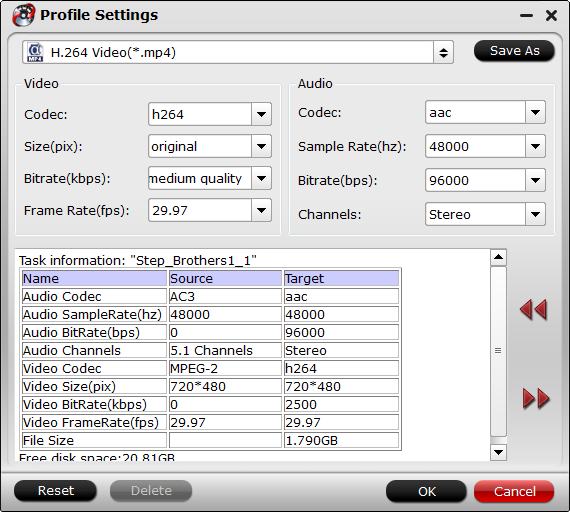 Step 4: Transcode movies for Seagate Hit the right-bottom”Convert”button to start transcode video on Windows for storing movies to Seagate Wireless Plus 1TB/2TB. And after the process, open output folder, you can find your created movies. Move Your Digital Movies On to Seagate Wireless Plus 1TB/2TBIt’s easy to take your media wherever you go. When you buy digital downloads, just load them up on the Wireless Plus device. Once the movies are on your mobile device or computer, then it’s simple to load them up onto the Wireless Plus device:
- Connect to the Wireless Plus network from the device where you’ve downloaded your movies.
- From the Wireless Plus main screen, navigate to one of the media views: Videos, Photos, Music, Documents.
- Click the Upload button on the top menu.
- Enter the file name or click Browse and then locate the file you want to copy to your Wireless Plus device.
- Click Upload. The file will be added to the category you selected.
Now you can take more than 300 Blu-ray/DVD movies with you and watch them wherever you go, no wires necessary. You can start downloading data for all your travels, whether to work at a cafe or to see the world. Read More:
The Hottest Pitch Perfect 2 Blu-ray ReviewThe Barden Bellas are back to pitch slap the world in Pitch Perfect 2, the follow-up to the original runaway global hit about a group of lovable misfits with only one thing in common: the irresistible way they sound when they’re seamlessly mixed together, mashed-up and arranged like never before. With just one chance left at redeeming their legacy, the Bellas must fight for their right to win the World Championships of A Cappella in Copenhagen. And as they struggle to balance the pressures of musical domination with senior angst, it will take the power of sisterhood to find their voice and see what it takes to be the world’s top pitches. Universal Pictures Home Entertainment has announced the official details for the U.S. Blu-ray release of the hit summer comedy Pitch Perfect 2, which is set for release on September 22nd. After you read a lot of Pitch Perfect 2 Blu-ray Review, you may want to order a Pitch Perfect 2 Blu-ray form Amazon at once. But, have you ever thinking about copy Blu-ray to Seagate Portable Hard Drive and Play Blu-rays on Seagate Portable Hard Drive? Yes, you have but don't know how to? This article will guide you How to Rip and Backup Pitch Perfect 2 Blu-ray to Seagate Wireless Portable Hard Drive and Stream Blu-ray Videos at anywhere. Hot Search: Blu-ray to WD MyCloud | Blu-ray on Laptop | Blu-ray to MKV for Seagate | Blu-ray to USB Type-C As you know, Seagate Portable Hard Drive can support a wide range of videos; however, due to the reason of lacking DVD, BD drive, Seagate Portable Hard Drive can not meet the demands of putting Blu-ray discs onto it directly.To achieve this goal, an easy-to-use Blu-ray Converter is the key. <review> The recommended Pavtube BDMagic is capable of ripping Blu-ray (or DVD) to almost all video formats, such as AVI, MP4, MPEG, WMV, MOV, FLV for storing on Seagate Portable Hard Drive. What’s more, it provides various optimal presets for playback on iPhone, iPad, iPod, Apple TV, iTunes, Samsung, Chromecast, etc. For Mac users, please turn to Pavtube BDMagic for Mac, which enables you to convert Blu-ray to Seagate on Mac OS X (including El Capitan).How to Copy Pitch Perfect 2 Blu-ray Blu-ray to Seagate Portable Hard Drive for Convenient AccessThis quick start guide takes Blu-ray Ripper Windows version (Including Windows 10) screenshots as an example. The method to convert Blu-ray movies to Seagate Portable Hard Drive on Mac is the same. All that you should take care is to download the right version according to your situation.Download Blu-ray Ripper for Seagate: Other Download:- Pavtube old official address: http://www.pavtube.cn/blu-ray-ripper/- Cnet Download: http://download.cnet.com/Pavtube-BDMagic/3000-7970_4-75922877.html1. Load Pitch Perfect 2 Blu-ray movieLaunch the Blu-ray ripping software on PC and click “File” > “Load from disc” to load Pitch Perfect 2 Blu-ray movie with BD drive. 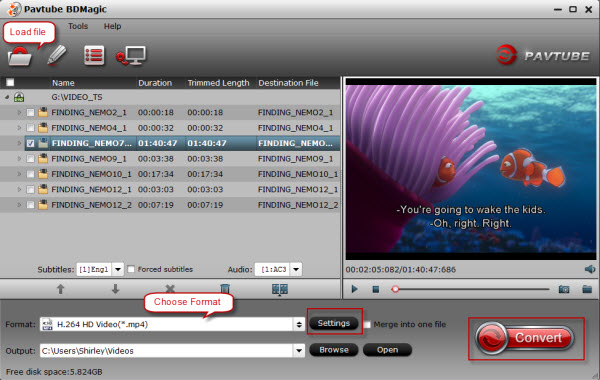 Step 2. Choose output formatSince almost of all the media devices like iPad, laptops, smart TV, game consoles, Apple TV, smartphones and tablets that Seagate Portable Hard Drive can be used with can support MP4 video files. So you can target MP4 as output format from "Common Video".
  Tip: Simply click Settings bar and you can tweak the settings like video bitrate, frame rate, audio sample rate, etc to your satisfaction and even save it as preset.Step 3. Start Pitch Perfect 2 Blu-ray movie conversionHit the "Convert" button to start ripping Pitch Perfect 2 Blu-ray movies to MP4 format for free access by Seagate Portable Hard Drive supported multimedia devices.After the conversion, click Open button to locate the output videos. Afterwards, you can copy and upload the converted Pitch Perfect 2 Blu-ray to your Seagate for easier access on iPads, Wi-Fi enabled smartphones and tablets, iPads, laptops, etc. Enjoy.Tips:1.You can also get other output formats like MKV, AVI, FLV, WMV, and more according to your purposes. 2.If you want to convert Pitch Perfect 2 Blu-ray/DVD to 3D videos or transcode Blu-ray/DVD to MP4 with multiple audio and subtitle tracks, try Pavtube ByteCopy.3. Free apps are available across Android, iOS, and Kindle for download, and after downloading the app, users can view available wireless networks and select the Seagate Wireless. And content can be played in many different ways, via the Media app on iOS, Android, or Kindle Fire, via any browser, via Apple Airplay or to any DLNA devices via minidlna, which is built into the OS.
 To play your converted files on your mobile devices, your just need to tap the movie file and play it. Now you have successfully carry your entire Blu-ray media library with you with the Seagate Wireless Plus Portable Hard Drive. Just enjoy while traveling with your family! 4. Once the Blu-ray movies are ripped on your computer, then it's simple to load them up onto the Wireless Plus device:1. Connect to the Wireless Plus network from the device where you've downloaded your movies.2. From the Wireless Plus main screen, navigate to one of the media views: Videos, Photos, Music, Documents.3. Click the Upload button on the top menu.4. Enter the file name or click Browse and then locate the file you want to copy to your Wireless Plus device.5. Click Upload. The file will be added to the category you selected.Now you can take more than 300 Blu-ray movies (include Pitch Perfect 2) with you and watch them wherever you go, no wires necessary. You can start downloading data for all your travels, whether to work at a cafe or to see the world. Read More: