Showing posts with label Backup. Show all posts

Monday, August 22, 2016

DVD Copying, Ripping, Burning and Cloning: What's the Difference?

2016 has witnessed a lot of amazing software worth our attention. Today, we have compiled the DVD Copying, ripping, burning or cloning, what is the difference? And Top best DVD ripper for Windows 10 or Mac OS Sierra owners in 2016-2017 that will surely maximize the use of your DVD collections. 

The multiple terms used to describe the common task of copying or extracting data from a DVD may seem confusing. This is because the terminology surrounding the making of a DVD copy may appear at first glance to be interchangeable. Copying, ripping, burning or cloning what is the difference? Actually, each of these terms has a nuanced meaning unique to a specific set of actions. 

DVD copy software allows the copying of an unencrypted DVD. Copying a DVD is often a two-step process, unless you have a DVD burner. First, the data is moved onto a hard disk from the DVD, and then it is recorded onto a blank or rewriteable DVD. Read >> DVD Ripping VS DVD Copying

Cloning a DVD refers to the process of duplicating content that resides on a hard disk and transferring that to another hard disk. In either case, making a DVD copy from an encrypted DVD requires bypassing the security restraints that the manufacturer may have placed on it. 

Ripping a DVD refers to extracting content from a media-storage device that can be detached from a computer. This could be a CD, DVD or a USB drive. When someone rips a DVD, the resulting copy of the content will consist of unformatted files. Also referred to as digital audio extraction, the ripped DVD will first have to be reformatted in order for it to be viewable on a computer or other media. 

Many DVD copy software solutions also have decryption capabilities, since a decrypted disc's data cannot be duplicated without first decrypting it. Making a DVD copy may be necessary in order to protect an investment in archived content. This may include everything from recordings of family events to your favorite movies. A DVD ripper software application usually re-encodes the data so that a computer's filing system may access and use it. 

Hot Search: DVD Movie to Memory Card | DVD to Hard Drive | DVD to Flash Card |Rip DVD to Probox2 Android box | 

The act of making a DVD copy is burning a DVD. The term DVD is an acronym that stands for Digital Video Disc. The making of a DVD copy requires laser technology. The intense beams of light emitted by some lasers are powerful enough to burn holes in objects and can even damage a person's eyesight. Lasers produce heat through focused light. Burning a DVD simply means recording content on it with a laser beam. A burned DVD copy will have a unique spiral track embedded, or burned, onto the DVD. When a DVD is burned, the heat produced by a laser optically records data on the DVD copy through this laser beam. This beam changes the material nature of a dye used to specially coat the disc. 

“About Burning a DVD - Pavtube DVD Creator features: It lets you burn any kind of video sources to playable DVD. With its simple wizard-style user interface and powerful editing features, DVD authoring and burning can’t be easier. Almost any kind of fair videos (MKV, AVI, MP4, WMV, MOV, MTS, TiVo, etc) can be imported and converted to DVD video. Photos can be made into slide show DVD simply with a few clicks. In addition, the Quick Burn feature enables users to burn archived ISO image and DVD-Video structure instantly.Just follow the step guide. ” 

On a read-only DVD, the dye most commonly used is cyanine. You can tell a read-only DVD by the color of the surface of the disc. It will have a blue or greenish hue. The laser causes less light to penetrate through the coating, and this causes a pit-like effect. A DVD's tracks are much less likely to suffer scratches than a vinyl disc, which are made of softer plastic than a DVD. In a read/write disc, the dye often used is Phthalocyanine, which appears to have a golden hue on the disc's surface. In this type of disc, the laser causes this dye to expand, which changes the diffusion of light, also causing a pit-like effect. DVD copy technology continues to improve, since media stored on deteriorating DVDs and CDs may represent a significant lost of content to a collector. 

Other Similar Search: 

Whether you are copying, ripping, burning or cloning, remember that decrypting security-protected DVDs often opens the door to the possibility of copyright infringement. U.S. copyright fair-use provisions provide protection from prosecution if a consumer makes only one backup of a DVD copy of premium content encrypted by a manufacturer. In many countries, including the U.S., it is a crime to sell or freely distribute copies of commercially sold DVDs. 

Source:http://www.toptenreviews.com/software/articles/dvd-copying-ripping-burning-and-cloning-whats-the-difference/ 

Best DVD Copier and Ripper Recommended for DVD Collector 

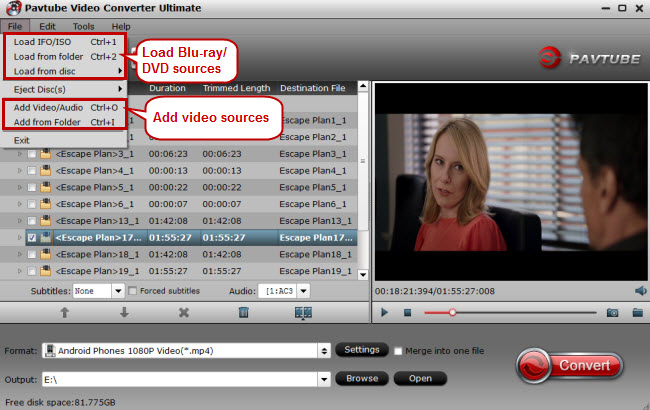
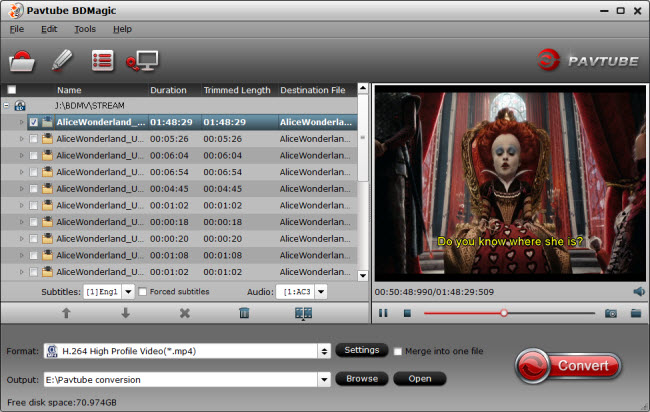
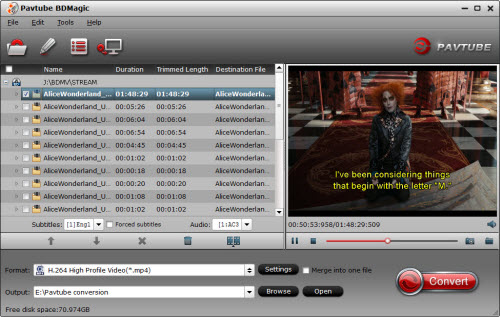
Pavtube BDMagic is a commercial DVD copy and ripping software. It can circumvent copy protection mechanisms, such as the encryption used on most commercial DVDs and shift format. Learn the key features of the best DVD copy and ripping software: 

  • Break various DVD encryption including Region, RCE, CSS, CPRM, UOP, AACS, etc.
  • 1:1 backup DVD in original video structure and video quality.
  • Directly copy DVD main title to VOB file.
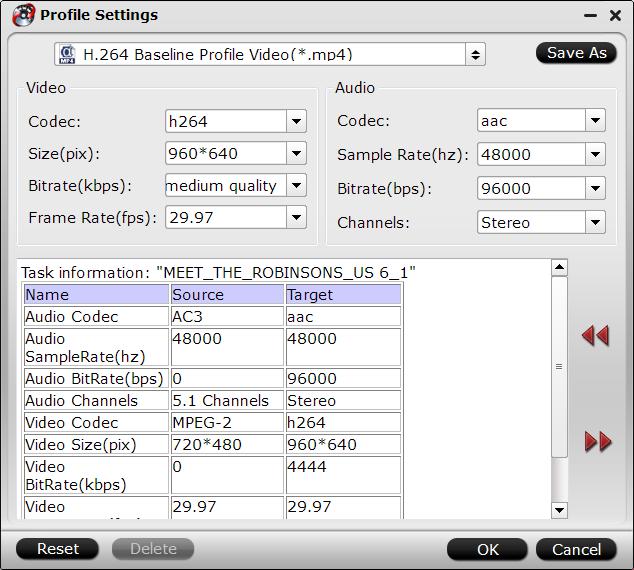
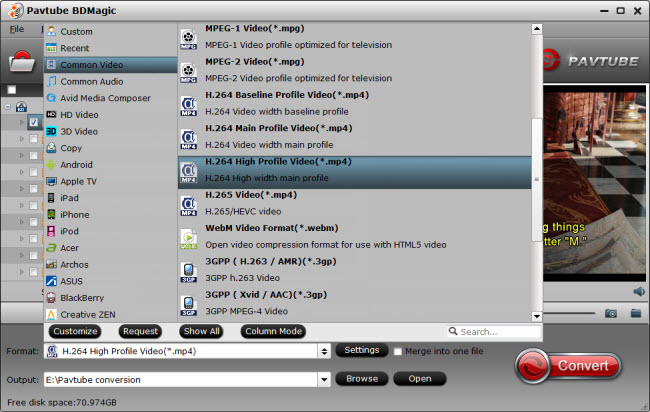
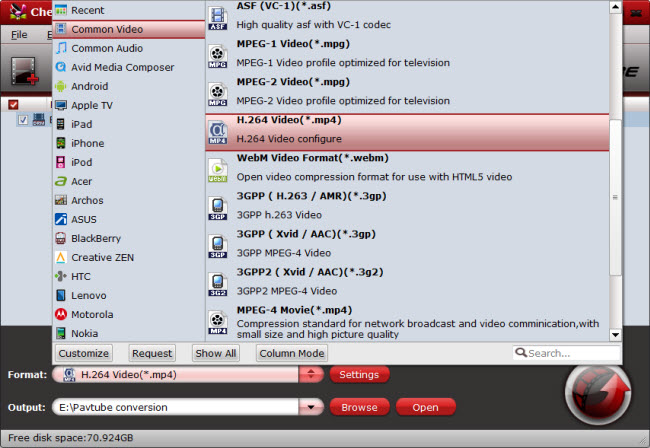
  • Convert DVD disc, DVD ISO/IFO, DVD Folder to H.265, M3u8, mp4, mov, m4v, avi, mkv, flv, etc.
  • Rip DVD to optimized preset for popular devices, like iPhone 6S, Surface Pro 4, PS4, Galaxy Note 5, iPad Pro, etc.
  • Trim and crop DVD videos so that you can upload the clips to YouTube, Vimeo and other sharing sites.
  • Split a whole DVD video to several segments and merge selected movie titles into one file.
  • Select desired subtitles stream and audio track or copy and rip DVD with forced subtitle.
  • Set display aspect ratio as well as output ratio and output mode
  • Add text watermark to selected DVD video clip. You can either set parameters or drag the text on preview screen to set its location.
  • You can add special effects like Simple Gauss Blur, Flip Color, Invert, Aged Film to your source DVD video.
  • In Color Control section, you can correct color by by adjusting brightness, contrast, and saturation.
  • Deinterlacing function makes your source video keep good image quality.
  • Either replace/remove original audio, or set audio fade in/out effects.
  • Add SRT/ASS/SSA subtitles to your original DVD videos
  • Adjust video/audio resolution, bitrate, frame rate, sample rate, codec, channel before copy and rip DVD.
Free download and install Windows Version: 


Free download and install Mac version: 


Read More: 

Friday, July 29, 2016

Copy DVD Movie to Memory Card for Viewing

If you are a teacher you may often need to copy some DVD movies or video data play in the classroom for students to watch. Holding a laptop and a lot of DVDs disc run in the different classroom is a how hard a thing. When you show students a movie or a video data need to constantly move forward back is how troublesome thing. But if you use a DVD to Memory Card ripper software to rip copy the DVD movies to Memory card to play for students is much more easy. 


About Memory Card 

SD card memory card, which is used in mobile phones, digital cameras, laptops, MP3 and other digital products of independent storage medium, generally is the shape of the card, so collectively referred to as "memory", also known as the "digital memory card", "digital memory card", "memory CARDS", etc. Memory card has the advantages of small size, easy to carry and use simple. At the same time, because most of the memory card has good compatibility, easy to exchange data between different digital products. In recent years, with the continuous development of digital products, memory storage capacity is continuously improved, the application and spread quickly. 

Steps for How to Rip DVD to Memory Card with Best Video Formats 

First of all, you'd accept the truth that Memory Card can't support DVD files. To get DVDs onto Memory Card, you'll need a third-party DVD ripping software to get the content off the DVD disc as a protection-free and easily readable element for Memory Card. There're kinds of different DVD ripping software out there (some free, some not) with a variety of different options. It seems a bit overwhelming. Here we highly recommend Pavtube BDMagic, which can help us finish DVD conversion bypassing DVD copy protection. 

With it, you can convert DVD to MP4, AVI, MKV for Memory Card streaming with no quality loss; it also enables you to copy DVD main movies for backup onto Memory Card in .vob format. And what we've learned is that MP4 would be one best target format for it is fully compatible with nearly all media devices including Samsung TViPadiPhonePlexApple TV, etc. If you are running on Mac OS X, turn to Pavtube BDMagic for Mac

Free Download Top DVD to Memory Card Ripper: 


Other Download: 

- Pavtube old official address: http://www.pavtube.cn/blu-ray-ripper/ 
- Cnet Download: http://download.cnet.com/Pavtube-BDMagic/3000-7970_4-75922877.html 

1. Import DVD movies 

Insert your DVD disc to the drive, then launch the DVD ripping software and click the "Load file(s)" button to have the DVD content imported. You can also add VIDEO_TS folder, DVD ISO files are the source files for converting. 


2. Decide output format 

Click Format bar and choose your desired format. To store hundreds of DVD's on Memory Card, you can rip DVD to .mp4, or .avi, .mkv, etc compressed format. And MP4 is the best output format for Memory Card we recommend. 


3. Advanced Settings: 

With the right settings you can retain the quality of the original DVD while also saving space. Simply click Settings bar and you can tweak the settings to your satisfaction and even save it as preset. 

4. Start DVD to Memory Card conversion 

Hit the "Start conversion" button at the bottom of the main interface to start the conversion. It will automatically rip DVD to Memory Card compatible video files. Once the conversion is finished, click "Open" to quickly find the converted movies for moving to Memory Card with simple copy-and-paste. Then just enjoy the high quality DVD movies on your media players from Memory Card. 

Note: Much wonderful software bundled with BDMagic will provide you more amazing experience in converting videos. Go to Money Saving Software Bundles to get special offer for more software, such as BDMagic($49) + DVD Creator($35) = Only $49.9, Save $28.1, BDMagic($49) + ChewTune($29)= Only $49.9, Save $28.1 and so on. 

Read More: 

Monday, July 11, 2016

Convert MP4 to Samsung SDD 850 Evo for Sharing

The Samsung SSD 850 Evo delivers great performance with useful features, at an affordable price. The drive is available with up to 2TB of storage space. After you got the Samsung SSD 850 Evo and have stored a lots of downloaded MP4 files in your computer or server, ever thought of streaming those MP4 files via DLNA to iOS, WD TV, PS3/PS4, etc. But you will find it is a painful try for just converting MP4 to Samsung SSD 850 Evo directly for playing on most media streamers. Have the similar trouble? Don't worry. This article aims to give you an easy way to fix the issue. 

Hot Search: Blu-ray/DVD to NetGear ReadyNAS | Blu-ray/DVD to Micca Media Player | DVD Movies to Dropbox | Play MKV Movies on Kodi 15 | iTunes Movies onto NAS 

Samsung SSD 850 Evo has some limits to play MP4 files via NAS on different platforms. Besides, the codec limitation will prevent you from uploading MP4 to NAS successfully. In fact, to stream MP4 files from Samsung SDD 850 Evo to HDTV, Xbox OnePS4VLC, or other media players is not hard work. If the NAS does DLNA, you can try a DLNA/UPNP client. There are several apps out there but none of them do a particularly good job on HD MP4s. What you can do is to convert MP4 to a compatible format and then you can share it off the Samsung SDD 850 Evo effortlessly. 

To manage your MP4 files on kinds of NAS compatible devices, you'd better convert MP4 to correct format before storing on Samsung SDD 850 Evo. Pavtube Video Converter Ultimate is a highly recommended tool to help you finish the task. It is a great MP4 converter that supports transcoding MP4 to MKV, FLV, MPG, WMV and more. Meanwhile, it also comes with useful editing functions, like video joining, video trimming, splitting, cropping, etc. Now just download the program to learn how to convert MP4 to store on Samsung SDD 850 Evo for DLNA streaming. Here is review

Free Download Top MP4 to Samsung SDD 850 Evo Converter: 


Other Download: 

- Pavtube old official address: http://www.pavtube.cn/blu-ray-video-converter-ultimate/ 
- Cnet Download: http://download.cnet.com/Pavtube-Video-Converter-Ultimate/3000-2194_4-75938564.html 

Streaming MP4 Movies to Samsung SDD 850 Evo for Share 

Step 1. Run the program 

Just drag and drop your MP4 files from the computer to the pane of this app, or click the "Add Files..." option at the top left corner of this app's pane to choose and import the files you want to convert. It supports batch conversion and joining multiple video clips into one file. 


Step 2: Set output format as MP4 

From "Format" drop-down option, choose output formats as "HD Video" > "H.264 HD Video(*.mp4)" if you want to enjoy a HD video quality. 


Tips: On the main interface, check the movie titles you want to rip, from the drop-down list of subtitles, select one of your desired language as your subtitles, if you check "Forced subtitles" option, you will see subtitles only when actors are speaking a language that are different from the subtitles that your specified before. 

Step 3: Customize output video quality 

Click "Settings" on the main interface to pop out "Profile Settings" window, adjust the codec, size, bitrate to fit with your devices. 


Step 4: Start to convert 

Clicking the “Convert” button on main interface to convert MP4 to Samsung SDD 850 Evo supported format. When the conversion is completed, feel free to transfer MP4 to Samsung SDD 850 Evo in suitable MP4 and play them on your multimedia players. 

Mac user can use Pavtube iMedia Converter for Mac to convert your MP4 to Samsung SDD 850 Evo in MP4 format. And now, this program has updated to support the newest Mac OS X El Capitan. Moreover, now you can get the app at a big discount in Pavtube Summer Holiday Coupon

Read More: 

Sunday, June 26, 2016

Backup DVDs to Seagate Central 3TB/4TB/2TB Personal Cloud Storage

Backup and Store DVDs to Seagate Central for streaming to Game Consoles, Media players, Smart TVs, Portable devices is a good idea for movie fans who has a lot of DVD discs and you want to be able to watch to them from any computer or device around your home without any limitation. It has many advantages, for example, it frees you from the troubles of disc loss or damage, and the space of physical hard disk, and lets you upload a personal DVD movies to the Youtube, VLC, Windows Media Player, streaming DVD contents to Chromecast 2, TV, Roku player, PS4, PS4, WDTV and so on, so you can share it with your family members or access your movies at home or on the road.

However, the Seagate Central has the ability to stream most major file types, including MP4, M4V, MKV, AVI, WMV, OGG, MP3, M4A, WMA, AIFF, WAV, and FLAC. However, playback support is ultimately dictated by the playback device, meanwhile, considering DVD copy protection, you may need rip DVDs to any playable digital formats and then backup the ripped DVD movies to Seagate Central Personal Cloud Storage.

Hot Search: 500 DVDs to Seagate Wireless Plus | HD Movies to Seagate Wireless Plus | Upload DVDs to Dropbox | Blu-ray on Raspberry Pi 2 rasplex | DVD to 3TB AirPort Time Capsule Wireless Hard Drive

This is easier than it sounds – essentially you copy all your DVD movies to Seagate Central 3TB Personal Cloud Storage that can stream the DVD movie files to your game consoles, media players, Smart TVs, and portable devices. Here, we can offer you a Best DVD to Seagate Central Ripper - Pavtube BDMagic /Pavtube BDMagic for Mac .

* No.1 fast Blu-ray/DVD conversion software in the market which decrypts almost all copy-protected Blu-ray/DVDs.

* It could backup Blu-ray/DVD to Seagate Central 2TB/3TB/4TB Personal Cloud Storage compatible H.264 video, MPEG-4, and Motion-JPEG for video, and AAC, MP3, Audible (formats 2, 3, 4), Apple Lossless, AIFF, and WAV for audio with excellent output video quality.

* Besides converting Blu-ray/DVD files, it can also compress a DVD to smaller file size, saving the space for your console if you need.

* The professional DVD Ripper not only can select subtitle, trim videos and reset video parameters for better DVD viewing on any multimedia devices, but also offer you 6X time DVD ripping speed by NVIDIA CUDA technology.

* Supported OS: Windows 10, Windows 8.1, Windows 8, Windows 7, XP, etc.

* If you need to stream DVD to Samsung devices, simply click the “Profile” column and choose Samsung compatible formats from “Samsung”;

* If you need to stream DVD to PS4, PS3, PSP, Xbox One/360, Wii, etc., simply click the “Profile” column and choose compatible format from their special format, which will remove all the incompatibility issue;

* If you desire to stream the ripped DVD to Apple TV, iPad, iPhone, Android, Surface and any of other multimedia devices, you can also choose directly from the “Apple”, “Common Video”, “HD Video”, etc. profile listed in the “Profile” Category that envelops 150+ profiles, there are HD MP4, HD MOV, HD AVI, HD MKV, HD WMV, HD MPG, TS, WebM, DV, AVI, Divx, Xvid, FLV, SWF, F4V, M4V, etc. available for your choice.

Free Download this TOP DVD to Seagate Central 3TB/4TB/2TB Converter:


Other Download:

- Pavtube old official address: http://www.pavtube.cn/blu-ray-ripper/
- Cnet Download: http://download.cnet.com/Pavtube-BDMagic/3000-7970_4-75922877.html

Rip DVD to Seagate Central 3TB/4TB/2TB with Best Video Settings

Step 1. Load DVD movies

Insert your DVD disc into DVD drive, Launch the program and click the "Load file(s)" button to import the DVD movies. DVD, ISO/IFO files are also supported. You can select chapters as you want.


Tip: Highlight the movie title you want to rip, and then you can click the dropdown menu after “Subtitles” and “Audio” respectively to select your wanted subs and audio track to be preserved in the resulted files.

Step 2. Choose output format for your DevicesSince almost of all the media devices like WD Media Player, iPad, laptops, Smart TV, Game Consoles, Apple TV, smartphones and tablets that Seagate Central NAS can be used with can support MP4 video files. So you can target MP4 as output format from “Common Video”.


You have a great many choices only depending on what your purpose of using the output video file.

1. Backup DVD to VOB/DVD folder: fast speed, original DVD quality and structure, convenient for future DVD burning;
2. Convert DVD to PC/Mac General Video: diversified choices, different formats for various purposes, smaller file size;
3. Rip DVD to Device Video: Play DVD on iPhone/iPad/Android/Apple TV/Surface/TV/other portable devices in mobile way.

Tip: Click Settings bar, you can adjust the level of compression to suit the quality you want. If you prefer a much better video quality and don’t mind the output file size, you can rise the video bit rate higher. Generally speaking, the higher video bit rate will result in the larger output file size, and vice versa.

Step 3: Rip DVD to Seagate Central

Finally, click “Convert” button to copy “Avengers: Age of Ultron” Blu-ray to optimized format for Seagate Central. When the conversion finishes, click Open button to find the output files and you can do the online movie sharing via your Seagate Central, iPad/Android/PS4/Xbox/Roku with family members and friends. Also you can stream your video onto any smart TV or devices in the house using Seagate.

How to Stream DVD video from Seagate to Devices from Windows/Mac

Please follow this procedure to load content onto your Seagate in Windows:

  • Set up your Seagate by opening the Public folder and clicking on the "Manage the Seagate Central" link.
  • Before you decide to transfer a large amount of files to your Seagate, Seagate recommends you make sure you have the most up-to-date firmware. See the instructions at the end of this article on how to check and update firmware.
  • Open the Start menu, then open (My) Computer or Windows/File Explorer. (In Windows 8: Press the Windows key () + D, then select File Explorer ()
  • In the left sidebar, click on the triangle icon next to Network to expand the menu


  • Find the Seagate and click on it.
  • The Seagate will appear with the hostname.
  • Example: Seagate-123456. The Public folder will appear. You may also see folders with titles that correspond with your username and other users you have set up. If you plan to view your content outside of your home using the Seagate Media app, this content must be placed in the Public folder.
  • Open another Windows/File Explorer or (My) Computer window and navigate to the files you would like to add to your Seagate.
  • Select the content you would like to copy and drag and drop the content to the folder of your choice. The private folder's title is your username. That folder will always require a login and should be used to store files you don't want readily available on your local network. You can add files to this folder by double-clicking on the folder and providing your credentials. Once you're logged in, you can manually transfer files to that folder.
How to verify and update firmware

To verify whether you have the latest version of the firmware on the Seagate, open the Public folder and click on the "Manage the Seagate Central" link. Once logged in, go to "Settings" and then click on "Advanced" and "Firmware Update". On the right-hand side, click on "Check for update" and apply any updates it may find.

Please follow this procedure to load content onto your Seagate from a Mac computer:

  • Set up your Seagate Central by opening the Seagate's Public folder and clicking on the "Manage the Seagate Central" link.
  • Before you decide to transfer a large amount of files to your Seagate, Seagate recommends you make sure you have the most up-to-date firmware. Check the bottom of this article to see how to verify the firmware on your drive.
  • Open Finder from the Mac desktop.
  • In the left sidebar under Shared, find your Seagate device listed as Seagate-XXXXXX(where Seagate-XXXXXX is the host name).
  • The public folder will be displayed. You can access it from here if that's where you want to copy your data. If you want to access your private folder, you will need to click on Connect As, then type in your credentials. Note: The username that is displayed by default is not the username of your Seagate. You will need to clear out that username and then type in the username that you gave the drive during setup.
  • Once you are connected, the private share (titled according to your username) and the public share will display in the left sidebar. Double-click on the desired folder to drag and drop data to it.
    If you would like to view your content while outside of your home through the Seagate Media app, please drag and drop your content to the Public folder. The Seagate Media app has a limitation that will only allow you access to your Public Folder.
How to verify and apply firmware on the Seagate

To verify which version of the firmware is on your Seagate, open the Seagate's Public folder and click on the "Manage the Seagate Central" link. Once logged in, click on the "Settings" tab, then click on "Avanced" on the left-hand side of the window. Click on "Firmware Update." Click on "Check for update" on the right-hand side and apply any updates it finds. (More reference).

Additional Tips: 

1. If you’d like to copy only movie content and leave out the extras and commentary, the Directly Copy is exactly what you need, which copies intact. M2TS main movie from Blu-ray disc without extras.

2.There are various output profile presets.

Please choose the subtitle and movie language you need in the option box under the movie list. And then please click the format bar to choose MKV as output format.

Many people like me own would love to enjoy movies and TV shows from physical discs to more than one mobile phone and tablet. You can count on Pavtube ByteCopy because it offers so many output formats that you would find the suitable one eventually.

Note: Much wonderful software bundled with BDMagic will provide you more amazing experience in converting videos. Go to Money Saving Software Bundles to get special offer for more software, such as BDMagic($49) + DVD Creator($35) = Only $49.9, Save $28.1, BDMagic($49) + ChewTune($29)= Only $49.9, Save $28.1 and so on.

Read More: 

Wednesday, April 27, 2016

Best Blu-ray Ripping Free Guides and Tips

Summary: If you are a Blu-ray collector, you won’t regret visiting the page! This guide will show you the best blu-ray software alternative guide and tips. 

Want to share your Blu-ray movies on Internet or just simply enjoy your Blu-ray movies on portable devices wherever you go? Here are some instructions on how to rip Blu-ray to all popular video and audio format. 

Blu-ray Ripping Tips 

Have a bunch of Blu-ray discs and want a more convenient way to manage and organize them? How about ripping your Blu-ray collection to NAS, Cloud Storage, Media Server, External Hard Drive? Or do you would like to play and view your Blu-ray movie on iPhone SE, iPhone 7, iPad Pro 9.7, iPad Air 3, Galaxy S7, Galaxy TabPro S, Galaxy Tab S2 without using Blu-ray discs? 

No matter what you want to do on your Blu-ray discs, here gathered around all guides and tips about Blu-ray ripping and copying. If you can’t find the one you need, just leave the message at the comment area to let us know. We will find the solution for you, especially. 


Featured Articles: 


Related Topics 

 Blu-ray to Software  

Look at this column to learn how to rip Blu-ray to common video formats so you can edit Blu-ray files in editing software like Windows Movie Maker, iMovie, Final Cut Pro and play Blu-ray on VLC, WMP, QuickTime and more. 


 Blu-ray to Site  

Here, you can learn how to rip and upload your Blu-ray movies to some video sharing site like YouTube, Facebook, Vimeo, etc. 


  Blu-ray to Video   

Read this column then you will get the best solution to rip Blu-ray and learn how to convert Blu-ray to any video/audio format like WMV, AVI, MOV, MP4, FLV, VOB and more. 

 Blu-ray to Device   

In this column you will learn how to rip Blu-ray to iPad, iPhone, Samsung Galaxy, Google Nexus, Nook HD, Amazon Kindle, TV, etc. mobile devices highly compatible format. 

  Blu-ray Software Alternative   

Want to get the best Blu-ray ripper/copying alternatives? These guides introduce the best Blu-ray ripping and Copying tools for ripping, converting and copying Blu-ray are simple as ABC. 

  Blu-ray Backup Tips   

How to create Blu-ray collection backups quickly and safely? Here you will get all the tips on how to back up your Blu-rays. 

  Blu-ray Knowledge Supplement  

Why we can’t play any Blu-ray on our Blu-ray Player? Which are the decent Blu-ray Ripper/Copier? The answers for questions above can be found on this column. 

Sometimes, you can’t play your Blu-ray on your Blu-ray player due to Blu-ray region codes. Region codes are basically DRM (digital rights management) techniques that allow studios to control the release of films in various regions. A Blu-ray player only can play the Blu-ray discs sold at the same region as the Blu-ray player manufactured. 

There are 3 separate Blu-Ray region codes. These codes are classified alphabetically as Region A, Region B, and Region C. 

Region A: This region covers all of North America, South America and South East Asia. 
Region B: This encompasses Europe, Africa, Middle East, French territories and Greenland. 
Region C: Region which covers the rest of the world including Russia, Asia, and China. 


When you want to play Blu-ray of region A, B and C on your Blu-ray player freely or on your region-locked PS3/PS4/Xbox One/360, you can refer to the following guides: 


  Top Blu-ray Ripper Recommendations  

To fulfill all the tasks above, you need a Blu-ray Ripper or Blu-ray Copier. There are various Blu-ray ripping tool floating on the web but which one is the best? We gathered some top reviews on best Blu-ray ripper for you: 

Free Download Pavtube Top Blu-ray Ripper for you:


Other Download: 
 
- Pavtube old official address: http://www.pavtube.cn/blu-ray-ripper/ 
- Cnet Download: http://download.cnet.com/Pavtube-BDMagic/3000-7970_4-75922877.html 

Read More: 

Friday, April 1, 2016

Rip Blu-ray to 1080p DivX AVI Videos For Streaming

Basic Knowledge about Ripping Blu-ray to AVI

There always lies variety of Blu-ray disc copy-protections before trying to rip Blu-ray to AVI, such as The Advanced Access Content System, The Image Constrain Token (ICT), The ROM-Mark, and so on. So you need a Blu-ray to AVI ripper that can help you remove them all. It should also constantly update to defeat upcoming Blu-ray encryption technologies.

Hot Search: DVD to MP4 | Blu-ray to H.264 MP4 | Blu-ray to 3D video | Blu-ray to MP3 |  

If you've already invested in lots of Blu-ray discs, you may wanna watch your favorite Blu-ray movies in a more convenient way without a Blu-ray Player. While, as you see, no matter PC, tablet or smart phones can't support Blu-ray as source media. 

Considering all above factors, transforming Blu-ray to DivX AVI is absolutely a good choice. An simple and efficient program to decrypt the Blu-ray and convert the content to AVI file format on your hard drive with original quality. Here, you need a Blu-ray to DivX AVI Converter - Pavtube BDMagic. This converter can rip and copy Blu-ray to DivX AVI without quality loss and can get fast conversion with NVIDIA CUDA/ AMD GPU acceleration technology. Its spupported OS includes  Windows 2003/XP/Vista/Windows 7/Windows 8/Windows 8.1/Windows 10.(More reasons for choosing BDMagic). 

Want Mac Version? Please click here to get Pavtube BDMagic for Mac. Download the program and start conversion:


Other Download

Pavtube Old Site Download: http://www.pavtube.cn/blu-ray-ripper/    
Cnet Downlod: http://download.cnet.com/Pavtube-BDMagic/3000-7970_4-75922877.html

Steps guide on how to rip Blu-ray to 1080p DivX AVI with the best quality

Step 1. Load your Blu-ray movies 

Launch the Blu-ray to DivX AVI Converter. When the interface pops up, click “File” to import Blu-ray movie into the programme. If your movie has several language subtitles, you can choose the one what you want in the “Subtitles”. 


Step 2. Choose the output format 

Click format bar and choose output format. You can then choose "DivX AVI-Audio Video Interleaved(DivX)(*.avi)" from the Common Video drop-down list as the output file format. 


Tip: Before conversion, you can click “Settings” button right besides “Format” and enter “Profile Settings” panel to adjust video size, bit rate, frame rate, sample rate and audio channels. If you want to keep 1080p Full HD resolution, set the video size as 1080*1920. Keep in mind the file size and video quality is based more on bitrate than resolution which means bitrate higher results in big file size, and lower visible quality loss, and vice versa. 

Step 3. Start ripping 

Finally, hit the big “Convert” button to start converting Blu-ray to AVI /DivX in 1080p high quality. When the conversion ends, you will be able to get the result video via tapping the Open button in the main interface. Afterwards, you can just put and play Blu-ray rips anywhere anytime for great enjoyment.  

Although DivX AVI is regarded as the most suitable output format in Blu-ray conversion, you also can transform it toMP4H.265MKVMOVM3U8 according to your desire with Pavtube BDMagic.

Note: Do you know there are more than 80% DVD owners will make digital backup of their discs, so need you if you have Blu-ray. It is sure that Blu-ray engineered with much stronger scratch proof than DVD, but as optical storage media, Blu-ray also need a backup. With around 4 times compression ratio, by converting Blu-ray to AVI, you can shrink 20GB Blu-ray movie to 5GB AVI file yet the quality loss cannot be noticed by naked eyes. Learn>> Backup 50 GB Blu-ray Movies to 25 GB.

Read More:

Wednesday, February 17, 2016

Backup 2016 Oscars iTunes Movies to Seagate Business Storage NAS

The Oscars or Academy Awards honor achievements in the American film industry. The ceremony has been held annually since 1929. It lets viewers learn more about the celebrities behind the year’s most popular movies. If you’re Movie fans, you may want to copy iTunes videos to Seagate Business Storage NAS for streaming or sharing with your family smoothly and quickly. This guide will help you out! 

iTunes store is the home for media entertainment. We can get any movies and TV shows collection we wished for from it anywhere, anytime. And there are many feature-length movies and episodes of television series are also available for purchase. Sometimes, we may want to backup the great movies or TV shows we bought from iTunes store to our NAS server for the following reasons:

1. Access or share them on other computers without Apple ID account.

2. Save more space for your computer disk drive.

3.To prevent movies or videos losing when syncing with other device, iTunes crash or other unexpected disasters.
To make a successful backup of iTunes video and TV shows to NAS server, you will first have to remove the DRM protection from them. Then you have the authorization to distribute them at random. Pavtube Chewtune can be your idea choice to remove DRM M4V from iTunes videos and TV shows for Seagate Business Storage NAS. Just with a few steps, you can get complete DRM-free iTunes movies and TV shows.


Tips: To remove DRM protection from Oscars iTunes videos and TV shows, you can first drag and drop them from iTunes store to your local computer hard drive. Then start the DRM decryption process with the following steps:How to remove DRM and backup iTunes to Seagate Business Storage NAS for streaming and sharing?

Step 1: Add iTunes files to the software. 

Click “File” menu, import iTunes videos to the application by hitting “Add Video/Audio” or “Add from folder”.


Step 2: Set output file format. 

Select your desired output file formats from “Format” drop-down selection, for example, you can choose the more popular “MPEG-4 Movie(*.mp4)” as the file format for NAS.


Step 3: Define an output folder to store output files. 

Hit “Browse” icon to locate an place to save the DRM-free movies and TV shows.

Step 4: Remove DRM from iTunes movies for NAS. 

Start the decryption process by clicking the right-bottom round icon to remove iTunes videos and TV shows DRM for Seagate Business Storage NAS. 

Transfer iTunes videos onto Seagate Business Storage NAS

Open your NAS and create a target directory inside the share, so that you have a specific folder to point iTunes at.


Next, start your iTunes, open the application preferences pane, and click the "Advanced" tab. find the "iTunes Media folder location" box. Click the "Change" button next to the box. You'll get a file picker dialog box, which you should point at the network folder you've previously created.


When you click "OK" to close the Preferences pane, iTunes will ask you if you want to move and rename files in the new location to match the "Keep iTunes Media folder organized" preference- say yes.


Navigate to "File" > "Library" > "Organize Library." to actually move the files. when the copy completes successfully, that means you have unload iTunes to NAS.

When you finished all the steps above, you can play your iTunes videos via NAS in different devices and share with your family at home. Enjoy! 

Read More: