Wednesday, May 31, 2017

Play Wedding Videos on Smart TV

Have recorded some great and memorable moment on your daughter's wedding party and wish to re-watch them on your Samsung/Sony/Panasonic/LG Smart TV. The following article will show you how to transfer and play wedding videos on smart tv with different solutions.

Solution 1: Play wedding videos on Smart TV from USB port
Solution 2: Stream Wedding videos to Smart TV via Plex

Solution 1: Play wedding videos on Smart TV from USB port

If your television set has a USB port and your TV does support video playback from USB, then you may be able to use it to watch wedding videos that you have copied from your computer. The main factor that affects your ability to watch the wedding video is the file format. You will need to consult the user manual or promotional material for the particular set to see which formats it supports. Your Smart TV may only play video in very limited file formats, in addition, some sets will only play a supported video at a specific resolution or within a particular range of resolutions.

The wedding video captured by your smartphone, camera, camcorder or other devices can be in different compression codec or file resolution. What's more, you may fail to find the detailed information about what file formats can be viewed on Smart TV. To fix all those head-scratching issues, you can download Pavtube Video Converter Ultimate (review), which has full support for all media types, you can comprehensively load wedding videos in Blu-ray/DVD disc, digital video in virtually any file formats with the resolution of 4K/2K/HD/SD. The biggest merits of this program is that it allows you to directly output Sony/Samsung/LG/Panasonic Smart TV preset profile formats with the optimal playback settings so that even if you don't know what file formats can be viewed on your Smart TV, you can still use our program to produce the best playback results if you happen to own a Samsung/Sony/LG/Panasonic TV.

Solution 2: Stream Wedding videos to Smart TV via Plex

If you are fortunately to own a TV that are included in Plex supported Smart TV television models listed below, you will then be able to stream and view the wedding videos on your large screen TV with Plex's beautifully organized interface.

LG

Plex app is available on LG television models running the following software:
NetCast (2013 models)
webOS Lite
webOS 1.0
webOS 2.0
webOS 3.0

Samsung

The app is available on 2016 and newer model year Samsung sets that are Tizen-based. The exception is for users located in Brazil, China, or Iran; the app is not currently available for users in those countries.

Sony

The app is available through the Opera TV Store for many 2013 and newer Sony Bravia models. (Note that the Opera forum list does include models older than 2013, which are not supported by the Plex for Smart TVs app.)

Toshiba

The app is made available through the Smart TV Alliance for Toshiba televisions. You can find the list of supported Toshiba models on the Smart TV Alliance website.

VIZIO Televisions

Supported Models
Most 2013 to 2016 model VIZIO televisions are supported. You can determine whether a model is compatible:
- If the app store is named Vizio Internet Apps Plus, then the model is compatible
- If the app store is named anything else (including just "Vizio Internet Apps"), then the model does not currently support the Plex App

To directly play wedding video on Smart TV via Plex, the wedding video must be 100% compatible with your Smart TV. If not, Plex will try to transcode the file for you. However, as the file transcoding process is very CPU intensive, if your computer is serveral years old, it may simply not be powerful enough to perform the transcoding, then you will suffer video buffering issues during the streaming process. In addition, the transcoding process uses temporary disk storage for the converted media. By default, the temporary files are stored on the OS boot disk. This can cause problems if your boot drive is very small.

To have a smooth streaming process with Plex Media Server, it would be much ideal for you to use a our powerful video media conversion app - Pavtube Video Converter Ultimate listed above to convert unsupported video to Smart TV supported file formats or specially optimized file formats for viewing.

Free download Windows version

Free download Mac version

How to Convert and Play Wedding Videos on Samsung/Sony/LG/Panasonic Smart TV?

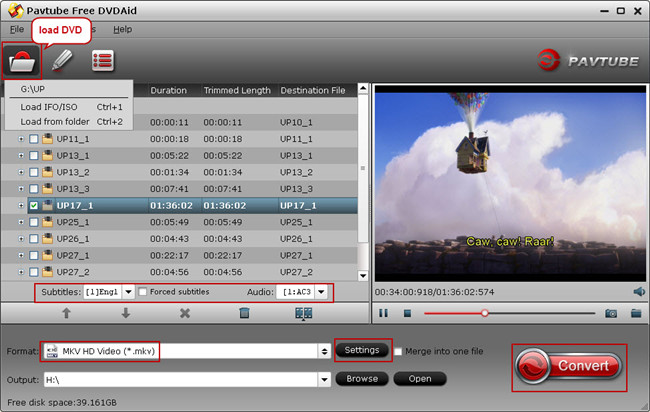
Step 1: Load wedding videos.

Download the free trial version of the program. Launch it on your computer. Click "File" menu and select "Add Video/Audio" or click the "Add Video" button on the top tool bar to import wedding video into the program.

Load wedding videos

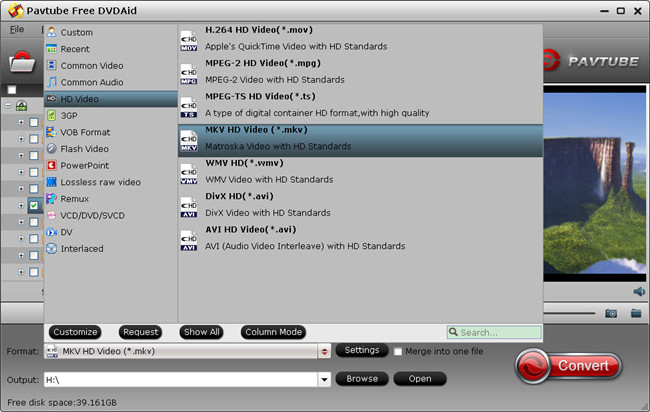
Step 2: Choose output file format.

Clicking the Format bar, from its drop-down list, select your Smart TV supported file formats such as "H.264 HD Video(*.mp4)" under "HD Video" main category.

Output Smart TV playable file formats

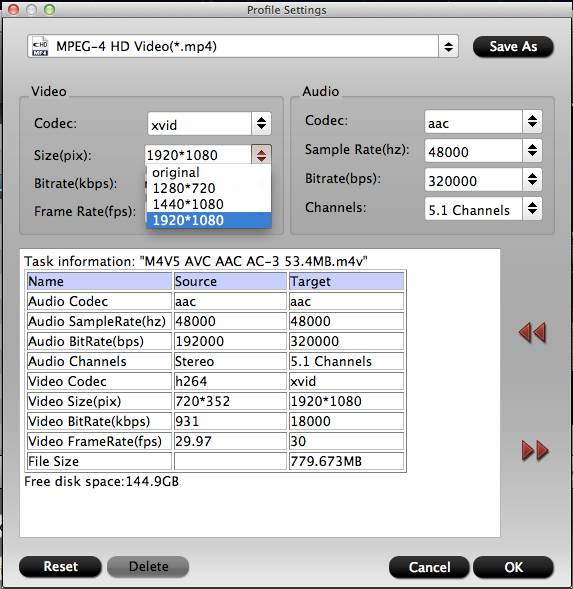
You can then adjust other profile settings such as video codec, resolution, bit rate, frame rate, audio codec, bit rate, sample rate, channels, etc as you like to get better output video and audio quality for Smart TV.

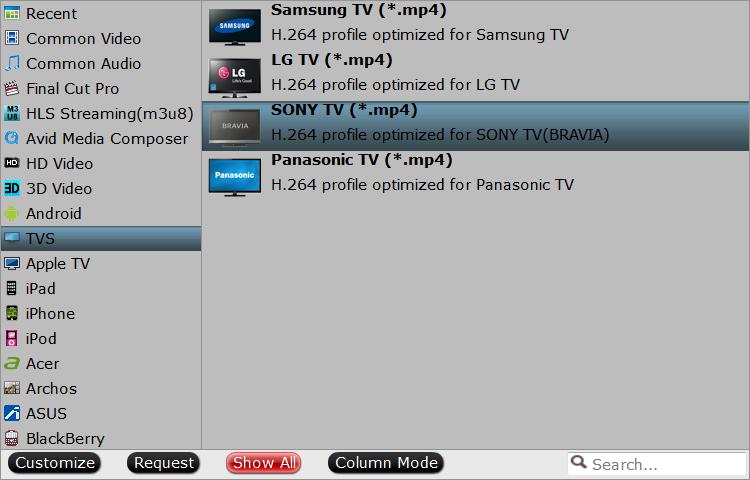
If you have no ideal how to adjust those settings on your own, just directly output TV preset profile formats under "TVs" main category.

Output TV preset profile formats

Step 3: Begin the conversion process.

After all setting is completed, hit right bottom convert button to begin the conversion process from wedding videos to Samsung/Sony/LG/Panasonic Smart TV playable file formats or specially optimized file formats.

When the conversion is completed, you can click "Open output folder" to popup output directory with the converted files. Then feel free to play wedding videos on Smart TV from USB or add video to Plex for streaming to Smart TV.

Tuesday, May 23, 2017

Copy and Convert Educational DVDs for Kindergarten

Kindergarten teacher prefer to collect some educational DVDs for make them played for Kindergarten. But it is not convenient to play educational DVD except DVD player, computer. So maybe you are looking for the easy way to play educational DVD for Kindergarten. Here we share one easy way to play educational DVDs.

We recommend that you can copy or rip educational DVDs for more easy playback. Why copy or rip educational DVDs?

Reason 1: Disadvantages of DVD disc

  • DVD is easily broken
  • DVD occupies much space of our room
  • Regional lockout causes DVD won't play error
  • DVD playback requires DVD drive and MPEG2 decoder

Reason 2: For playing Educational DVD on any devices

Although many people claim DVD industry is gradually waning, the DVD/Blu-ray sales are still quite high, which determines the DVD-closely-connected tool would not disappear from the mainstream OSs in the near future. The fact is no matter how gigantic the new system upgrade is, both Windows and Mac always contain at least one add-on for DVD. If you copy or rip Educational DVD, you can transfer them to any devices like iPhone, iPad, TV, projector etc for easy playback.

Best Educational DVD Copier/Ripper

Pavtube ByteCopy (Read Review) is a professional DVD ripper. You can use it to copy Educational DVDs to computer and then easy playback. Also you can rip educational DVDs to any formats for iPhone, iPad, TV, projector etc for free playing. So that Kindergarten can play Educational DVDs on anydevices anytime anywhere.

Pavtube ByteCopy, the best DVD to Lossless MKV solution, is a powerful program with the ability of backing up DVD collection to multi-track MKV without quality loss, ripping DVD movies to MP4 and MOV with multiple audio streams, and converting DVD from hard discs to virtually any popular video and audio format so that you can freely watch movies on Apple iOS devices, Android OS devices, Windows RT/Pro devices, HDTV, 3D TVs, PSP, PS4, PS3, Plex, WDTV Live, Roku 3 and more devices. In recent update, ByteCopy now has improved H.265 Encoding speed With NVIDIA GPU Acceleration. If you want to copy Blu-ray or rip Blu-ray, you can also use Pavtube ByteCopy to help you done.

Mac user please get Pavtube ByteCOpy for Mac to convert Educational DVDs and other DVD, Blu-ray on Mac (macOS Sierra, El Capitan Yosemite, Mavericks, Lion included).

How to Copy and Convert Educational DVDs for Kindergarten

Step 1: Click “File” to find “Load from disc” to import source educational DVD movies to Encrypted this DVD ripper software. If you have some Blu-rays, you also can load to convert to any formats.

load Blu-ray

Step 2: Remove educational DVD encryption. Here, you have 3 options:

Option A - Full Disc Copy educational DVD

Full disc copy allows you to keep the whole file structure in your Blu-ray disc complete without any quality loss. Click the “Copy the entire disc” button   on the top menu to start Blu-ray full disc copy.

Option B - Directly Copy educational DVD

If you want to reduce the time consuming, you can try copying Blu-ray main movie only which will leave out any extras for you. Click the format bar to follow “Copy” > “Directly Copy.”

directly copy

Option C – Rip educational DVD to popular MP4/MOV/AVI/MKV formats

You also can choose to convert educational DVD to common MKV, MP4, AVI, MOV, etc format. If you choose to convert educational DVD to MKV, you can select lossless MKV format in "Multi-track Video". In this way, you can keep lossless image and sound quality and all the subtitle and audio tracks.

lossless MKV

Tip: All formats here are set with optimized video/audio codecs, bitrates, frame rates, etc. But you can still specify as you like by clicking Settings button. In the Profile Settings window, you can choose or specify exactly the parameters you like. And in the Task information section, you can compare the detailed information of the source video and the target video.

Step 3: If you choose the second or third way to copy Blu-ray to Kodi, you need to hit the “Convert” button in bottom right corner to start educational DVD main movie copy or educational DVD to MKV, MP4, MOV and AVI conversion. When the process is completed, open output folder and find the ripped DVD file.

After the ripping, you can play educational DVD on any media player, portable devices, TV, projector, PS4, Xbox etc freely. Have a try!

Monday, May 15, 2017

2 Ways to Put 3D Blu-ray to PS VR for viewing

PlayStation VR, known by the codename Project Morpheus during development, is a virtual reality headset developed by Sony Interactive Entertainment. It was designed to be fully functional with the PlayStation 4 home video game console. You can import some 3D movies like 3D Blu-ray into it for enjoying the 3D moment. If you feel a little difficult to watch 3D Blu-ray movies with PS VR, you can get two easy methods in this article. Read on.

Method 1 of Watching 3D Blu-ray on PS VR

1. Upgrade PS VR to the System Version 2.5

Watching 3D Blu-Rays with the PlayStation VR only works if you have the latest updates to both the system and the headset. You want the PlayStation 4 to be updated to System Version 4.5, and the PlayStation VR to be updated to System Version 2.5.

2. Make sure PS VR is positioning

It's usually pretty important to make sure your PSVR is correctly positioned on your head, but when watching a 3D Blu-Ray this is critical. If the image is shifted too far in any direction because the lenses are not correctly positioned in fron of your eyes, the 3D effect can quickly become disorienting. Make sure you're seated, and your headset is correctly aligned.

3. Make sure the lenses in your headset is clean

It's also important to make sure the lenses in your headset are as clean as they can possibly be. Make sure you have a microfiber cloth nearby, and remove any smudges from the lenses before you try to watch a 3D Blu-Ray.

As soon as you put the Blu-Ray in your PlayStation 4, Cinematic mode will adjust to show you the movie in 3D. You won't see any 3D features until the movie starts, unless your movie included 3D visuals in the menu system for the disc.

Everything else about Cinematic Mode will remain the same, which means the display size will remain whatever your default setting is. If you've set your Cinematic Mode to Medium, you'll probably want to increase the size to Large when watching 3D Blu-Rays. This will use more of the display, and offer you more of the 3D experience.

Once you have the display size set to your liking, it's important to position the display just slightly higher than you'd normally set it when playing a game. This makes it easier for you to shift a little during the movie, so you aren't trying to reset the view while watching. To make this adjustment, pick your chin up a little higher than usual and hold the Option button until the display recenters.

Once the movie has started, you'll be able to control the movie just like you would any other movie viewed through your PlayStation 4. If you prefer the separate media remote, DualShock 4 controller, or voice commands, you'll find each of these features still exist in the headset. However, since you're going to be sitting stationary for a while, you'll want to ensure you choose a control method before you hit play.

Source: https://www.vrheads.com/get-best-possible-3d-blu-ray-experience-your-playstation-vr

Methos 2 of Watching 3D Blu-ray on PS VR

If you have many 3D Blu-ray discs or want to view 3D Blu-ray on PS VR, you can convert 3D Blu-ray to a 3D video format for easy playback with PS VR. Here, I choose to use Pavtube Video Converter Ultimate, which can rip any 3D Blu-ray movie to PS VR supported 3D format like 3D SBS MP4 format with super fast speed. Besides, it also can rip all the newest even region-locked Blu-ray/DVD and work in 4K/SD/HD video, TV shows and music dramas. It can accept H.265, MP4, AVI, FLV, MKV, ASF, etc and then change them to 3D SBS MP4/MKV/MOV for PS VR and other VR Headsets like Google Cardboard, Oculus Rift DK2, Air VR, HTC Vive, Google DayDream View, 3D TV etc. For me, it is the best choice. You can free download and have a try. (Read its review to learn more)

If you are using Mac, you can get the Mac version - Pavtube iMedia Converter for Mac to convert 3D Blu-ray to PS VR 3D format on Mac easily. You can also reference this guide.

Simple Process of Converting 3D Blu-ray to 3D format for PS VR

Step 1: Load 3D Blu-ray disc.

Add 3D Blu-ray from disc drive into Pavtube Video Converter Ultimate by clicking "Load Disc" button. Or you can choose to import Blu-ray ISO image or Blu-ray folder from hard drive.

Tips: The program will automatically select the main Blur-ray title for you, you can select your desired subtitle languages or audio tracks from the drop-down list of "Subtitle" and "Audio" under the Blu-ray title displaying list.

Step 2: Output 3D MP4 or MKV format.

Move to "Format" menu, find "3D Video" category and choose "MP4 Side-by-Side 3D Video(*.mp4)" or "MKV Side-by-Side 3D Video(*.mkv)" as output format, you can also choose 3D TAB MKV or MP4 format according to your own needs.

Step 3: Adjust 3D profile settings.

Click settings to open "3D Profile Settings" window, here you can adjust output 3D video depth, select the specific 3D resolution: Side by Side (Half - Width) or Side by Side (Full) or change the image display order for 3D SBS movie.

Step 4: Start the final conversion process.

Go back to the program main interface, hit on the "Convert" button and start to create 3D SBS or TAB MP4/MKV video from 3D Blu-ray disc. When the conversion is done, you can locate the generated 3D SBS MP4 video in output folder to view on VR Headsets with seriously immersive 3D effect.

Thursday, May 11, 2017

Save 50% from Pavtube Video Converter Ultimate During 2017 Mother’s Day Deals

Have ideals celebrating the coming Mother’s Day with your Mum? You can rip your DVD, Blu-ray and convert any videos, movies to any formats for playing on TV, portable devices etc with your mother. That’s great. Pavtube Video Converter Ultimate, the industry leader in the field of DVD, Blu-ray and video backup solutions, today kicks off its Mother’s Day Promotion, offering the bigest 50% discounts. You can also get the Pavtube Video Converter Ultimate 50% OFF on 2017 Mother’s Day from Pavtubes facebook website.

Save 50 percent off on Pavtube Video Converter Ultimate for DVD/Blu-ray/Video Conversions

Part 1. What is Pavtube Video Converter Ultimate?

Pavtube Video Converter Ultimate

Pavtube Video Converter Ultimate is a popular video conveter, DVD ripper, Blu-ray ripper. It can convert videos, rip DVD to formats, rip Blu-ray to formats on Windows. It is a popular product from Pavtube Studio. You can free download it and buy it with only $32.5 on 2017 Mother’s Day promotion.

Part 2. What Pavtube Video Converter Ultimate Can Help Us?

1. Convert to Various Format Files
Input for more than 200+ format videos Converting a variety of media formats including AVI, WMV, MP4, MOV, FLV, MPEG, 3GP, VOB, Xvid to your desired format files.
Convert HD videos and 4K videos Perfectly convert HD Video including Tivo, MXF, MTS, etc and even 4K video and 4K source files to various common video formats.
Perfectly support for H.265 video Encode video with H.265/HEVC codec, then you can stream media files in perfect quality with small file size and less bandwidth.
Convert DVD Blu-ray to any formats Pavtube Video Converter Ultimate also can rip your DVDs, Blu-rays to any formats like MP4, MOV, MKV, MPEG etc.

2. Enjoy Media Files Anywhere Anytime

Output videos for all popular devices: optimized file for all your desired devices including iPad, iPhone, Android, Xbox, PSP, PS3, Nexus, Kindle Fire, etc.

3. Make 3D Movies for Grand Visual Experience

Convert 2D/3D resources to 3D movies in 3D MKV, 3D MP4, 3D MOV, 3D WMV and 3D AVI format to watch on 3D devices with Side by Side, Red/Blue and Top/Bottom 3D effects.

4. Enhance and personalize your media files

Professional editing functions are provided to you: split, merge, trim, crop, add watermark, adjust video effect, edit audio and insert subtitles.

5. Customize video and audio parameters

Change output video codec, size, frame rate, bitrate and audio codec, sample rate, bitrates and channels for better display quality.

6. Super faster conversion speed

Do not want to wait an eternity to convert a single clip? Pavtube Video Converter Ultimate surpasses other tradition video conversion application with 6x faster conversion speed. It is capable of accelerating the video encoding and decoding speed with the advanced NVIDIA CUDA technology and AMD Accelerated Parallel Processing (APP). Now it has Improve H.265, H.264 Encoding Speed With NVIDIA GPU Acceleration. Just save your precious time and energy for most important and amusing things in life.

Note:

For Mac user, please get its Mac version - Pavtube iMedia Converter for Mac to convert video/DVD/Blu-ray on Mac (macOS Sierra, El Capitan Yosemite, Mavericks, Lion included). You can free download it or buy it with only $32.5.

2017 Mother's Day Pavtube Other Products Big Promotion

A. 50% ~ 55% Discount Products

Windows Products Mac products
Pavtube ByteCopy
Pavtube BDMagic
Pavtube DVDAid
Pavtube Media Magician
Pavtube ByteCopy for Mac
Pavtube BDMagic for Mac
Pavtube DVDAid for Mac
Pavtube Media Magician for Mac

B. Only $9.9 Crazy Promotion Products

Windows Products Mac Products
DVD Creator
Video Converter
MXF Converter
MKV Converter
MTS/M2TS Converter
HD Video Converter
MXF MultiMixer
FLV/F4V Converter
DVD Creator for Mac
Video Converter for Mac
MXF Converter for Mac
MKV Converter for Mac
MTS/M2TS Converter for Mac
HD Video Converter for Mac
iMixMXF for Mac
FLV/F4V Converter for Mac

OK, I guess you will master this fast. And get started to give your motherr a big surprise on Mother’s Day 2017. And wish you a happy time!!!

Source: http://i-freepedia.com/pavtube-video-converter-ultimate-mothers-day-deals/

Wednesday, May 10, 2017

Pavtube ByteCopy Gives you 50% OFF Promotion on 2017 Mother's Day

Mother’s Day is approaching soon. Great news for Blu-ray/DVD ripper software users for the upcoming Mother’s Day: Pavtube ByteCopy & Pavtube ByteCopy for Mac launch a big Mother’s Day promotion for all multimedia software users to celebrate Mother’s Day from now. You can get a Pavtube ByteCopy (for Mac) in only the half of the original price.

Everyone is invited to get the gifts and enjoy Pavtube ByteCopy/Pavtube ByteCopy for Mac 50% off discount coupon codes for Blu-ray and DVD enjoyment at: https://www.facebook.com/pavtubefans/app/198826126804423/

Pavtube ByteCopy & Pavtube ByteCopy for Mac 50% OFF Promotion on 2017 Mother's Day

A. Pavtube ByteCopy (Only $21 now)

Main features of Pavtube ByteCopy (Read Review)

*Rip Blu-ray, 4K Blu-ray, 3D Blu-ray, DVD to any video/audio formats.
*2 ways to copy Blu-ray/DVD: Full disc copy, direclt copy.
*Lossless Blu-ray/DVD to MKV backup with multiple audio/subtitle tracks.
*Convert Blu-ray/DVD to Multi-track MP4, MOV, AVI.
*Rip Blu-ray/DVD to iPhone, Android, player, TV, PS3/PS4, Editors, VR etc supported video.
*Improve H.265, H.264 Encoding Speed With NVIDIA GPU Acceleration.
*Allow you to complete the conversion process with three simple clicks.
*Editing tool: trim, crop, merge, insert subtitles, export srt/ass/ssa subtitles, add video effects.
*Compatible with Windows 10, Windows 8.1, Windows 8, Windows 7, Windows XP.

Free download and 50% off buy Pavtube ByteCopy

B. Pavtube ByteCopy for Mac (Only $21 now)

Main features of Pavtube ByteCopy for Mac (Read Review)

*Convert Blu-ray/DVD to 200+ Multimedia Devices and Formats
*Convert 2D Blu-ray/DVD to 3D Video/3D Blu-ray to movies in 3D MKV, 3D MP4, 3D AVI, 3D WMV, etc
*Best Blu-ray/DVD to multi-track MKV, MP4, MOV, Apple ProRes MOV solution.
*Rip Blu-ray/DVD to iPhone, iPad, player, TV, PS3/PS4, Apple TV, QuickTime, NLEs, VR etc supported video.
*Backup Blu-ray/DVD without Quality Loss with two copy ways.
*Personalize Movie With Customized Adjustments.
*Supported OS: macOS Sierra, Mac OS X 10.11 El Capitan, Mac OS X 10.10 Yosemite, 10.9 Mavericks, 10.8 Mountain Lion, 10.7 Lion, 10.6 Snow Leopard.

Free download and 50% off buy Pavtube ByteCopy for Mac

2017 Mother's Day Pavtube Other Products Big Promotion

A. 50% ~ 55% Discount Products

Windows Products

Pavtube Video Converter Ultimate
Pavtube BDMagic
Pavtube DVDAid
Pavtube Media Magician

Mac products

Pavtube iMedia Converter for Mac
Pavtube BDMagic for Mac
Pavtube DVDAid for Mac
Pavtube Media Magician for Mac

B. Only $9.9 Crazy Promotion Products

Windows Products

DVD Creator
Video Converter
MXF Converter
MKV Converter
MTS/M2TS Converter
HD Video Converter
MXF MultiMixer
FLV/F4V Converter

Mac Products

DVD Creator for Mac
Video Converter for Mac
MXF Converter for Mac
MKV Converter for Mac
MTS/M2TS Converter for Mac
HD Video Converter for Mac
iMixMXF for Mac
FLV/F4V Converter for Mac

To get more detailed information about the Pavtube 2017 Mother’s Day Big Promotion, don’t miss the Facebook promotion link: https://www.facebook.com/pavtubefans/app/198826126804423/, Happy 2017 Mother’s Day!!!

Source: http://i-freepedia.com/pavtube-bytecopy-mothers-day-promotion/

Monday, May 8, 2017

Free Ways to Copy DVD to USB Drive With Ease

A USB flash drive has an astonishing ability to store a large number of data with storage capacity varying from 8MB to 1TB. It's easy to to carry around, without worry of scratching. There are some occasions that you want to making a backup of a DVD's contents to a USB flash drive for convenient playback or management. In this article you can get two free ways to copying DVD to USB for better usages easily.

2 Free Ways to Copy DVD to USB Drive

Way 1. Directly Copy DVD to USB

For unprotected DVD content, we could directly copy source DVD content and then paste it to target USB drive, as long as USB drive gets enough space. Copy and paste is the most direct and easiest solution to copy DVD to USB drive. You could check the below steps to learn how to directly copy DVD to USB drive via copy-and-paste.

1. Get source DVD content ready: insert DVD disc into DVD drive of your computer, get DVD folder or ISO image file on you computer well prepared for copy-and-paste. Make sure your DVD content is not copy protected. Otherwise you may not be able to copy and paste source DVD content.

2. Plug USB drive into USB port. Computer would automatically detect it and install USB drive if it’s not installed. Make sure your USB flash drive gets enough space for storing DVD content. You could format your USB drive if there’s not enough space, or remove unneccessary files to save space.

3. Right click DVD disc drive and then select “Open”. Select all files there and copy them for pasting to USB drive. To copy DVD folder or ISO image file, right click the folder or ISO file and then select Copy option, go to USB drive and right click on a blank place to select “Paste”. Or you could select “Send to” option to send DVD content to USB drive.

Way 2. Copy DVD to USB with a Free Software

Another way is ripping DVD to a digital format for USB. People are inevitably in need to rip DVD for storing onto a portable USB disk (16GB, 32GB, 64GB, etc.) from SanDisk, Kingston, Sony, Toshiba, Seagate, or other brands. So how to make it? A DVD ripper is all what we need. We can easily google out tons of such kind of tools, free and paid, clean and ad-supported. Undoubtedly, it's a tough task to pick out a satisfying one. If you want to free rip DVD to USB drive, we have some nice free DVD ripper to recommend, namely Free DVDAid. With it, you can rip DVD to AVI, MKV, WMV, MOV, M4A, WMA and other formats for USB. Free DVDAid allows users to fast rip DVD to USB disk on Windows 10, 8, 7, XP, etc. Mac users can work with its Mac version on macOS Sierra 10.12 and lower.

Plus: If you want to copy Blu-ray to USB, you can also use Pavtube ByteCopy to help that done. It can copy Blu-ray directly and entire full copy Blu-ray. It also can rip Blu-ray to any formats you need.

Free download and install Free DVDAid on your computer

Before Ripping DVD to USB you need to Prepare the below things:

Computer with working USB port and DVD drive;
USB drive (external DVD drive) and USB connection cable;
Source DVD content: DVD disc, folder or ISO image file;
Internet connection.

How to Free Rip DVD to USB with Pavtube Free DVDAid

1. Load DVD movie

Insert DVD into DVD-Rom, launch the Free Mac DVDAid, and load DVD by clicking on the “Load Disc” button. You can also import DVD VIDEO_TS folder, ISO files, and IFO files into this freeware.

load dvd into free dvdaid

Tip: After the files are loaded, you can select the subtitles and audio track you prefer. On the right windows, you can preview your files and take snapshots of your favorite movie scenes.

2. Select the output format

Hit on the “Format” bar and you can choose any video format like MOV, MKV, WMV, AVI, FLV, MP3, M4A, WMA, WAV, etc for USB output for playing on your devices like iPhone, iPad, Samsung, PLEX, PS4, PS3 etc

free dvdaid output format

3. Start Ripping

Click the "Convert" button on the main interface and the software will start to convert DVD to USB friendly video formats immediately. When the conversion finishes, click "Open" to find the converted video files. Then you can effortless transfer the video files to your devices for easy playback on the go.

Monday, May 1, 2017

Impot GoPro Hero5 4K video to iMovie on macOS Sierra

Both of GoPro Hero5 Black and GoPro Hero5 Session have 4K video at 30 fps as their top-end mode. You can record 3840x2160 4K video with MP4 format by them easily for celebrating the special time and sharing with families and friends. After uploading YouTube, Instagram, Vimeo etc, many users like to edit GoPro Hero5 4K videos in NLEs like iMovie. But you may get a poor experience in editing GoPro Hero5 4K video in iMovie. No worry, here we show you how to import GoPro Hero5 4K video to iMovie on macOS Sierra without any problems.

To ensure successfully importing GoPro Hero5 4K to iMovie smoothly, what you need to do is to convert GoPro Hero5 4K video to iMovie friendly video formats. Why converting GoPro Hero5 4K video to iMovie? Because iMovie friendly editing format is Apple Intermediate Codec not MP4 video. So you’d better get a GoPro 4K video converter to convert GoPro Hero 5 4K video for iMovie for perfecting on Mac.

Best GoPro Hero5 4K to iMovie Converter for Mac

Here the award-winning Pavtube Video Converter for Mac cut the buck at this point, letting you convert GoPro Hero5 4K video to iMovie ompatible formats so as to import 4K to iMovie for Mac without any compatibility issue. Besides, it also can convert GoPro Hero5 4K to other NLEs like FCP X, iMovie, Premiere Pro, Avid Media Composer, Davinci resolve etc supported formats. You can also use it to convert GoPro Hero5 4K to some devices like iPhone, iPad, Samsung etc for easy playback at home or on the travel. It also allows you to convert GoPro Hero5 4K video to any formats you need.

Moreover, this 4K video converter also performs great as a 4K video compressor to compress 4K to 1080P/720P with even smaller file size if you wish. Yet a 4K video editor as well to reduce GoPro Hero5 4K video file size, cut GoPro Hero5 4K video files, crop black bar, add SRT subtitles, add watermarks and so on. That’s great.

See also:
GoPro Hero5 4K to Youtube 
GoPro Hero5 4K to Instagram  
GoPro Hero5 4K to Windows Movie Maker
GoPro Hero5 4K to Resolve
GoPro Hero5 4K to Avid Media Composer

Free download this GoPro Hero5 4K to iMovie Video Converter for Mac

How to Convert GoPro Hero5 4K video to iMovie on macOS Sierra

Step 1: Add 4K Video Source

Click "Add" button on the top of the main interface to load original GoPro Hero5 Black or GoPro Hero5 Session 4K videos to the program. Or you can simply drag & drop the videos to the software.

Step 2: Set Output Video Format

Click the Format column to select output format "iMovie and Final Cut Express > Apple Intermediate Codec(AIC) (*.mov)" as the best compatible video format for editing 4K in iMovie.

Tips: 4K Video Settings

Click "Settings" button if you'd like to customize advanced audio and video parameters like Video Codec, aspect ratio, bit rate, frame rate, Audio codec, sample rate, audio channels. Usually 1080p is the optimal setting for using in iMovie. You can downscale GoPro Hero5 4K to 1080p.

video converter mac profile settings

Step 4: Start Conversion

After confirming everything is alright, click the "Convert" button on the bottom right to launch the conversion. Since 4K video file is usually very large, please be more patient for the conversion. Thereafter, import, play and edit the GoPro Hero5 Black or GoPro Hero5 Session 4K files in iMovie. Enjoy.