The point here, you will find it a painful experience when editing 4K footage in Adobe Premiere Pro (no matter Premiere Pro CC, CS6, CS5.5, CS5 or CS4). Your computer freezes when editing the 4K video. So, what's the fluid workflow for editing 4K in Adobe Premiere smoothly?
Q: “I'm wondering if anyone out there has experience with the 4K footage the Phantom 3 produces and how it plays with Premiere Pro CC. If so, do you have any suggested export settings to get the most resolution out of the footage - without having to buy a new server farm. Does Premiere Pro import the footage natively, or does it have to be converted first? Another (possibly dumb) question: Is it possible to configure the 4K camera to shoot in 1080P if 4K ultra resolution is not needed in a particular shoot? In other words, can you dumb it down to save disk space? Thanks. “
As the show above, you may have the same issues. It is officially stated that MP4 is supported by Adobe Premiere. The reason is that MP4 is a format container with different codecs. Your MP4 file codec isn't compatible with Adobe Premiere. If you don’t want to buy a new server farm, you can search a free converter to convert 4K to MPEG-2, the best format that Premiere Pro supported.
Hot Search: MOV. files in Sony Vegas Pro | Import DVD into Windows Movie Maker | VOB to iMovie | Import a DVD to iMovie | H.265 to Premiere Pro CC
How to import 4K Videos to Adobe Premiere with Video Converter Ultimate
In the following article, we will show you how to downscale and convert 4K to 1080p MPEG-2 videos so that you can edit 4K footage in Adobe Premiere without bogging down your computer. The process is surprisingly easy and can be done using Pavtube Video Converter Ultimate - Here is review.
Developed with the most advanced converting technology, this 4K video converter truly and fully supports input and output videos at upto 4K resolution. With it, you can effortlessly convert your 4K videos formatted in MP4, XAVC, XAVC S, MXF to advanced encoders like MPEG-2, Apple Intermediate Codec, ProRes and DNxHD, ensuring maximum editing quality and efficiency when working with Adobe Premiere, iMovie, Final Cut Pro, Avid Media Composer, etc. If you're facing problems when editing 4K footage, just download it to convert the 4K stuff for smoothly importing and editing in your editing systems. Below are steps on converting 4K footage for Adobe Premiere Pro.
Note: This tutorial is based on Windows OS. If you are a Mac user, please try this MP4 to Adobe Premiere Pro for Mac - Pavtube iMedia Converter for Mac.
Free Download and trail:


Other Download:
- Pavtube old official address: http://www.pavtube.cn/blu-ray-video-converter-ultimate/
- Cnet Download: http://download.cnet.com/Pavtube-Video-Converter-Ultimate/3000-2194_4-75938564.html
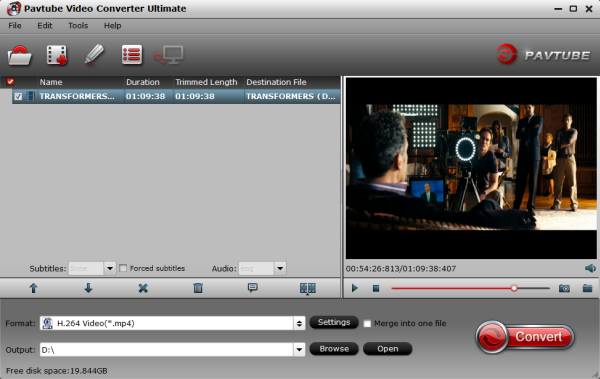
Step 1. Load your 4K videos
Launch the 4K to Adobe Premiere converter, then drag & drop the 4K files onto the main interface, or you can click the "Add Video" button to locate the videos from your local disk. Batch conversion is available here, so you are allowed to import several files at one time.
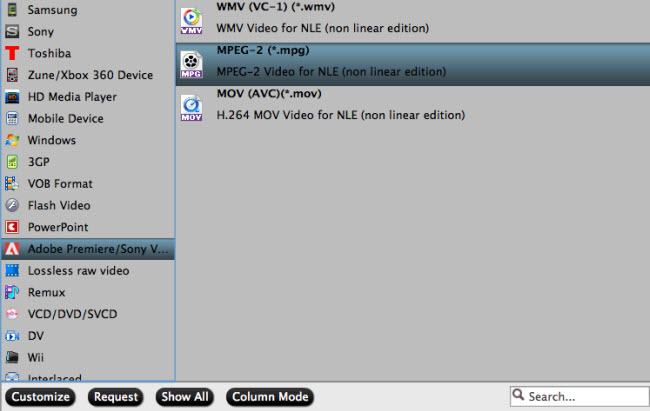
Step 2. Choose Premiere compatible format
To pick a proper output, you’ll need to know formats compatible with Adobe Premiere Pro CC and Adobe Premiere Elements 13 first. Convert 4K Video files to MPG, WMV or MOV - highly compatible with Adobe Premiere will be great. Here you can click the format bar to follow “Adobe Premiere/Sony V…” > “MPEG-2(*.mpg).”
Step 3: Advanced Profile Settings
In case the default settings do not fit your requirement, you can click “Settings” button and enter “Profile Settings” panel to adjust video size, bit rate, frame rate, sample rate and audio channels. Here personally I recommend you to set the video size as 1920*1080p for better editing. Of course, if you want to get original 4K resolution, just keep the video size as original.
Note: The product also has more editing functions that you can click the “Edit” to do some editing incidentally, such as trim, crop and change the effect.

Step 5: Click the “Convert” button to start transcoding MP4 files to MPEG-2. After the conversion, click the ‘Open’ button to locate the output files and transfer the convert mp4 files for editing in Pro CC on Windows.
Finally, you can edit some 4K videos with Adobe Premiere Pro CC for uploading to web or sharing with your friends.
Tips:
1. You can check the "Merge into one file" box, to combine several .mp4 clips together if necessary.
2. These are the advantages of 4K videos to Premiere Pro CC Converter, convenient, clean interface, simple operation. If you have the requirement of DVD burning or muti-track preserving, there are some bundled products to help you save more, just click here.
Much wonderful software bundled with Video Converter Ultimate will provide you more amazing experience in converting videos. Go to Money Saving Software Bundles to get special offer for more software, such as ByteCopy + Video Converter Ultimate = Only $79.9, Save $27.1, Video Converter Ultimate($65) + ChewTune($29) = Only $74.9, Save $19.1 and so on.
Read More:
Q: “I'm wondering if anyone out there has experience with the 4K footage the Phantom 3 produces and how it plays with Premiere Pro CC. If so, do you have any suggested export settings to get the most resolution out of the footage - without having to buy a new server farm. Does Premiere Pro import the footage natively, or does it have to be converted first? Another (possibly dumb) question: Is it possible to configure the 4K camera to shoot in 1080P if 4K ultra resolution is not needed in a particular shoot? In other words, can you dumb it down to save disk space? Thanks. “
As the show above, you may have the same issues. It is officially stated that MP4 is supported by Adobe Premiere. The reason is that MP4 is a format container with different codecs. Your MP4 file codec isn't compatible with Adobe Premiere. If you don’t want to buy a new server farm, you can search a free converter to convert 4K to MPEG-2, the best format that Premiere Pro supported.
Hot Search: MOV. files in Sony Vegas Pro | Import DVD into Windows Movie Maker | VOB to iMovie | Import a DVD to iMovie | H.265 to Premiere Pro CC
How to import 4K Videos to Adobe Premiere with Video Converter Ultimate
In the following article, we will show you how to downscale and convert 4K to 1080p MPEG-2 videos so that you can edit 4K footage in Adobe Premiere without bogging down your computer. The process is surprisingly easy and can be done using Pavtube Video Converter Ultimate - Here is review.
Developed with the most advanced converting technology, this 4K video converter truly and fully supports input and output videos at upto 4K resolution. With it, you can effortlessly convert your 4K videos formatted in MP4, XAVC, XAVC S, MXF to advanced encoders like MPEG-2, Apple Intermediate Codec, ProRes and DNxHD, ensuring maximum editing quality and efficiency when working with Adobe Premiere, iMovie, Final Cut Pro, Avid Media Composer, etc. If you're facing problems when editing 4K footage, just download it to convert the 4K stuff for smoothly importing and editing in your editing systems. Below are steps on converting 4K footage for Adobe Premiere Pro.
Note: This tutorial is based on Windows OS. If you are a Mac user, please try this MP4 to Adobe Premiere Pro for Mac - Pavtube iMedia Converter for Mac.
Free Download and trail:
Other Download:
- Pavtube old official address: http://www.pavtube.cn/blu-ray-video-converter-ultimate/
- Cnet Download: http://download.cnet.com/Pavtube-Video-Converter-Ultimate/3000-2194_4-75938564.html
Step 1. Load your 4K videos
Launch the 4K to Adobe Premiere converter, then drag & drop the 4K files onto the main interface, or you can click the "Add Video" button to locate the videos from your local disk. Batch conversion is available here, so you are allowed to import several files at one time.
Step 2. Choose Premiere compatible format
To pick a proper output, you’ll need to know formats compatible with Adobe Premiere Pro CC and Adobe Premiere Elements 13 first. Convert 4K Video files to MPG, WMV or MOV - highly compatible with Adobe Premiere will be great. Here you can click the format bar to follow “Adobe Premiere/Sony V…” > “MPEG-2(*.mpg).”
Step 3: Advanced Profile Settings
In case the default settings do not fit your requirement, you can click “Settings” button and enter “Profile Settings” panel to adjust video size, bit rate, frame rate, sample rate and audio channels. Here personally I recommend you to set the video size as 1920*1080p for better editing. Of course, if you want to get original 4K resolution, just keep the video size as original.
Note: The product also has more editing functions that you can click the “Edit” to do some editing incidentally, such as trim, crop and change the effect.
Step 5: Click the “Convert” button to start transcoding MP4 files to MPEG-2. After the conversion, click the ‘Open’ button to locate the output files and transfer the convert mp4 files for editing in Pro CC on Windows.
Finally, you can edit some 4K videos with Adobe Premiere Pro CC for uploading to web or sharing with your friends.
Tips:
1. You can check the "Merge into one file" box, to combine several .mp4 clips together if necessary.
2. These are the advantages of 4K videos to Premiere Pro CC Converter, convenient, clean interface, simple operation. If you have the requirement of DVD burning or muti-track preserving, there are some bundled products to help you save more, just click here.
Much wonderful software bundled with Video Converter Ultimate will provide you more amazing experience in converting videos. Go to Money Saving Software Bundles to get special offer for more software, such as ByteCopy + Video Converter Ultimate = Only $79.9, Save $27.1, Video Converter Ultimate($65) + ChewTune($29) = Only $74.9, Save $19.1 and so on.
Read More:
- Import Nikon D750 MPEG-4/H.264 videos to FCP 6/7 effortlessly
- Add SRT Subtitles to AVI File on Windows 10/Mac El Capitan
- FFmpeg Alternative - Tutorial to Crop Video Using FFmpeg
- Import iTunes DRM Videos to Adobe Premiere Pro
- Import Documentary Footage to Adobe Premiere Pro/ DaVinci Resolve