Backup and Store DVDs to Seagate Central for streaming to Game Consoles, Media players, Smart TVs, Portable devices is a good idea for movie fans who has a lot of DVD discs and you want to be able to watch to them from any computer or device around your home without any limitation. It has many advantages, for example, it frees you from the troubles of disc loss or damage, and the space of physical hard disk, and lets you upload a personal DVD movies to the Youtube, VLC, Windows Media Player, streaming DVD contents to Chromecast 2, TV, Roku player, PS4, PS4, WDTV and so on, so you can share it with your family members or access your movies at home or on the road.
However, the Seagate Central has the ability to stream most major file types, including MP4, M4V, MKV, AVI, WMV, OGG, MP3, M4A, WMA, AIFF, WAV, and FLAC. However, playback support is ultimately dictated by the playback device, meanwhile, considering DVD copy protection, you may need rip DVDs to any playable digital formats and then backup the ripped DVD movies to Seagate Central Personal Cloud Storage.
Hot Search: 500 DVDs to Seagate Wireless Plus | HD Movies to Seagate Wireless Plus | Upload DVDs to Dropbox | Blu-ray on Raspberry Pi 2 rasplex | DVD to 3TB AirPort Time Capsule Wireless Hard Drive
This is easier than it sounds – essentially you copy all your DVD movies to Seagate Central 3TB Personal Cloud Storage that can stream the DVD movie files to your game consoles, media players, Smart TVs, and portable devices. Here, we can offer you a Best DVD to Seagate Central Ripper - Pavtube BDMagic /Pavtube BDMagic for Mac .
* No.1 fast Blu-ray/DVD conversion software in the market which decrypts almost all copy-protected Blu-ray/DVDs.
* It could backup Blu-ray/DVD to Seagate Central 2TB/3TB/4TB Personal Cloud Storage compatible H.264 video, MPEG-4, and Motion-JPEG for video, and AAC, MP3, Audible (formats 2, 3, 4), Apple Lossless, AIFF, and WAV for audio with excellent output video quality.
* Besides converting Blu-ray/DVD files, it can also compress a DVD to smaller file size, saving the space for your console if you need.
* The professional DVD Ripper not only can select subtitle, trim videos and reset video parameters for better DVD viewing on any multimedia devices, but also offer you 6X time DVD ripping speed by NVIDIA CUDA technology.
* Supported OS: Windows 10, Windows 8.1, Windows 8, Windows 7, XP, etc.
* If you need to stream DVD to Samsung devices, simply click the “Profile” column and choose Samsung compatible formats from “Samsung”;
* If you need to stream DVD to PS4, PS3, PSP, Xbox One/360, Wii, etc., simply click the “Profile” column and choose compatible format from their special format, which will remove all the incompatibility issue;
* If you desire to stream the ripped DVD to Apple TV, iPad, iPhone, Android, Surface and any of other multimedia devices, you can also choose directly from the “Apple”, “Common Video”, “HD Video”, etc. profile listed in the “Profile” Category that envelops 150+ profiles, there are HD MP4, HD MOV, HD AVI, HD MKV, HD WMV, HD MPG, TS, WebM, DV, AVI, Divx, Xvid, FLV, SWF, F4V, M4V, etc. available for your choice.
Free Download this TOP DVD to Seagate Central 3TB/4TB/2TB Converter:


Other Download:
- Pavtube old official address: http://www.pavtube.cn/blu-ray-ripper/
- Cnet Download: http://download.cnet.com/Pavtube-BDMagic/3000-7970_4-75922877.html
Rip DVD to Seagate Central 3TB/4TB/2TB with Best Video Settings
Step 1. Load DVD movies
Insert your DVD disc into DVD drive, Launch the program and click the "Load file(s)" button to import the DVD movies. DVD, ISO/IFO files are also supported. You can select chapters as you want.
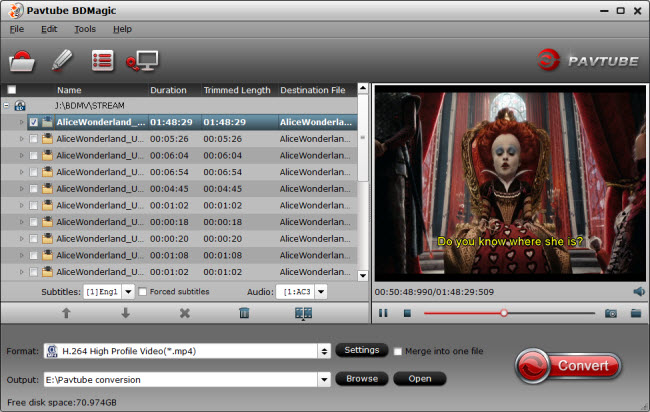
Tip: Highlight the movie title you want to rip, and then you can click the dropdown menu after “Subtitles” and “Audio” respectively to select your wanted subs and audio track to be preserved in the resulted files.
Step 2. Choose output format for your DevicesSince almost of all the media devices like WD Media Player, iPad, laptops, Smart TV, Game Consoles, Apple TV, smartphones and tablets that Seagate Central NAS can be used with can support MP4 video files. So you can target MP4 as output format from “Common Video”.
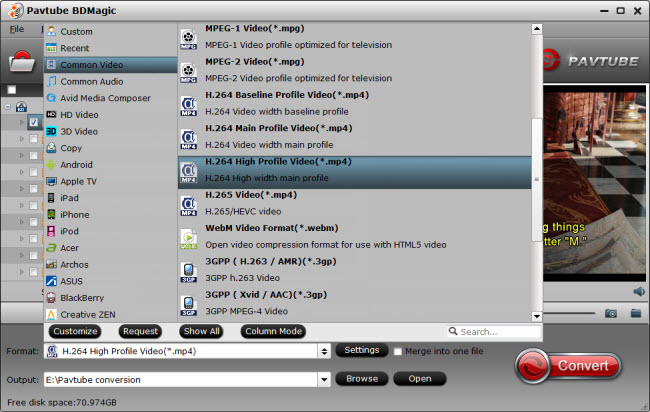
You have a great many choices only depending on what your purpose of using the output video file.
1. Backup DVD to VOB/DVD folder: fast speed, original DVD quality and structure, convenient for future DVD burning;
2. Convert DVD to PC/Mac General Video: diversified choices, different formats for various purposes, smaller file size;
3. Rip DVD to Device Video: Play DVD on iPhone/iPad/Android/Apple TV/Surface/TV/other portable devices in mobile way.
Tip: Click Settings bar, you can adjust the level of compression to suit the quality you want. If you prefer a much better video quality and don’t mind the output file size, you can rise the video bit rate higher. Generally speaking, the higher video bit rate will result in the larger output file size, and vice versa.
Step 3: Rip DVD to Seagate Central
Finally, click “Convert” button to copy “Avengers: Age of Ultron” Blu-ray to optimized format for Seagate Central. When the conversion finishes, click Open button to find the output files and you can do the online movie sharing via your Seagate Central, iPad/Android/PS4/Xbox/Roku with family members and friends. Also you can stream your video onto any smart TV or devices in the house using Seagate.
How to Stream DVD video from Seagate to Devices from Windows/Mac
Please follow this procedure to load content onto your Seagate in Windows:
To verify whether you have the latest version of the firmware on the Seagate, open the Public folder and click on the "Manage the Seagate Central" link. Once logged in, go to "Settings" and then click on "Advanced" and "Firmware Update". On the right-hand side, click on "Check for update" and apply any updates it may find.
Please follow this procedure to load content onto your Seagate from a Mac computer:
To verify which version of the firmware is on your Seagate, open the Seagate's Public folder and click on the "Manage the Seagate Central" link. Once logged in, click on the "Settings" tab, then click on "Avanced" on the left-hand side of the window. Click on "Firmware Update." Click on "Check for update" on the right-hand side and apply any updates it finds. (More reference).
Additional Tips:
1. If you’d like to copy only movie content and leave out the extras and commentary, the Directly Copy is exactly what you need, which copies intact. M2TS main movie from Blu-ray disc without extras.
2.There are various output profile presets.
Please choose the subtitle and movie language you need in the option box under the movie list. And then please click the format bar to choose MKV as output format.
Many people like me own would love to enjoy movies and TV shows from physical discs to more than one mobile phone and tablet. You can count on Pavtube ByteCopy because it offers so many output formats that you would find the suitable one eventually.
Note: Much wonderful software bundled with BDMagic will provide you more amazing experience in converting videos. Go to Money Saving Software Bundles to get special offer for more software, such as BDMagic($49) + DVD Creator($35) = Only $49.9, Save $28.1, BDMagic($49) + ChewTune($29)= Only $49.9, Save $28.1 and so on.
Read More:
However, the Seagate Central has the ability to stream most major file types, including MP4, M4V, MKV, AVI, WMV, OGG, MP3, M4A, WMA, AIFF, WAV, and FLAC. However, playback support is ultimately dictated by the playback device, meanwhile, considering DVD copy protection, you may need rip DVDs to any playable digital formats and then backup the ripped DVD movies to Seagate Central Personal Cloud Storage.
Hot Search: 500 DVDs to Seagate Wireless Plus | HD Movies to Seagate Wireless Plus | Upload DVDs to Dropbox | Blu-ray on Raspberry Pi 2 rasplex | DVD to 3TB AirPort Time Capsule Wireless Hard Drive
This is easier than it sounds – essentially you copy all your DVD movies to Seagate Central 3TB Personal Cloud Storage that can stream the DVD movie files to your game consoles, media players, Smart TVs, and portable devices. Here, we can offer you a Best DVD to Seagate Central Ripper - Pavtube BDMagic /Pavtube BDMagic for Mac .
* No.1 fast Blu-ray/DVD conversion software in the market which decrypts almost all copy-protected Blu-ray/DVDs.
* It could backup Blu-ray/DVD to Seagate Central 2TB/3TB/4TB Personal Cloud Storage compatible H.264 video, MPEG-4, and Motion-JPEG for video, and AAC, MP3, Audible (formats 2, 3, 4), Apple Lossless, AIFF, and WAV for audio with excellent output video quality.
* Besides converting Blu-ray/DVD files, it can also compress a DVD to smaller file size, saving the space for your console if you need.
* The professional DVD Ripper not only can select subtitle, trim videos and reset video parameters for better DVD viewing on any multimedia devices, but also offer you 6X time DVD ripping speed by NVIDIA CUDA technology.
* Supported OS: Windows 10, Windows 8.1, Windows 8, Windows 7, XP, etc.
* If you need to stream DVD to Samsung devices, simply click the “Profile” column and choose Samsung compatible formats from “Samsung”;
* If you need to stream DVD to PS4, PS3, PSP, Xbox One/360, Wii, etc., simply click the “Profile” column and choose compatible format from their special format, which will remove all the incompatibility issue;
* If you desire to stream the ripped DVD to Apple TV, iPad, iPhone, Android, Surface and any of other multimedia devices, you can also choose directly from the “Apple”, “Common Video”, “HD Video”, etc. profile listed in the “Profile” Category that envelops 150+ profiles, there are HD MP4, HD MOV, HD AVI, HD MKV, HD WMV, HD MPG, TS, WebM, DV, AVI, Divx, Xvid, FLV, SWF, F4V, M4V, etc. available for your choice.
Free Download this TOP DVD to Seagate Central 3TB/4TB/2TB Converter:
Other Download:
- Pavtube old official address: http://www.pavtube.cn/blu-ray-ripper/
- Cnet Download: http://download.cnet.com/Pavtube-BDMagic/3000-7970_4-75922877.html
Rip DVD to Seagate Central 3TB/4TB/2TB with Best Video Settings
Step 1. Load DVD movies
Insert your DVD disc into DVD drive, Launch the program and click the "Load file(s)" button to import the DVD movies. DVD, ISO/IFO files are also supported. You can select chapters as you want.
Tip: Highlight the movie title you want to rip, and then you can click the dropdown menu after “Subtitles” and “Audio” respectively to select your wanted subs and audio track to be preserved in the resulted files.
Step 2. Choose output format for your DevicesSince almost of all the media devices like WD Media Player, iPad, laptops, Smart TV, Game Consoles, Apple TV, smartphones and tablets that Seagate Central NAS can be used with can support MP4 video files. So you can target MP4 as output format from “Common Video”.
You have a great many choices only depending on what your purpose of using the output video file.
1. Backup DVD to VOB/DVD folder: fast speed, original DVD quality and structure, convenient for future DVD burning;
2. Convert DVD to PC/Mac General Video: diversified choices, different formats for various purposes, smaller file size;
3. Rip DVD to Device Video: Play DVD on iPhone/iPad/Android/Apple TV/Surface/TV/other portable devices in mobile way.
Tip: Click Settings bar, you can adjust the level of compression to suit the quality you want. If you prefer a much better video quality and don’t mind the output file size, you can rise the video bit rate higher. Generally speaking, the higher video bit rate will result in the larger output file size, and vice versa.
Step 3: Rip DVD to Seagate Central
Finally, click “Convert” button to copy “Avengers: Age of Ultron” Blu-ray to optimized format for Seagate Central. When the conversion finishes, click Open button to find the output files and you can do the online movie sharing via your Seagate Central, iPad/Android/PS4/Xbox/Roku with family members and friends. Also you can stream your video onto any smart TV or devices in the house using Seagate.
How to Stream DVD video from Seagate to Devices from Windows/Mac
Please follow this procedure to load content onto your Seagate in Windows:
- Set up your Seagate by opening the Public folder and clicking on the "Manage the Seagate Central" link.
- Before you decide to transfer a large amount of files to your Seagate, Seagate recommends you make sure you have the most up-to-date firmware. See the instructions at the end of this article on how to check and update firmware.
- Open the Start menu, then open (My) Computer or Windows/File Explorer. (In Windows 8: Press the Windows key () + D, then select File Explorer ()
- In the left sidebar, click on the triangle icon next to Network to expand the menu
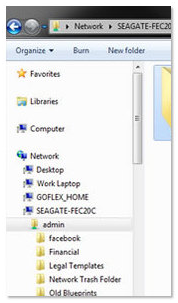
- Find the Seagate and click on it.
- The Seagate will appear with the hostname.
- Example: Seagate-123456. The Public folder will appear. You may also see folders with titles that correspond with your username and other users you have set up. If you plan to view your content outside of your home using the Seagate Media app, this content must be placed in the Public folder.
- Open another Windows/File Explorer or (My) Computer window and navigate to the files you would like to add to your Seagate.
- Select the content you would like to copy and drag and drop the content to the folder of your choice. The private folder's title is your username. That folder will always require a login and should be used to store files you don't want readily available on your local network. You can add files to this folder by double-clicking on the folder and providing your credentials. Once you're logged in, you can manually transfer files to that folder.
To verify whether you have the latest version of the firmware on the Seagate, open the Public folder and click on the "Manage the Seagate Central" link. Once logged in, go to "Settings" and then click on "Advanced" and "Firmware Update". On the right-hand side, click on "Check for update" and apply any updates it may find.
Please follow this procedure to load content onto your Seagate from a Mac computer:
- Set up your Seagate Central by opening the Seagate's Public folder and clicking on the "Manage the Seagate Central" link.
- Before you decide to transfer a large amount of files to your Seagate, Seagate recommends you make sure you have the most up-to-date firmware. Check the bottom of this article to see how to verify the firmware on your drive.
- Open Finder from the Mac desktop.
- In the left sidebar under Shared, find your Seagate device listed as Seagate-XXXXXX(where Seagate-XXXXXX is the host name).
- The public folder will be displayed. You can access it from here if that's where you want to copy your data. If you want to access your private folder, you will need to click on Connect As, then type in your credentials. Note: The username that is displayed by default is not the username of your Seagate. You will need to clear out that username and then type in the username that you gave the drive during setup.
- Once you are connected, the private share (titled according to your username) and the public share will display in the left sidebar. Double-click on the desired folder to drag and drop data to it.
If you would like to view your content while outside of your home through the Seagate Media app, please drag and drop your content to the Public folder. The Seagate Media app has a limitation that will only allow you access to your Public Folder.
To verify which version of the firmware is on your Seagate, open the Seagate's Public folder and click on the "Manage the Seagate Central" link. Once logged in, click on the "Settings" tab, then click on "Avanced" on the left-hand side of the window. Click on "Firmware Update." Click on "Check for update" on the right-hand side and apply any updates it finds. (More reference).
Additional Tips:
1. If you’d like to copy only movie content and leave out the extras and commentary, the Directly Copy is exactly what you need, which copies intact. M2TS main movie from Blu-ray disc without extras.
2.There are various output profile presets.
Please choose the subtitle and movie language you need in the option box under the movie list. And then please click the format bar to choose MKV as output format.
Many people like me own would love to enjoy movies and TV shows from physical discs to more than one mobile phone and tablet. You can count on Pavtube ByteCopy because it offers so many output formats that you would find the suitable one eventually.
Note: Much wonderful software bundled with BDMagic will provide you more amazing experience in converting videos. Go to Money Saving Software Bundles to get special offer for more software, such as BDMagic($49) + DVD Creator($35) = Only $49.9, Save $28.1, BDMagic($49) + ChewTune($29)= Only $49.9, Save $28.1 and so on.
Read More: