SUMMARY: Here, we offers you two parts about how to convert videos to iMovie supported format on Mac OS X and how to Edit Video by using iMovie on Mac, enjoy!
Why Do I Failed to Edit Videos with iMovie on Mac OS X El Capitan? Without doubt, you may have come across the same puzzle as above. The problem is that the OS is currently in beta, so Apple is still working on fixing the bugs. Until the final version is released later this year, you don’t have a choice but to either wait it out, or find an alternative to iMovie. If waiting isn’t an option, luckily for you, there’s a pretty decent substitute that you could use.
Whether the problem is that your audio isn’t in sync with the video, you have trouble converting videos to another format, can’t add background music or you have a different issue, a lot could go wrong with using iMovie in El Capitan. Just sustain your attention on the following.
Hot Search: VOB to iMovie | DVD to iMovie | Blu-ray to iMovie |
According to Apple, iMovie supports these video formats: MPEG-4, QuickTime MOV, MPEG-2, AVCHD, DV (both standard and high-definition videos). And iMovie supports most of the commonly-used video codecs, including H.264, MPEG-2, MPEG-4, DV, and AIC. If your videos are in the above mentioned formats and the right video codec, it could be very easy to import these videos into iMovie. See the steps from Part II for how to import video to iMovie.
Part I: Convert Videos to iMovie Supported Format on Mac OS X with Pavtube
However, when videos recorded by your camcorders or the movies you've downloaded online are not just in the iMovie-friendly formats. you need the right video format for iMovie. If you are not lucky enough, there is a way to fix it. You can convert the videos to iMovie compatible formats by using the professional app, iMedia Converter for Mac(Snow Leopard, Lion, Mountain Lion, Mavericks, Yosemite and El Capitan included). It is your best bet to do video conversion.
Step 1. Add Video files to the program
Launch this Video to iMovie converter and import any format videos. For saving your time, you can drag your video files to the program in a batch.

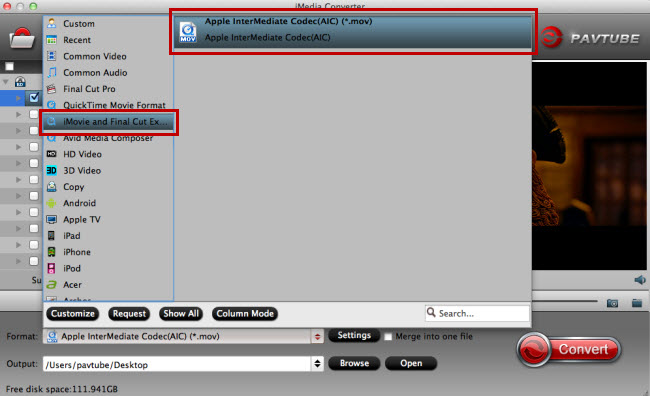
Step 2: Choose iMovie supported video format
Apple Intermediate Codec (AIC) is a high-quality 4:2:0 video codec which is well supported by iMovie. So click the format bar, follow "iMovie and Final Cut Pro..." to choose "Apple InterMediate Codec (AIC) (*.mov)". Learn>>Best File Formats for iMovie.
Step 3. Edit MKV files with the built-in video editor (Optional)
You can use the video editor to do some pre-editing work like adding watermarks for Copyright. Just click the watermark button to do what you want.

Step 4. Start converting MKV files.
Click the big red "Convert" button in the main UI. This program will start converting your mkv video to iMovie perfectly. To find your videos, just click "Open" button.
Part II: How to Edit Video by using iMovie on Mac
iMovie comes with a built-in library, which can organize your videos automatically. Thus, all the movies you have created and all the video clips you have captured will be displayed in sequence. With its creative interface, iMovie enables you to create new project and view your library easily and quickly. iMovie provides a platform for sharing videos. With few clicks, you can upload movies to websites, like YouTube and make versions for iPhone, iPod, Apple TV, etc. In a word, editing movies on iMovie is a nice and ideal choice. Here is the basic information for how to edit videos on iMovie.
Step-by-step guide on how to edit video using iMovie for Mac OS X (Lion, Mountain Lion, Mavericks, Yosemite)
Step 1: Create a New iMovie Project
After running iMovie, go to File> New Project, and give a name to the project. Then click Create to start a new project..
Step 2: Connect Your DV Camera to Mac
Connect your DV camera with Mac using a USB cable. Turn on your camera and set it to PC connect mode..
Step 3: Import Video to the Project
After getting the "Camera Connected" notice, click "Import" button. Then iMovie will import your videos and play the videos. If you want to stop adding videos, just click "Import" button again. To delete video clips, just drag and drop your added video clip(s) from the clips pane to the editable timeline along the bottom of the iMovie main interface. The difference between iMovie and other applications is that once you have deleted a clip from iMovie, you will not be able to get the clip back.
iMovie allows you to add videos in formats like: MOV, MPG, AVI, MP4, DAT, 3GP
If you have got videos in FLV, MP4, VOB, MTS, MXF and AVI format, which are not supported by iMovie, you can adopt iMedia Converter for Mac, a useful conversion tool, to convert these videos to iMovie compatible format first.
Step 4: Edit Video on iMovie
-To Split a Clip: Put the cursor under the viewing window where you would like to split the clip into two. Move to "Edit" menu, then click on the "Split Video Clip at Playhead" option.
-To Crop a Clip: Click "Crop" and drag the small triangles to the timeline to select the wanted portions.
-To Add Effects: Choose "Effects" tab in the menu at the bottom of the clips pane. In the editing area, choose a clip that you want to add effect. Select an wanted effect. It allows you to adjust the effect under the preview window. You can preview the result in the preview window. iMovie supports to change the parameters of the effect. When done, click the "Preview" button again so that to load the new settings for the effect. Then click "Apply," button and wait until it finishes effect rendering. After the effect is being added to the editing region, you can view the effect rendering process by the red progress bar that appears in the clip. After that, save your edit.
Step 5: Save the Project
In the main interface, click the "File" and then select the "Save Project" option.
That's all. Hope the article editing video on Mac using iMovie can do some favor for you.
Much wonderful software bundled with Video Converter Ultimate will provide you more amazing experience in converting videos. Go to Money Saving Software Bundles to get special offer for more software, such as ByteCopy + Video Converter Ultimate = Only $79.9, Save $27.1, Video Converter Ultimate($65) + ChewTune($29) = Only $74.9, Save $19.1 and so on.
Read More:
Why Do I Failed to Edit Videos with iMovie on Mac OS X El Capitan? Without doubt, you may have come across the same puzzle as above. The problem is that the OS is currently in beta, so Apple is still working on fixing the bugs. Until the final version is released later this year, you don’t have a choice but to either wait it out, or find an alternative to iMovie. If waiting isn’t an option, luckily for you, there’s a pretty decent substitute that you could use.
Whether the problem is that your audio isn’t in sync with the video, you have trouble converting videos to another format, can’t add background music or you have a different issue, a lot could go wrong with using iMovie in El Capitan. Just sustain your attention on the following.
Hot Search: VOB to iMovie | DVD to iMovie | Blu-ray to iMovie |
According to Apple, iMovie supports these video formats: MPEG-4, QuickTime MOV, MPEG-2, AVCHD, DV (both standard and high-definition videos). And iMovie supports most of the commonly-used video codecs, including H.264, MPEG-2, MPEG-4, DV, and AIC. If your videos are in the above mentioned formats and the right video codec, it could be very easy to import these videos into iMovie. See the steps from Part II for how to import video to iMovie.
Part I: Convert Videos to iMovie Supported Format on Mac OS X with Pavtube
However, when videos recorded by your camcorders or the movies you've downloaded online are not just in the iMovie-friendly formats. you need the right video format for iMovie. If you are not lucky enough, there is a way to fix it. You can convert the videos to iMovie compatible formats by using the professional app, iMedia Converter for Mac(Snow Leopard, Lion, Mountain Lion, Mavericks, Yosemite and El Capitan included). It is your best bet to do video conversion.
Step 1. Add Video files to the program
Launch this Video to iMovie converter and import any format videos. For saving your time, you can drag your video files to the program in a batch.
Step 2: Choose iMovie supported video format
Apple Intermediate Codec (AIC) is a high-quality 4:2:0 video codec which is well supported by iMovie. So click the format bar, follow "iMovie and Final Cut Pro..." to choose "Apple InterMediate Codec (AIC) (*.mov)". Learn>>Best File Formats for iMovie.
Step 3. Edit MKV files with the built-in video editor (Optional)
You can use the video editor to do some pre-editing work like adding watermarks for Copyright. Just click the watermark button to do what you want.
Step 4. Start converting MKV files.
Click the big red "Convert" button in the main UI. This program will start converting your mkv video to iMovie perfectly. To find your videos, just click "Open" button.
Part II: How to Edit Video by using iMovie on Mac
iMovie comes with a built-in library, which can organize your videos automatically. Thus, all the movies you have created and all the video clips you have captured will be displayed in sequence. With its creative interface, iMovie enables you to create new project and view your library easily and quickly. iMovie provides a platform for sharing videos. With few clicks, you can upload movies to websites, like YouTube and make versions for iPhone, iPod, Apple TV, etc. In a word, editing movies on iMovie is a nice and ideal choice. Here is the basic information for how to edit videos on iMovie.
Step-by-step guide on how to edit video using iMovie for Mac OS X (Lion, Mountain Lion, Mavericks, Yosemite)
Step 1: Create a New iMovie Project
After running iMovie, go to File> New Project, and give a name to the project. Then click Create to start a new project..
Step 2: Connect Your DV Camera to Mac
Connect your DV camera with Mac using a USB cable. Turn on your camera and set it to PC connect mode..
Step 3: Import Video to the Project
After getting the "Camera Connected" notice, click "Import" button. Then iMovie will import your videos and play the videos. If you want to stop adding videos, just click "Import" button again. To delete video clips, just drag and drop your added video clip(s) from the clips pane to the editable timeline along the bottom of the iMovie main interface. The difference between iMovie and other applications is that once you have deleted a clip from iMovie, you will not be able to get the clip back.
iMovie allows you to add videos in formats like: MOV, MPG, AVI, MP4, DAT, 3GP
If you have got videos in FLV, MP4, VOB, MTS, MXF and AVI format, which are not supported by iMovie, you can adopt iMedia Converter for Mac, a useful conversion tool, to convert these videos to iMovie compatible format first.
Step 4: Edit Video on iMovie
-To Split a Clip: Put the cursor under the viewing window where you would like to split the clip into two. Move to "Edit" menu, then click on the "Split Video Clip at Playhead" option.
-To Crop a Clip: Click "Crop" and drag the small triangles to the timeline to select the wanted portions.
-To Add Effects: Choose "Effects" tab in the menu at the bottom of the clips pane. In the editing area, choose a clip that you want to add effect. Select an wanted effect. It allows you to adjust the effect under the preview window. You can preview the result in the preview window. iMovie supports to change the parameters of the effect. When done, click the "Preview" button again so that to load the new settings for the effect. Then click "Apply," button and wait until it finishes effect rendering. After the effect is being added to the editing region, you can view the effect rendering process by the red progress bar that appears in the clip. After that, save your edit.
Step 5: Save the Project
In the main interface, click the "File" and then select the "Save Project" option.
That's all. Hope the article editing video on Mac using iMovie can do some favor for you.
Much wonderful software bundled with Video Converter Ultimate will provide you more amazing experience in converting videos. Go to Money Saving Software Bundles to get special offer for more software, such as ByteCopy + Video Converter Ultimate = Only $79.9, Save $27.1, Video Converter Ultimate($65) + ChewTune($29) = Only $74.9, Save $19.1 and so on.
Read More: