Have some excellent DVD movies and want to import them to Final Cut Pro X to make fantastic videos? DVD videos are saved in discs with special format (VOB). And some commercial DVDs are encrypted to copy videos from. We can not import DVD to Final Cut Pro X directly. If you have DVD collection that you would like to extract any movie clips to be able to edit it in Final Cut Pro (X) on Mac OS X, it is possible to rip the DVD to a Final Cut Pro X (FCP X) friendly file that you can then import into Final Cut Pro X on Mac.
Wanna rip DVD to FCP X to Stream more easily? Here, we offer you three ways of putting DVD to FCP for editing on Mac OS X El Capitan, Juts choose the way as you like.
Part One: Professional Way of Import DVD discs to Final Cut Pro (FCP 6/7/X) on Mac OS X
Do you have any great idea to convert your DVD video? Sure! DVD video does not natively work within FCP X. To fix this issue, DVD video fiels must be ripped off the disc and then converted. This process works to rip DVD video for use in Final Cut Pro X. To rip DVD to FCP X, you will need a DVD ripping software. The best program for converting DVD to FCP X is Pavtube BDMagic for Mac (Now 30% off discount). With it, we can effortlessly rip DVD to Apple ProRes MOV format for further editing within Final Cut Pro 6/7 and FCP X on Mac (El Capitan and Yosemite included) without quality loss. Now download this program and follow this guide below to complete your task. Read the review.
Besides FCP X, This versatile DVD to FCP X Converter can also rip Blu-ray to H.264 MP4, Premiere Pro, Avid MC, iMovie, Sony vegas Pro, Premiere Elements, etc video editing programs. If you want to play Blu-ray movies on smartphone, tablet, Smart TV or other media player. Just trying our Blu-ray to Final Cut Pro Converter. This software can help you rip and convert Blu-ray to any video/audio format to fit your needs.
Free Download top Mac DVD to FCP X Converter:


Other Download:
- Pavtube old official address: http://www.pavtube.cn/blu-ray-ripper-mac/
- Cnet Download: http://download.cnet.com/Pavtube-BDMagic/3000-7970_4-76177782.html
Note: For people who want to edit DVD in FCP X keeping the multiple audio/video track separately as original,Pavtube ByteCopy for Mac (Now 30% off discount) is a powerful tool to transcode DVD to multi-track Apple Prores codec. Suppose you are good at both English and Francia, and want to preserve both of them from original DVD discs when converting, this app will be your best choice. (Here is a detailed guide for you).
How to Convert DVD movies to ProRes 422 for Final Cut Pro X?
Step 1. Load DVD movie.
Download the best DVD to FCP X Converter for Mac, install and run the Mac app. Or you can Insert Blu-ray to disc drive, click the “Load disc” button to import source Blu-ray.

Note: Pick one audio track and subtitles in the drop-down list of Audio and Subtitles. You are free to preview DVD movie in the right preview window to check if you get the correct audio track and subtitles.
Step 2. Select output format.
1)Choose the suitable output format from the “Format” menu, and here choose “Final Cut Pro > Apple ProRes 422(*.mov)” as output format for FCP X. Note: If you are a FCP X user, before you try to do the conversion, don't forget to make sure that you have installed the Apple ProRes Codec manually since the FCP X asks users to install it by themselves.

Tip: You can click settings button on the main interface of the DVD Ripper to customize the output parameters, set the resolution or bitrate as you want, you can also keep them as default.

Step 3. Start ripping DVD movies to ProRes 422 for FCP X.
Double check all press and hit the “Convert” button to start ripping DVD movies to Final Cut Pro X compatible Apple ProRes format on Max OS X El Capitan. Once the conversion finishes, import the ripped video files to FCP X and edit them to get your own video clip with ease.
Additional Tips:
If you want to convert both videos files like MTS, AVI, WMV, MKV, FLV, VOB, MXF, etc. and DVD/Blu-ray to Final Cut Pro supported ProRes codec, just turn to iMedia Converter for Mac, which can convert various video formats and DVD/Blu-ray to ProRes codecs on Mac.
Part Two: How To Bring DVD Video Into Final Cut Pro X?
Bringing DVD footage into Final Cut Pro X is simple! Convert your DVD footage with the free application, MPEG Streamclip, by transcoding it into a format that works natively within your non-linear video editing application (Premiere, AVID, Final Cut Pro X).
Ripping media off a DVD to insert in your video project does not have to be a tricky process! Because DVD video does not natively work within FCPX, DVD video files must be ripped off the disc and then converted. This process works to rip DVD video for use in any editing application, but in this example we’ll optimize for Final Cut Pro X. Follow these simple steps:
1. Download Squared 5′s free video conversion software, MPEG Streamclip (Streamclip is an industry favorite for converting a multitude of video formats and codecs). Install the application on your system.

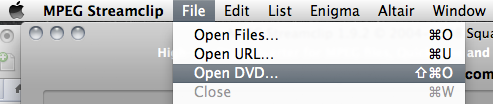
2. Open MPEG Streamclip and then open your DVD in the application (from the menu bar, File > Open DVD…)
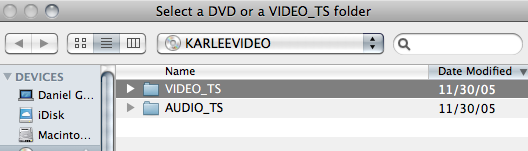
3. Select the Video_TS folder (this contains the main video).
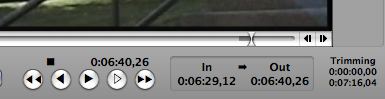
4. MPEG Streamclip will open up your DVD video in the application. Just like the shortcuts for Final Cut Pro (and FCPX) you can set the in and out points of the video you’d like to export by using the shortcuts “I” and “O”.
5. MPEG Streamclip will let you convert your DVD to a wide variety of video formats. Choose the format that best matches your project settings (ie what your timeline is set for). ProRes (Apple’s intermediate codec optimized for post production) is typically a good choice for converting your DVD video.
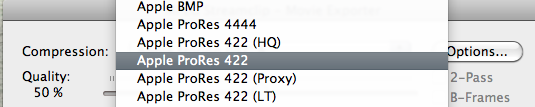
6. Crank your quality setting up to 100%. Although you have a multitude of options for customizing export out of MPEG Streamclip, typically all other defaults will suffice for a standard DVD conversion.

7. Import your clips into Final Cut Pro X and get to editing!

Part Three: How to rip a DVD with HandBrake & import to FinalCut Pro
1.Insert the DVD and open Handbrake (icon looks like a Cocktail with a Pineapple).

2. Navigate to the VIDEO_TS folder in the DVD.
- Handbrake should recognize and select your DVD video contents in a Finder Window bearing your video's title.
- The highlighted folder will have the name "VIDEO_TS". Click in the Finder Window
- If not, click on "Source" in the HandBrake window, and choose the VIDEO_TS folder
- HandBrake will scan the folder (2-3 minutes)
- When it's done go to the Title drop-down menu and choose the file you want to convert. HandBrake will default-select the largest file.

Handbrake will auto- matically search for DVD video contents and choose larg- est file (usually the main one). If you want a section you can choose it from the Title pull-down menu.
3. Once open you can configure the settings. Destination is the path and file name it will be given.

Format allows user to choose the video format – not very important since we will need to convert it before importing anyways. More advanced options are offered for video and audio compression, quality, chapter divisions, etc. These can be left as the default. To begin ripping, click “Start”. Progress will be shown on the bottom of the window.
More on Settings
- On the right-side of the upper menu bar click the "Toggle Presets" icon
- If you want to insert into Final Cut or playback on a computer (in a presentation, etc.) then choose "Normal" or "High Profile."
- However, if you just want to playback the video on another device choose an option under the "Device" menu.
- More advanced options are offered for video and audio compression, quality, chapter divisions, etc. These can be left as the default.
To begin ripping, click “Start”.
- Progress will be shown on the bottom of the window.
- When HandBrake is done the Cocktail & Pineapple icon will appear to tell you it's done.
4. Next you need to convert the HandBrake .m4v file to a .mov using MPEG Streamclip. To do so, open up MPEG Streamclip.

- Drag the m4v video file into the MPEG Streamclip window.
- Go to File > Export to QuickTime
- Set the Compression to "Apple ProRes422"
- Drag the quality bar to 100%
- Choose the frame size "(unscaled)"
- Click "Make Movie". Choose the path and file name and click Save.

Drag the video file into MPEG Streamclip. Click File > Export to QuickTime. Set the Compression setting to “Apple DV/DVCPRO – NTSC”. Drag the quality bar to 100%. Choose the frame size to be “320 x 240 (unscaled)”. Click “Make Movie”. Choose the path and file name and click save.
5. Import into Final Cut Pro. To do so, open Final Cut Pro. Click File > Import > Files. Locate file and click Choose. Source:here.

Do you have another way you like to convert your DVD video? Let us know in the comments!
Read More:
Wanna rip DVD to FCP X to Stream more easily? Here, we offer you three ways of putting DVD to FCP for editing on Mac OS X El Capitan, Juts choose the way as you like.
Part One: Professional Way of Import DVD discs to Final Cut Pro (FCP 6/7/X) on Mac OS X
Do you have any great idea to convert your DVD video? Sure! DVD video does not natively work within FCP X. To fix this issue, DVD video fiels must be ripped off the disc and then converted. This process works to rip DVD video for use in Final Cut Pro X. To rip DVD to FCP X, you will need a DVD ripping software. The best program for converting DVD to FCP X is Pavtube BDMagic for Mac (Now 30% off discount). With it, we can effortlessly rip DVD to Apple ProRes MOV format for further editing within Final Cut Pro 6/7 and FCP X on Mac (El Capitan and Yosemite included) without quality loss. Now download this program and follow this guide below to complete your task. Read the review.
Besides FCP X, This versatile DVD to FCP X Converter can also rip Blu-ray to H.264 MP4, Premiere Pro, Avid MC, iMovie, Sony vegas Pro, Premiere Elements, etc video editing programs. If you want to play Blu-ray movies on smartphone, tablet, Smart TV or other media player. Just trying our Blu-ray to Final Cut Pro Converter. This software can help you rip and convert Blu-ray to any video/audio format to fit your needs.
Free Download top Mac DVD to FCP X Converter:
Other Download:
- Pavtube old official address: http://www.pavtube.cn/blu-ray-ripper-mac/
- Cnet Download: http://download.cnet.com/Pavtube-BDMagic/3000-7970_4-76177782.html
Note: For people who want to edit DVD in FCP X keeping the multiple audio/video track separately as original,Pavtube ByteCopy for Mac (Now 30% off discount) is a powerful tool to transcode DVD to multi-track Apple Prores codec. Suppose you are good at both English and Francia, and want to preserve both of them from original DVD discs when converting, this app will be your best choice. (Here is a detailed guide for you).
How to Convert DVD movies to ProRes 422 for Final Cut Pro X?
Step 1. Load DVD movie.
Download the best DVD to FCP X Converter for Mac, install and run the Mac app. Or you can Insert Blu-ray to disc drive, click the “Load disc” button to import source Blu-ray.
Note: Pick one audio track and subtitles in the drop-down list of Audio and Subtitles. You are free to preview DVD movie in the right preview window to check if you get the correct audio track and subtitles.
Step 2. Select output format.
1)Choose the suitable output format from the “Format” menu, and here choose “Final Cut Pro > Apple ProRes 422(*.mov)” as output format for FCP X. Note: If you are a FCP X user, before you try to do the conversion, don't forget to make sure that you have installed the Apple ProRes Codec manually since the FCP X asks users to install it by themselves.
Tip: You can click settings button on the main interface of the DVD Ripper to customize the output parameters, set the resolution or bitrate as you want, you can also keep them as default.
Step 3. Start ripping DVD movies to ProRes 422 for FCP X.
Double check all press and hit the “Convert” button to start ripping DVD movies to Final Cut Pro X compatible Apple ProRes format on Max OS X El Capitan. Once the conversion finishes, import the ripped video files to FCP X and edit them to get your own video clip with ease.
Additional Tips:
If you want to convert both videos files like MTS, AVI, WMV, MKV, FLV, VOB, MXF, etc. and DVD/Blu-ray to Final Cut Pro supported ProRes codec, just turn to iMedia Converter for Mac, which can convert various video formats and DVD/Blu-ray to ProRes codecs on Mac.
Part Two: How To Bring DVD Video Into Final Cut Pro X?
Bringing DVD footage into Final Cut Pro X is simple! Convert your DVD footage with the free application, MPEG Streamclip, by transcoding it into a format that works natively within your non-linear video editing application (Premiere, AVID, Final Cut Pro X).
Ripping media off a DVD to insert in your video project does not have to be a tricky process! Because DVD video does not natively work within FCPX, DVD video files must be ripped off the disc and then converted. This process works to rip DVD video for use in any editing application, but in this example we’ll optimize for Final Cut Pro X. Follow these simple steps:
1. Download Squared 5′s free video conversion software, MPEG Streamclip (Streamclip is an industry favorite for converting a multitude of video formats and codecs). Install the application on your system.
2. Open MPEG Streamclip and then open your DVD in the application (from the menu bar, File > Open DVD…)
3. Select the Video_TS folder (this contains the main video).
4. MPEG Streamclip will open up your DVD video in the application. Just like the shortcuts for Final Cut Pro (and FCPX) you can set the in and out points of the video you’d like to export by using the shortcuts “I” and “O”.
5. MPEG Streamclip will let you convert your DVD to a wide variety of video formats. Choose the format that best matches your project settings (ie what your timeline is set for). ProRes (Apple’s intermediate codec optimized for post production) is typically a good choice for converting your DVD video.
6. Crank your quality setting up to 100%. Although you have a multitude of options for customizing export out of MPEG Streamclip, typically all other defaults will suffice for a standard DVD conversion.
7. Import your clips into Final Cut Pro X and get to editing!
Part Three: How to rip a DVD with HandBrake & import to FinalCut Pro
1.Insert the DVD and open Handbrake (icon looks like a Cocktail with a Pineapple).
2. Navigate to the VIDEO_TS folder in the DVD.
- Handbrake should recognize and select your DVD video contents in a Finder Window bearing your video's title.
- The highlighted folder will have the name "VIDEO_TS". Click in the Finder Window
- If not, click on "Source" in the HandBrake window, and choose the VIDEO_TS folder
- HandBrake will scan the folder (2-3 minutes)
- When it's done go to the Title drop-down menu and choose the file you want to convert. HandBrake will default-select the largest file.
Handbrake will auto- matically search for DVD video contents and choose larg- est file (usually the main one). If you want a section you can choose it from the Title pull-down menu.
3. Once open you can configure the settings. Destination is the path and file name it will be given.
Format allows user to choose the video format – not very important since we will need to convert it before importing anyways. More advanced options are offered for video and audio compression, quality, chapter divisions, etc. These can be left as the default. To begin ripping, click “Start”. Progress will be shown on the bottom of the window.
More on Settings
- On the right-side of the upper menu bar click the "Toggle Presets" icon
- If you want to insert into Final Cut or playback on a computer (in a presentation, etc.) then choose "Normal" or "High Profile."
- However, if you just want to playback the video on another device choose an option under the "Device" menu.
- More advanced options are offered for video and audio compression, quality, chapter divisions, etc. These can be left as the default.
To begin ripping, click “Start”.
- Progress will be shown on the bottom of the window.
- When HandBrake is done the Cocktail & Pineapple icon will appear to tell you it's done.
4. Next you need to convert the HandBrake .m4v file to a .mov using MPEG Streamclip. To do so, open up MPEG Streamclip.
- Drag the m4v video file into the MPEG Streamclip window.
- Go to File > Export to QuickTime
- Set the Compression to "Apple ProRes422"
- Drag the quality bar to 100%
- Choose the frame size "(unscaled)"
- Click "Make Movie". Choose the path and file name and click Save.
Drag the video file into MPEG Streamclip. Click File > Export to QuickTime. Set the Compression setting to “Apple DV/DVCPRO – NTSC”. Drag the quality bar to 100%. Choose the frame size to be “320 x 240 (unscaled)”. Click “Make Movie”. Choose the path and file name and click save.
5. Import into Final Cut Pro. To do so, open Final Cut Pro. Click File > Import > Files. Locate file and click Choose. Source:here.
Do you have another way you like to convert your DVD video? Let us know in the comments!
Read More: