DVD to External HDD Frequently asked questions:
“Need a tool which can help me direct copy of DVD films I own? as per my question above I'm not sure which format to use. I will mainly watch at home or if on holiday. I would like the ability not to be restricted to media player. I have windows 10 laptop, Apple TV, saying smart TV & smartphone also Apple iPad mini. I Eventually store on external hdd, would like to back these up to cloud (currently this will be too expensive due to the space I will require) I will watch the ripped movies. Any good suggestions? Can I get my DVDs to External HDD for watching everywhere?”
Hot Search: DVD to Premiere - Rip and Import DVD to Premiere Pro CS6 | DVDs to Dropbox | 500 DVDs to Seagate Wireless Plus | Stream DVD to 4K TV
The great of a dream is the possibility of achieving it. So how can we carry our DVD movies wherever? Whether for backup, transfer, or just making space on your main hard drive, there are times when we want to move files to an external drive. These are inexpensive, and available online and at many computer and electronics stores. In this guide, we will show you the best way of backup all DVDs to External Hard Drive for Various Purposes via Windows 10? Get the best DVD Ripper to make a copy of all DVDs now, then you can view movies everywhere and everytime with original quality.
As we all know, DVDs are usually hard to be backed up due to region code and disc encryption protection, you’d better to use Pavtube DVD copying program to remove the disc protection and copy source disc to External Hard Drive/Thumb Drive with same structure preserved. (Learn why choose this Best DVD Copying and Ripping Tool).
Pavtube DVDAid for Mac
Full guide: Directly Copy of DVDs to External Hard Drive on Windows 10
Step 1. Install Pavtube DVDAid on your Windows/Mac.
Pavtube DVDAid for Windows/Mac is an excellent DVD backing up tool that can make 1:1 copy of your source DVD with original structure including extras and menus. Meanwhile, this app is regarded as a great DVD ripping program to help users convert DVD collections for new how tablets and smartphones including like iPad Pro, iPad Air 2, iPad Mini 4, and iPhone 6S/6S Plus, iPod Touch 6, Apple TV 4, Samsung Galaxy Tab S2, Kindle Fire HDX, Google Nexus 7/10 and more.
Full disc copy and Main title copy - On the hand, it can copy your DVD disc with all information with audio streams and subtitle tracks. And on the other hand, it can backup the main movie content out of DVD disc with smaller size.
Conversion acceleration - With technology of NVIDIA CUDA and AMD APP, you can accelerate conversion process by using H.264 codec.
Preview before conversion - There is a preview window on the interface of DVDAid where you can take a preview of your movie before conversion.
Support adding subtitles and output multi-track video - Pavtube DVDAid supports to add *.SRT and *.ASS subtitlesinto video with built-in editing and can output multi-track video.(Best DVD Ripper with multi-track function)
Wide range of output formats - Except for common video formats, like MP4, MOV, H.264, AVI, M4V, etc, this professional DVD Ripper supports to output M3U8 and H.265 video.
Support converting 2D to 3D - With Pavtube DVDAid, you can convert your 3D DVD movies to Side-by-Side(SBS), Top-Bottom, or Anaglyph 3D in MKV/MP4/MOV/WMV/AVI format and enjoy them on your 3D TV or Media Players.
Lifetime free update- Pavtube DVDAid provides customers lifetime free upgrade of product and technical support. Users can contact the support staff via email for help and suggestion.
Below is the picture about the review of the users:

Containing these excellent features, would you like to try this professional DVD Ripper for External HDD?
Free download and install:


Other download:
Pavtube Old Site Download: http://www.pavtube.cn/dvd_ripper/
Cnet download: http://download.cnet.com/Pavtube-DVDAid/3000-7970_4-76158510.html
STEP 1. Load DVD Films/Movies
Launch Pavtube DVDAid and click “Load Disc” button to load DVD discs; you can select the main title and set subtitles/audio language you'd like to preserve.

STEP 2. Choose an output format
a. Click quick button "Copy the entire disc" to starts copying the DVD disc to hard drive maintaining the original structure.
As soon as the copying task finished, you can click "Open" button to get the output videos. The backed up DVD movie is usually saved as a directory file structure within which there are VIDEO_TS and AUDIO_TS folder. The VIDEO_TS folder contains main movies (.vob) and lots of system files (.ifo and .bup).
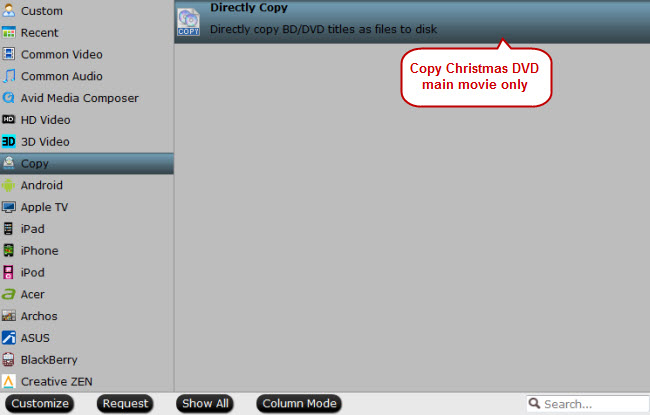
b. If you just wanna do movie only copy, you can choose "Copy" > "Directly Copy" from the Format menu to copy the . vob files only. After that, do remember clicking "Start conversion" button to do Movie-only copy. When the copying work is done, you are able to click "Open" button to get the output .vob files without any other extra contents.
c. If you want to store hundreds of DVD's on external hard drive, then rip the DVD to .avi, .mp4, .mkv, etc format. And click Settings bar, you can adjust the level of compression to suit the quality you want.
d. While, if you wanna transfer and play DVD copy on portable devices like Galaxy Tab S2, iPad Mini 4, iPad Pro, Nexus, Galaxy S6 Edge, etc, you need to further convert the backed up DVD movies.
Note: Pavtube ByteCopy provides hundreds of video/audio format. You should select the one according to your devices. If your multimedia players supports MKV, the best choice for you must be lossless MKV which can keep multiple subtitle/audio track and all chapter markers.
Step 3. Change video specs. (Optional)
If you are not satisfied with default specs, then click "Settings" to enter Profiles Settings windows. You can customize video frame rate, bitrate, size and other settings freely. (It does not work for directly copy)
Step 4. Start conversion.
Click the big red "Convert" to start backing up or converting your DVDs. Usually backup will be quicker because it does not need to do trancoding.
After the conversion, click "Open output folder" to quick locate converted files. Connect your external hard drive to computer and transfer them into it.
Read More:
“Need a tool which can help me direct copy of DVD films I own? as per my question above I'm not sure which format to use. I will mainly watch at home or if on holiday. I would like the ability not to be restricted to media player. I have windows 10 laptop, Apple TV, saying smart TV & smartphone also Apple iPad mini. I Eventually store on external hdd, would like to back these up to cloud (currently this will be too expensive due to the space I will require) I will watch the ripped movies. Any good suggestions? Can I get my DVDs to External HDD for watching everywhere?”
Hot Search: DVD to Premiere - Rip and Import DVD to Premiere Pro CS6 | DVDs to Dropbox | 500 DVDs to Seagate Wireless Plus | Stream DVD to 4K TV
The great of a dream is the possibility of achieving it. So how can we carry our DVD movies wherever? Whether for backup, transfer, or just making space on your main hard drive, there are times when we want to move files to an external drive. These are inexpensive, and available online and at many computer and electronics stores. In this guide, we will show you the best way of backup all DVDs to External Hard Drive for Various Purposes via Windows 10? Get the best DVD Ripper to make a copy of all DVDs now, then you can view movies everywhere and everytime with original quality.
As we all know, DVDs are usually hard to be backed up due to region code and disc encryption protection, you’d better to use Pavtube DVD copying program to remove the disc protection and copy source disc to External Hard Drive/Thumb Drive with same structure preserved. (Learn why choose this Best DVD Copying and Ripping Tool).
Pavtube DVDAid for Mac
Full guide: Directly Copy of DVDs to External Hard Drive on Windows 10
Step 1. Install Pavtube DVDAid on your Windows/Mac.
Pavtube DVDAid for Windows/Mac is an excellent DVD backing up tool that can make 1:1 copy of your source DVD with original structure including extras and menus. Meanwhile, this app is regarded as a great DVD ripping program to help users convert DVD collections for new how tablets and smartphones including like iPad Pro, iPad Air 2, iPad Mini 4, and iPhone 6S/6S Plus, iPod Touch 6, Apple TV 4, Samsung Galaxy Tab S2, Kindle Fire HDX, Google Nexus 7/10 and more.
Full disc copy and Main title copy - On the hand, it can copy your DVD disc with all information with audio streams and subtitle tracks. And on the other hand, it can backup the main movie content out of DVD disc with smaller size.
Conversion acceleration - With technology of NVIDIA CUDA and AMD APP, you can accelerate conversion process by using H.264 codec.
Preview before conversion - There is a preview window on the interface of DVDAid where you can take a preview of your movie before conversion.
Support adding subtitles and output multi-track video - Pavtube DVDAid supports to add *.SRT and *.ASS subtitlesinto video with built-in editing and can output multi-track video.(Best DVD Ripper with multi-track function)
Wide range of output formats - Except for common video formats, like MP4, MOV, H.264, AVI, M4V, etc, this professional DVD Ripper supports to output M3U8 and H.265 video.
Support converting 2D to 3D - With Pavtube DVDAid, you can convert your 3D DVD movies to Side-by-Side(SBS), Top-Bottom, or Anaglyph 3D in MKV/MP4/MOV/WMV/AVI format and enjoy them on your 3D TV or Media Players.
Lifetime free update- Pavtube DVDAid provides customers lifetime free upgrade of product and technical support. Users can contact the support staff via email for help and suggestion.
Below is the picture about the review of the users:
Containing these excellent features, would you like to try this professional DVD Ripper for External HDD?
Free download and install:
Other download:
Pavtube Old Site Download: http://www.pavtube.cn/dvd_ripper/
Cnet download: http://download.cnet.com/Pavtube-DVDAid/3000-7970_4-76158510.html
STEP 1. Load DVD Films/Movies
Launch Pavtube DVDAid and click “Load Disc” button to load DVD discs; you can select the main title and set subtitles/audio language you'd like to preserve.
STEP 2. Choose an output format
a. Click quick button "Copy the entire disc" to starts copying the DVD disc to hard drive maintaining the original structure.
As soon as the copying task finished, you can click "Open" button to get the output videos. The backed up DVD movie is usually saved as a directory file structure within which there are VIDEO_TS and AUDIO_TS folder. The VIDEO_TS folder contains main movies (.vob) and lots of system files (.ifo and .bup).
b. If you just wanna do movie only copy, you can choose "Copy" > "Directly Copy" from the Format menu to copy the . vob files only. After that, do remember clicking "Start conversion" button to do Movie-only copy. When the copying work is done, you are able to click "Open" button to get the output .vob files without any other extra contents.
c. If you want to store hundreds of DVD's on external hard drive, then rip the DVD to .avi, .mp4, .mkv, etc format. And click Settings bar, you can adjust the level of compression to suit the quality you want.
d. While, if you wanna transfer and play DVD copy on portable devices like Galaxy Tab S2, iPad Mini 4, iPad Pro, Nexus, Galaxy S6 Edge, etc, you need to further convert the backed up DVD movies.
Note: Pavtube ByteCopy provides hundreds of video/audio format. You should select the one according to your devices. If your multimedia players supports MKV, the best choice for you must be lossless MKV which can keep multiple subtitle/audio track and all chapter markers.
Step 3. Change video specs. (Optional)
If you are not satisfied with default specs, then click "Settings" to enter Profiles Settings windows. You can customize video frame rate, bitrate, size and other settings freely. (It does not work for directly copy)
Step 4. Start conversion.
Click the big red "Convert" to start backing up or converting your DVDs. Usually backup will be quicker because it does not need to do trancoding.
After the conversion, click "Open output folder" to quick locate converted files. Connect your external hard drive to computer and transfer them into it.
Read More: