Friday, October 30, 2015

Playing YouTube (FLV) files on a Keynote on Mac OS X El Capitan

Below is a complete set of solutions which can help you when it comes to adding YouTube videos to Keynote via Mac OS X El Capitan.

For Mac users Keynote is really a good tool to do presentation, and it's possible to embed YouTube to Apple Keynote. The Keynote application included with Mac OS X El Capitan. There are so many funny and interesting videos on YouTube, have you ever thought that use them to make your presentation more vivid and cogent?  Is there a possible way to download and embed a YouTube video into the Keynote other than creating a hyperlink for it? The answer is Yes. See below how to embed YouTube to Keynote on Mac in order to share Youtube videos in Keynote presentation with audiences. 

While, before inserting YouTube clips to Keynote for sharing, you need do some preparations. First, you need to download YouTube videos on your Mac, and then convert YouTube (.flv) video to Keynote supported video formats. Afterwards, it would be easy for you to import a YouTube video to Keynote on Mac.  

The following article is divided into 3 parts:

Part I. How to download YouTube videos on your Mac
Part II. Convert YouTube (.flv) video to Keynote supported video formats
Part III. Embed YouTube video to Keynote on Mac

Part I: How to download YouTube videos on your Mac

Actually, there are kinds of methods for downloading YouTube video to your Mac. Here we show you how to download videos from YouTube to your Mac with Safari. After opening the URL, pause the video when it starts to play for seconds, and wait for the video to fill the grey progress bar. Then click Window on the menu bar -> Activity, and find the line that represents your video, double click it and the download will begin.


With this method, you do not need any Youtube Downloaderor software, but have to wait for the videos being complete processed. 

Part II. Convert YouTube (.flv) video to Keynote supported video formats

As we know,YouTube FLV videos can be played using QuickTime 7 with the Perian component, but embed them into a Keynote presentation and they often won't play like other video files. (This is annoying because if a file is compatible with QuickTime, you'd expect it to work with other software that uses QuickTime functionality to play media - which is just about everything on a Mac OS X El Capitan.) 

Today here we have found a professional FLV to Keynote Converter for Mac to solve this problem. Maybe you don’ t know the best format for Keynote is MOV. How to work Keynote well with FLV files via Mac 10.11 we may learn from the following page. Here is review

Free Download the FLV to Keynote Converter for Mac for a first step.


Other Download:

- Pavtube old official address: http://www.pavtube.cn/imedia-converter-mac/
- Cnet Download: http://download.cnet.com/Pavtube-iMedia-Converter/3000-2194_4-76177788.html 

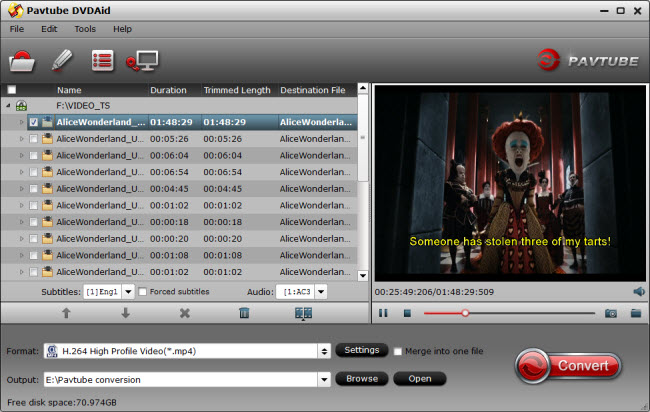
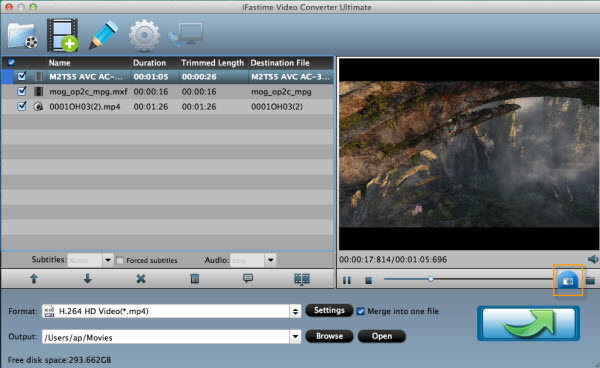
Step 1: Load Youtube (FLV) files. 

Then, Launch the program, drag your FLV files from your computer to the program main interface or load your files by Click "File" > "Add video/audio" or directly drag and drop the Halloween horrible videos to the program window.


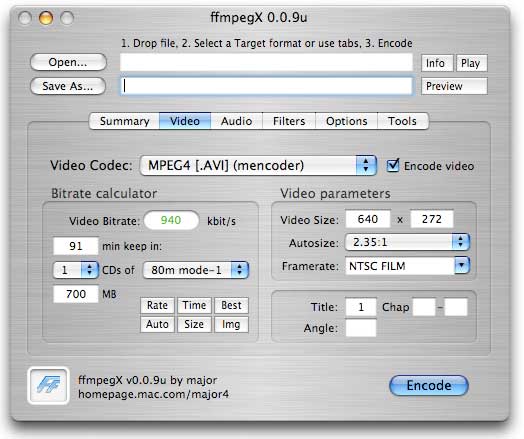
Step 2. Select output format. 

Go to "Format" bar, to play Youtube video on Keynote, go to select "Common Video" > "MOV - QuickTime(*.mov)" as the output file format. You can also select to choose other output file formats according to your own needs.


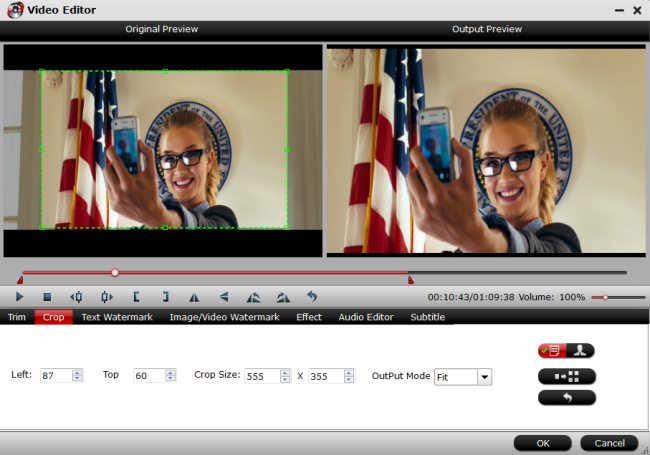
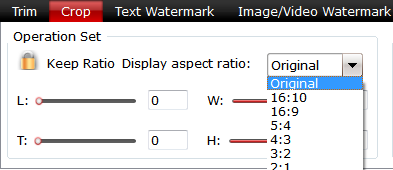
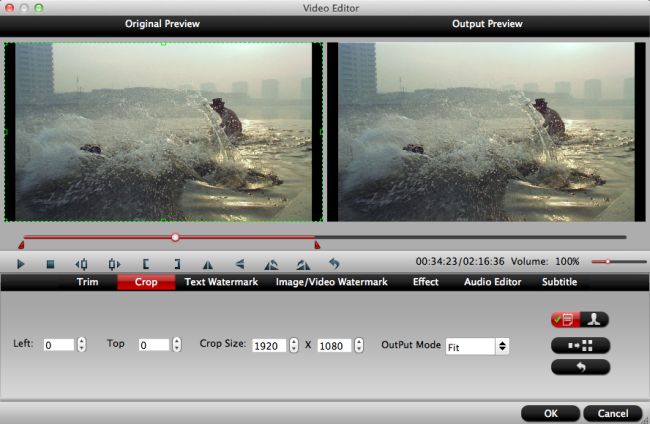
Step 3: Edit Youtube (FLV) video.

For more users, this program is not only a converting tool but also a simple editor. From the pencil icon ‘Editor’, we can see more editing items in. Something like ‘Trim’, ‘Crop’ or ‘Effects’ you can have a try by yourselves.


Step 4: Start Conversion.

Hit the Convert button to start YouTube (.flv) to Keynote conversion on Mac OS X 10.11. Once the conversion process shows in 100%, click Open button to locate the output .mov videos.

Part III. Embed YouTube video to Keynote on Mac OS X El Capitan

You can now drag this video file directly into Keynote. Like any other media asset you can use Keynote's inspector panel to add a border, shadow and even a reflection. You can trim the YouTube videos as you like for the YouTube video to Keynote presentation.

That's all. Only with a few simple steps, you can get YouTube videos and put them to your Keynote presentation. Get started now!

Read More:

Thursday, October 29, 2015

Restore Photos of iPhone 6S after iOS 9.0.2 Update

To fix the bug in iOS 9, Apple release iOS 9.0.1 and iOS 9.0.2 . However, there are many people responding that they lost photos after iOS 9.0.2 update on their iPhone 6S. So you can see many questions about the iPhone 6S photo recovery after iOS 9.0.2 update. 

To recover iPhone 6S photo after updating to iOS 9.0.2,you can use an iPhone Data Recovery to help you. From the Google search, Wondershare Dr.Fone for iOS is a top-rank iPhone data recovery program. You can use this iOS Data Recovery to restore your lost photos of iPhone 6S after iOS 9.0.2 update by extracting the iTunes/iCloud backup. In addition, the data recovery software can help you to recover lost contacts, text messages, reminders, photos, videos, notes,ect from iPhone, iPad directly. 

Free Download and Install iPhone Data Recovery
    

How to Recover photo of iPhone 6S After iOS 9.0.2 Update?

Step 1. Choose Recover mode

Connect your iPhone 6S to your computer and open iPhone Data Recovery program. There are three recovery modes on the interface. Currently, Wondershare only supports to recover photo form iTunes and iCloud backups. Choose any mode of the two to recover the photo of iPhone 6S. For example, if you choose “Recover from iTunes Bakups”, Wondershare will detect all iTunes backup files on your computer automatically. So just choose the one containing your lost photos and click "Select" button to begin.


Step 2: Preview and copy iPhone 6S photo

After the scan, you can preview all the contents of your iTunes backup file, including messages, iMessages, contacts, etc. Then mark the right file type on the left side and click “Recover” to save them on your computer.


Now, you have successfully extracted and restored lost photos of iPhone 6S from iTunes backup, You can transfer them back to your iPhone 6S. As you know that the extracted photos will be in a folder in your computer, so we offer two ways optional: from iCloud.com and from iTunes.

Source site: http://ios-recovery-software.blogspot.com/2015/10/recover-app-photo-of-iphone-6s.html

Related Software:

Wondershare Dr.Fone for Android - First aid to recover deleted or lost contacts, text messages, photos, videos, audio files, documents, whatshistory, call history, etc from Android phones and tablets.
Wondershare MobileTrans - One click and risk-free solution to move contacts, text messages, call logs, calendar, photos, music, video and apps between iPhone, Android, Blackberry and Nokia(Symbian) phones.
Wondershare TunesGo - Transfer and copy music, videos, playlists and other media files from iPhone, iPad and iPod touch to iTunes and PC with no difficulty.

Related Articles:

Wednesday, October 28, 2015

FFmpeg Alternative - Tutorial to Crop Video Using FFmpeg

Outline: FFmpeg is one of the most effective and highly preferred online tools for cutting video. Now you can read this page to learn how to Crop Video Using FFmpeg. 

Need to find the best way to enhance your video through professional editing? Is it possible to Crop Video with FFmpeg? Want to get the amazing effects like intro/credit, sound effects and transitions that will help to make your video more expressive. To search it on the internet, you’ll notice that many people are seeking for FFmpeg alternatives. So, this article will introduce you the best FFmpeg alternatives for most personal computer and Windows/Mac based pc to get over the disadvantages of FFmpeg.
  
Hot Search: Format Factory Alternative | MakeMKV Alternative | DVDFab Alternative | VLC Alternative

Part I: How to Using FFmpeg As a Video Cutting Tool

You can crop a video file using FFmpeg and it is not complex at all. When starting off, it will be paramount on you to determine the right values for your cropping filter. But, you must use cropdetect filter of the FFplay feature. This feature has different arguments for configuration that you should not lose focus on. There is limit, round and reset which all play different roles in the cropping procedures with FFmpeg. 


When editing video using FFmpeg, removing black bars will be the main target because they are very annoying especially in a movie. But, you have a solution in cropping. How will you achieve that? There are many ways used in cropping video using FFmpeg as discussed below:

Using fixed values- with this option, you must use normal expressions for the configuration of the crop filter. It will depend on the parameters of a video file to determine how the cropping will be done. There are values for both input and output configuration that you must get clear hold of.

Notably, out_width/output_height is one of the common expressions that show the amount of content cropped out of a video using FFmpeg. For x/y, it is a coordinate to show where cropping will begin and end. You must get that clearly so as not to crop out necessary sections. Precision is very important and no excuse for any flaws.

Crop filter is the main cropping feature that latest versions of FFmpeg use to crop videos. Be on the lookout for that whenever cropping videos with this program. To preview what you have cropped, the FFplay feature is used.

The good thing with FFmpeg is that you can crop video without necessarily re-encoding. Cropping before playback is the straightforward option that will not necessitate re-encoding.
  
Part II: Use a FFmpeg Alternative to Crop Video - Pavtube Video Converter Ultimate

If you are looking for an alternative software program to replace FFmpeg, make no mistake by choosing Pavtube Video Converter Ultimate which is highly recommended for its very easy-to-use video editing features, as well as powerful video transcoding function to help you out with any format issues. Moreover, this converter also works with Blu-ray/DVDs to satisfy your needs as an alternative to FFmpeg. Here is review

Crop: The "Crop" facility enables users to get rid of the black edges and unwanted area of the image. Switch to "Crop" tab, and follow the below methods to crop selected video:

A. Crop video by dragging and dropping the crop frame Simply move your mouse cursor to drag and adjust the green frame to desired position.


B. Crop video by setting values There are "Simple Mode" and "Advanced Mode" under Crop feature.


In "Simple Mode", you can customize values in the box of "Left", "Top" and "Crop Size" to make your crop decision. Under "Advanced Mode", there are four value fields: Left, Top, Width and Height. You can either type in specific values to the fields or adjust sliders to crop the source file.

Keep original aspect ratio and cropped aspect ratio

To keep original aspect ratio, users need make sure the "Display aspect ratio” and the "Size (pix)" in "Settings" option are all set as "Original". If you want to keep the cropped aspect ratio, Pavtube software offers several aspect ratios for you to choose from, including 16:10, 16:9, 5:4, 4:3, 3:2, and 2:1.


Once you selected a "Display aspect ratio", the "green crop frame" will keep this ratio to crop video and you are able to preview the final effect in real time. If you want to keep the same aspect ratio in your final output files, do remember to set the Video "Size (pix)" in "Settings" section as the same ratio as display aspect ratio.

For example, if you want to export a file with "3:2" aspect ratio, firstly, you choose "3:2" in "Display aspect ratio", and then go to "Settings" section to adjust the Video "Size(pix)" as 720x480 or 1440x960.

After finished, click "OK" to confirm.


More editing functions you can learn from>> Start Using VLC Video Editor Alternative Guide

Free Download this Top FFmpeg Video Editor Alternative: 


Other Download:
 - Pavtube old official address: http://www.pavtube.cn/blu-ray-video-converter-ultimate/
- Cnet Download: http://download.cnet.com/Pavtube-Video-Converter-Ultimate/3000-2194_4-75938564.html

Hope this article helped you to find the best solution to crop videos using FFmpeg media player without any software installing in your PC. If you feel this article interesting like it and share it with your friends. Visit the site regularly for more updates. 

What’s more? This method is also same for both Windows and Mac operating systems but Mac has its own interface. Just get the Pavtube as the Top FFmpeg Video Editor Alternative to Crop Video Clips and enjoy them! 

Read More:

Tuesday, October 27, 2015

Top iPhone Data Recovery Software

Apple users take up huge percent of mobile users. iPhone, iPad and iPod Touch have been common portable devices in our daily life. You can see many people using them around you, especially iPhone. Every new iPhone release can shake the smart phone market. With the popular and the powerful function of each new iPhone, people rely it on more and more, listening to music, watching movies, making notes, reminding daily schedule and more. People become to store more and more data on their iPhone/iPad.

However, these data probably get lost for many unexpected incidents such as iPhone stolen, damaged or got lost, accidental deletion, reset, virus attack, jailbreak or even error operations. Suffering accidental data loss is distressing for people in this info age, since we are used to store vital infolike contacts, messages, precious photos, favorite songs and even some confidential business info in our iPhone for convenience. iPhone data recovery program is a good choice to retrieve all lost data. With so many iPhone Data Recovery softwares on the market, people get confused that which one on earth to choose. Here, the article list you top iPhone data recovery software that are very popular in this field and the file types they supports to recover.


Wondershare

Aiseesoft

EaseUS

Leawo

iSkysoft

iMyfone

AnyMP4

iMobie

Conlusion

41 ticks

$69.95

Buy Now

40 ticks

$69.95

Buy Now

30 ticks

$79.95

Buy Now

30ticks

$59.95

Buy Now

41 ticks

$69.95

Buy Now

8 ticks

$69.95

Buy Now

40 ticks

$79.95

Buy Now


$69.99

Buy Now

iMobie doesn't list the detailed file types it supports to recover from iDevice, iTunes and iCloud backups but this company claims officially that it focuses on analyzing and recovering the most important 22 types of iOS content with the number of supported files being the biggest among these 8 iPhone/iPad Data Recovery Tools.

Note: All of the iPhone Data Recovery Softwares listed here support iPhone 6S/6S Plus/6/6 Plus/5S/5C/5/4S, iPad Air, iPad mini with Retina display, iPad mini, iPad with Retina display, The new iPad, iPad 2, iPod touch 5 as well as the old iPhone 4, iPhone 3GS, iPad 1, iPod touch 4. This chart is only for iPhone 6S/6S Plus/6/6 Plus/5S/5C/5/4S, iPad Air, iPad mini with Retina display, iPad mini, iPad with Retina display, The new iPad, iPad 2, iPod touch 5 devices. Because for the old iPhone 4, iPhone 3GS, iPad 1, iPod touch 4, all of the file types listed here can be retrieved from the three recovery modes these iPhone Data Recovery proframs official sites, excluding iMyfone Data Recovery.

We also learned from the official sites that all of the top iPhone Data Recovery tools have updated to support iTunes 12.2.1 and iOS 9. Their Windows versions support Windows 10 while Mac versions can support Mac OS X El Capitan.

Read the comparison carefully and decide to which one you should choose. After all, no one wants to lost any important data on their iPhone/iPad

Source from: http://open-mobile-share.com/top-iphone-data-recovery/

Related Articles:

Sunday, October 25, 2015

Pavtube 2015 Halloween Special Offer - Up to 40% Discount

Festivals are always the best opportunities to purchase the goods you were not willing to buy or had no ability to afford in the past days. 2015 Halloween is coming. Are you ready to open your wallet? To make your Halloween celebration even greater, Pavtube Studio has prepared a great Halloween Promotion – we are offering you a generous 40% Discount on our Blu-ray & DVD Softwares (Windows 10 and El Capitan supported).   


Since Pavtube Studio offers many kinds of Blu-ray/DVD/Video softwares that you possibly don't know which one to choose, I can make a brief introduction and a recommendation to you.  

Recommendation 1: If you often do video conversion process, you can take Pavtube Video Converter Ultimate andPavtube iMedia Converter for Mac into consideration. It can accept any Halloween movie source, like Blu-ray/DVD disc and 4K/SD/HD online/local video in any format and transform them to nearly any popular video format you have ever seen.  


Recommendation 2: For those who have plenty of Blu-ray discs, Pavtube BDMagic and Pavtube BDMagic for Mac will be the best choice. They are cheaper than the recommendation one but supply the same effect on Blu-ray/DVD Halloween movies.  


Recommendation 3: DVD owners who just need to rip and backup DVD disc or copy DVD folder, DVD ISO/IFO can focus on Pavtube DVDAid and Pavtube DVDAid for Mac. It only can deal with DVD movies but it is the cheapest item.  


Recommendation 4: Pavtube ByteCopy and Pavtube ByteCopy for Mac are for situation that your Halloween Blu-ray/DVD movies have several subtitles and audio tracks and you want to keep all the tracks and chapter markerswhile ripping and copying the discs. What's more, it enables you to extract FLAC/WAV audio from Blu-ray audio disc and extract SRT subtitle from Blu-ray movies.  


Think about which one is the best choice for you so that you can solve your video conversion problem with the least money. Don't waste the money-saving chance on Halloween. Just do it!  

Source: http://onebestsoft.com/pavtube-halloween-coupons/

Stream DVD to 4K TV (and HD TV, 8K TV) as Utmost Perfection

In the age of home theater, 4K TV (and HD TV, 8K TV) contribute a lot in picture and sound quality. Many people would like to spend most of the time sitting on the couch and watching TV for the movie viewing on UHD TV experience is so fantastic. However, these so smart UHD TV still have to play DVD by heavy DVD drive and need you to get your body off the couch to change DVD disc. How to watch DVD on 4K TV (and HD TV, 8K TV) without needing DVD drive?

There are many ways to watch DVD on 4K TV without needing DVD drive, like copying DVD to PlexDropboxhard drive, etc in advance and then watch these DVD movies on 4K/HD/8K TV. But before you put DVD movies to cloud storage, hard drive, you need to rip DVD to 4K/HD/8K TV supported formats. 

To get the work done, you need a DVD Ripper to remove the copy protection from DVD disc and then change DVD movies to 4K TV accepted format. If you don’t have idea about the DVD ripper, I can recommend you for Pavtube DVDAid. It is a professional DVD ripper, which can rip DVD to 4K/HD/8K TV in MP4, MKV, AVI, MOV, M4V, etc with original video quality. Importantly, backing up a DVD disc will cost 1-2 hour according to configuration of computer and bandwidth. But Pavtube DVDAid fully makes use of NVIDIA CUDA technology and AMD Accelerated Parallel Processing (APP) to largely accelerate DVD encoding speed from one format to another by using H.264 codec on Windows. 

You can free download and install Pavtube DVDAid here:


Other Download:

- Pavtube old official address: http://www.pavtube.cn/dvd_ripper/
- Cnet Download: http://download.cnet.com/Pavtube-DVDAid/3000-7970_4-76158510.html

How to play DVD on 4K, HD, 8K TV without DVD drive?

Step 1. Import DVD movies to the programInsert your DVD disc into computer’s DVD-Rom and then launch the DVD Ripper. Click Load DVD button to load the movies from your DVD discs.


Step 2: Choose optimized format for 4K TV

Click “Format” and select an output format for 4K HD TV. Here, you are recommended to choose format from TVs profile. For example, you can choose “Sony TV(*.mp4)” for your Sony 4K TV.


Tip: The format we have choosed has already been the optimized format for your Sony TV. If you still want to adjust some video and audio parameters. You can simply open profile settings window by clicking “Settings”.


Step 4: Backup DVD to 4K, HD, 8K TV

After all the settings is done, hit right-bottom “Convert” button to start copying DVD to 4K, HD, 8K TV. When the process finishes, you can locate the generated  videos in output folder.

You can simply store this ripped DVD videos to NAS, USB Flash drive, Dropbox for playing. Then, you can watch these DVD movies on your 4K, HD, 8K TV via the cloud storage or external hard drive without need the DVD disc in -and-out.

Related Articles:

Thursday, October 22, 2015

Pavtube Mac Products Upgrade Support for Mac OS X El Capitan

More and more people have upgraded their Mac system to the newest 10.11 El Capitan. When they are enjoying the benefits OS X El Capitan brought, many of them are suffering the softwares incompatibility issue on Mac OS X El Capitan, such as Blu-ray Ripper and DVD Ripper. Pavtube Studio updated its Mac products to meet the trend to prevent Pavtube users from the softwares incompatibility with El Capitan issue. Products that works compatible well with El Capitan including: Pavtube Video Converter for MacPavtube HD Video Converter for MacPavtube MTS/M2TS Converter for MacPavtube MXF Converter for Mac,Pavtube iMixMXFPavtube BDMagic for MacPavtube ByteCopy for MacPavtube DVDAid for MacPavtube iMedia Converter for Mac.


Rip and Backup  Blu-ray/DVD on El Capitan

After updated to El Capitan, you can't rip and copy Blu-ray/DVD any more? Don't worry! Pavtube Blu-ray/DVD rippers have solved the system incompatibility issue.With Pavtube newly upgraded Blu-ray/DVD products, you will get no difficulty to make a full disc copy or the main movie copy of the original 2D/3D Blu-ray/DVD disc on Mac OS X El Capitan. Besides that, the program also enables you to rip/convert Blu-ray/DVD disc to various different file formats on El Capitan platform for playing on iPhone/iPad/iPod, Android phone and tablets, Windows phones or tablets, game consoles, HD media players, streaming to Apple TV/Amazon Fire TV/Roku, etc.


Support 4K UHD, 8K video conversion


Updated Pavtube Mac products can  fully support you to convert 720P, HD, 4K even 8K videos differentiates itself from the pool of video converters on Mac OS X El Capitan. With  preset profiles for Apple and Android, the best video converter for OS X El Capitan enables you to convert any videos of any resolution to iPhone(6S Plus/6 Plus), iPad(Air 3/Mini 4/Pro), Samsung(Galaxy S6), HTC, Blackberry, Sony, etc. in a single click. It's very simple to use, requiring less time to learn the user guide.


Related Articles

Best Top 4 Video Converter for Mac OS X El Capitan Review

The newest system of Apple, Mac OS X 10.11 El Capitan is already generating a lot of interest online. There are a few additions and upgrades that this new OS upgrade will bring to users. After updating the Mac 10.11, you may facing the dilemma, installing and lots of movie files cannot work. Well, you have to know that a number of video converters for Mac have stopped working after updating to the newest OS X 10.11 El Capitan. In this case, I would introduce you top 4 video converter for Mac OS X E1 Capitan.

Pavtube iMedia Converter for Mac OS X El Capitan

With Pavtube iMedia Converter for Mac, you can convert various video files, such as MOV, AVI, MP4, FLV, MKV, 3GP, MP3, FLAC, etc. Let you able to enjoy them on your Mac OS X El Capitan, as well as other portable devices such as iPhone, iPad, Apple TV, Android, Windows Phones, PSP, PS3, and so on. Meanwhile, you can also use it for some simple editing before conversion (splitting, trimming and combining, rotating and cropping, quality improvement, etc.). There will be no loss of image quality, and conversion itself is swift and effective.


More feature:
  • Decode and Encode H.265/HEVC files
  • Transcode Sony XAVC files with MXF container
  • Backup BD/DVD with original structure
  • Convert 2D/3D BD, DVD, SD/HD video with ease
  • Convert to all popular video and audio formats
  • Popular 2D/3D BD to 3D video conversion
  • Provide native codec for iMovie, Final Cut Pro and much more
Don’t hesitate to download the free trial version:


Pavtube HD Video Converter for Mac OS X El Capitan

Pavtube HD Video Converter for Mac is an easy and simple video converter for all different types of Mac computers, certainly included Mac OS X El Capitan. With HD Video Converter for Mac OS X El Capitan, you can convert AVI in MOV, FLV in MP4, MKV in AVI, MTS in MPEG, and much more because it enables the changing of various formats to different ones on Mac OS X El Capitan. It makes no difference weather it is HD or SD video. It not only work for playing videos on Mac OS X El Capitan, you can optimize it to any iOS device, such as your iPhone 6,iPad Pro, iPad Mini 3/Air 2, and iPod Touch, as well as some android devices, such as the Samsung Galaxy Note, Kindle Fire HD, etc.


More feature:
  • Decoding and encoding H.265 HEVC codec with better quality
  • Transcode Sony XAVC files with MXF container
  • Turn 1080p/720p MKV, MOV, MXF, MTS, AVI, MPG, VOB to compatible format for free playback, editing, uploading and burning.
  • Output ProRes/DNxHD/DVCPRO/AIC and other codecs for NLEs on Mac
  • Get various audios/videos for free playback on popular devices
  • Assistant with your smooth mac editing workflow with HD videos
  • Powerful editing functions (e.g. trimming, cropping, adding watermarks, add video effect, etc)
Don’t hesitate to download the free trial version:


Pavtube Video Converter for Mac OS X El Capitan

Pavtube Video Converter for Mac Mac OS X El Capitan is a fully featured tool for converting any video files to popular video formats. And it allows you to edit video files and do some basic output settings before conversion., You can batch convert your videos to almost any format you need, it supports over 60 input video formats, and helps you convert all video formats for Apple, iPod, Sony PSP and more.


More feature:
  • Decoding and encoding H.265 HEVC codec with better quality
  • Transcode Sony XAVC files with MXF container
  • Turn SD/HD videos to watchable format for almost all popular devices
  • Output Apple ProRes/DVCPRO/HDV/Avid DNxHD/AIC for NLEs
  • Output compatible formats for various devices as well as Mac editing programs
  • Edit videos through trimming, cropping, adding watermarks, insert subtitles, etc
Don’t hesitate to download the free trial version:


iFastime Video Converter Ultimate for Mac OS X El Capitan

iFastime Video Converter Ultimate for Mac is an easy-to-use & professional best video converter for Mac OS X El Capitan. It has decent and simple interface, all standard formats are fully supported, like 3GP, Flash Video(FLV, F4V), iTunes Video(M4V), MKV, DVR, MJPEG Video (MJPG, MJPEG), etc., as well as all kinds of HD Video formats and audo files. You can preview the video files, and edit video for better effects (trim/crop/rotate media files, add subtitle, and make 2d to 3D video, etc.) before conversion.

The output formats are well organized by final player/devices, you can easily find what format compatible with your old or newest device, like iPhone 6/6 Plus/5S/5C, iPad Air 2/mini 3, Apple TV, Zune, PSP, Xbox 360, PS3, Archos, iRiver, Creative Zen etc.


More Feature:
  • Transcode XAVC MXF, Tivo, AVCHD, H.265
  • Output Prores/DNxHD/AIC/DVCPRO for NLE
  • Make 3D movies from 2D/3D resources on Mac
  • Get various devices and programs optimized file formats
  • Support Mac OS X El Capitan/Yosemite/Mavericks/Mountain Lion
  • If you are using FCP X, please make sure you have installed ProApps QuickTime Codecs
Don’t hesitate to download the free trial version:


Read More:
Source:http://onebestsoft.com/top-4-video-converter-for-mac-os-x-e1-capitan/