Summary: Looking for an easy way to view DVD movies like Captain America: the winter soldier, Non Stop and Divergent via Mede8er Multi-Media player for home entertainment on Mac. This guide can help you. I love the internet. It’s a place for sharing. In this article, I’m glad to sharing my experience of how to complete the DVD to HD MKV conversion for Mede8er Multi-Media player on Mac. Some folks over at google dvd ripping software on the internet. I did just that and I picked Pavtube. I have boon using the windows version since last year, and after getting the Mac Computer, I decided to get the Mac version. Here I just free downloaded the mac version and It works perfectly. Now, sharing my operating of this application: 1.After the installing, I open it and the concise interface of Pavtube ByteCopy for Mac at once shows up in my eyes. Then I Click “File” > “Load from disc” in top left corner to import DVD movies. (This function is really a humanized operation design and easy to use!)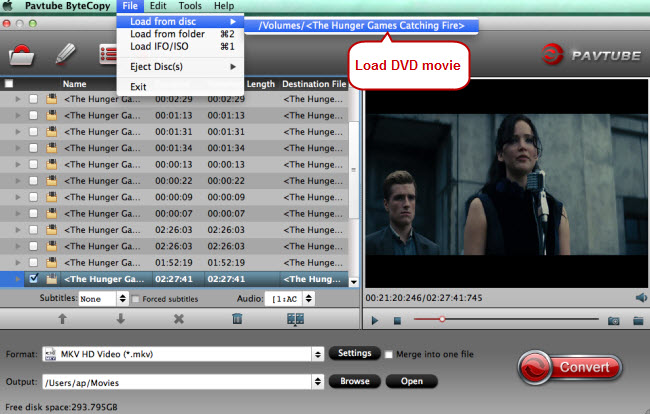 2.What really astounds me is that Pavtube ByteCopy for Mac also supports preview, which means I can watch the video before the conversion from DVD discs. At the meantime, capture and progress are also available. I just need to choose an output format as ““HD Video” > “MKV HD Video (*.mkv)”for Mede8er Multimedia Player.
  Note: If you want to backup DVD movies and DVDs to MKV container format with multiple audio tracks and subtitles included, also try Pavtube ByteCopy And choose "Multi-track Video> Lossless/encoded Multi-track MKV(*.mkv)" to get multi-track mkv format. 3. This great converter also supports customizing output format value. If you have other demands on videos, you may click the Settings button to specify the video and audio parameters. You can alter its size, sample rate, bitrate, frame rate and channels in it. This practical function can satisfy your specific needs for videos! 4.After I set everything I need, I just need to click the red “Convert” button. Thus I can get my HD NKV file in a very short time! I successfully convert my DVDs (Captain America: the winter soldier, Non Stop and Divergent) for Mede8er Multimedia Player. then, watching DVD movies on a TV with Mede8er Multimedia Player. By the way, the Windows users can refer to this guide and enjoy the happy times! I found some useful guide from this blog for you:
Sony is expected to welcome new model in its Xperia Z lineup with new devices this year. The new smartphones are expected to launch in September 2015 during IFA. Sony announced three models during its IFA press conference: the Xperia Z5, Xperia Z5 Premium and the Xperia Z5 Compact. Sony has announced that the Xperia Z5 and Xperia Z5 Compact will arrive on shelves in October, with the top-end Xperia Z5 Premium set to follow in November. The Xperia Z5 comes with many great features: boasts a 5.2in full HD display, Android 5.0 Lollipop, 3GB RAM and Qualcomm’s notorious Snapdragon 810 processor, However, it doesn't have Blu-ray drive for playing Blu-ray movies obviously. Plus, if you like collecting Blu-ray movies from Blu-ray disc, Blu-ray folder, or Blu-ray ISO image and wanna to watch them on Sony Xperia Z5? Read on to find out the best tutorial to rip and convert Blu-ray movies to Sony Xperia Z5 compatible video/audio formats with ease. Hot Search: DVD to H.264 MP4 | DVD to MKV | DVD to QuickTime | DVD to PS4 | iTunes to Sony Bravia TVHere you can try to adopt the Pavtube BDMagic for help. It is easy to use and helps you fast rip and convert (3D)Blu-ray to the Sony Xperia ZV playable format MP4 with perfect audio and video sync keeping HD quality. With its clean interface, fast converting speed and good video quality, converting Blu-ray to Xperia Z5 will be simply finished within a few clicks. Besides, this Blu-ray ripping tool also provide some video editing tools to let you crop the Blu-ray movies black bars, trim the unnecessary part, etc. Read the Top Blu-ray ripping tool. Note: If you are a Mac user, you can turn to BDMagic for Mac, which can help you convert Blu-ray to Xperia Z5 on Mac OS X. Free Download Top Blu-ray ripping software for Xperia Z5 here: 
 Other Download: - Pavtube old official address: http://www.pavtube.cn/blu-ray-ripper/- Cnet Download: http://download.cnet.com/Pavtube-BDMagic/3000-7970_4-75922877.htmlNow, let me show you how to get Blu-ray for playing on Sony Xperia Z5 SmartPhone? Step 1. Import Blu-ray to Pavtube BDMagic.Launch the Blu-ray Ripper for Xperia Z5; click the disc icon to select the Blu-ray files you want to convert. Blu-ray, DVD ISO/IFO files are supported as well. After the BD, DVD files are loaded, you can preview them on the right viewing window.
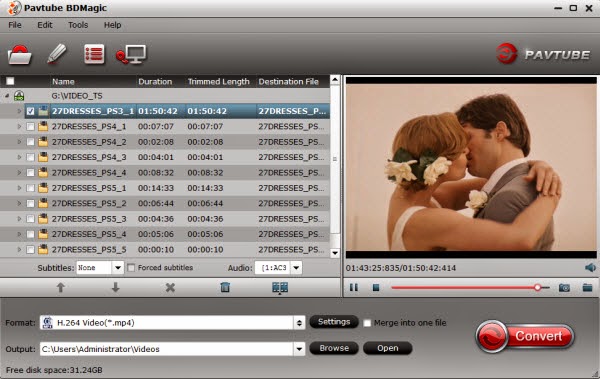 Note:You can also rip and convert latest Blu-ray to various video formats for playback or editing, edit the video before conversion including trim, crop, effect, etc, add *sst and *ass subtitle into video part and so on.Step 2. Choose target video format for Sony Xperia Z5 .Click the Format bar, and you can directly choose the optimized profiles for Xperia Android Smartphone under "Sony > Sony Xperia P Video(*.mp4)" which can fit Xperia Z5 tablet perfectly.
 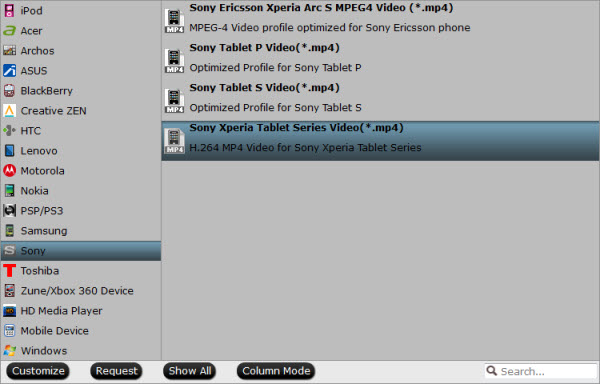 Step 3. Best Format Settings for ripping Blu-ray on Xperia Z5 If you like, you can click “Settings” to change the video encoder, resolution, frame rate, etc. For watching videos on the Android-based device, 720p with 1500~2000kbps is just all right. I found the file size and video quality is based more on bitrate than resolution which means itrate higher results in big file size, and lower visible quality loss. Step 4. Start Blu-ray to Xperia Z5 conversion. When all the settings are OK, click "Convert" button to start ripping Blu-ray movies to MP4 video for playback on Sony Xperia Z5 Smartphone with ease.When the conversion is over, click "open" to locate the ripped video files. After that, you can connect your Sony Xperia Z5 to computer and transfer the converted Blu-ray files to Xperia Z5 for enjoyment on the go. Editor’s Note: If you are considering to get a powerful all-in-one tool to convert videos, Blu-ray movies and DVDs to your Sony Xperia Z5, Nook HD, Galaxy Tab, Nexus 10, Nexus 9, Kindle Fire HDX, Galaxy Note, Galaxy S6, PS4 at the same saving time and effort, the all-in-one Pavtube Video Converter Ultimate program will a nice choice for you. If you are running a Mac OS X computer, iMedia Converter for Mac is the alternative. Read More:
Q: “ I am trying to encode some of my 3D rips to play in 3D on my Apple TV 4, but Handbrake is only encoding the image in 2D. I know the 3D is part of the MKV file, but I can't figure out how to encode it into a MP4. Ideas?” As the new Apple TV 4rd generation users, ever thought of putting your Blu-ray collections to Apple TV 4? With the backup Blu-ray ripping on Apple TV 4, you will no longer need to hunt for a movie in hundreds of Blu-rays and then bother to place it in a Blu-ray player and even should consider the region codes of your commercial BDs. Instead, you just sit on the bed and select desired movie with a handy remote control. In this page, we give you the easy solution.
If you also collected some 3D Blu-rays, do you know how to play the 3D Blu-ray movies on the ATV 4? Before you can watch 1080p 3D Blu-ray movies on Apple TV 4, you have to rip and convert the 3D Blu-rays to Apple TV 4 supported video format on Mac OS X El Capitan first. For convenience playback, you can choose to rip 3D Blu-ray to Apple TV 4 supported MP4, MOV, M4V or 3D MP4 format. And in order to play 3D Blu-ray movies on the ATV 4 freely, one easy-to-use Blu-ray ripper that supports handling 3D Blu-rays disc is necessary. Here Pavtube ByteCopy for Mac is a nice Mac 3D Blu-ray Converter to help you rip 3D Blu-ray to Apple TV 4 on Mac with no matter excellent MP4, MOV, M4V video or 3D MP4 format at fast speed. With it, you can also easily rip/convert 3D Blu-ray to Apple TV 4 as well as other 3D players like Stereoscopic Player and BenQ W1070 Projector with Side by Side effect in MP4 format. Read review. Free Download: 
 Other Download:- Pavtube old official address: http://www.pavtube.cn/bytecopy-mac/- Cnet Download: http://download.cnet.com/Pavtube-ByteCopy/3000-7970_4-76177783.html Step 1. After installing, launch the Blu-ray to iTunes Converter app on your computer. and then press "Load Disc" icon to import 2D/3D Blu-ray movie. Choose "File > Load from ISO/IFO" if you'd like to import Blu-ray ISO image file.
 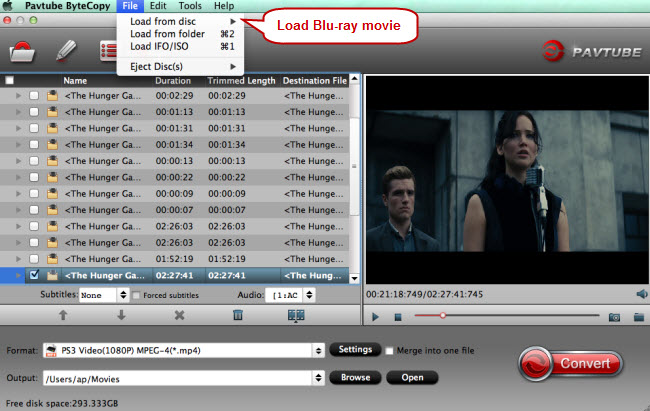 Step 2. To get acompatible format for iTunes, you can choose HD MP4, M4V and MOV format. If you want to keep 3D effect when ripping 3D Blu-ray, choose the 3D Side-by-Side MP4 format from "3D Video".
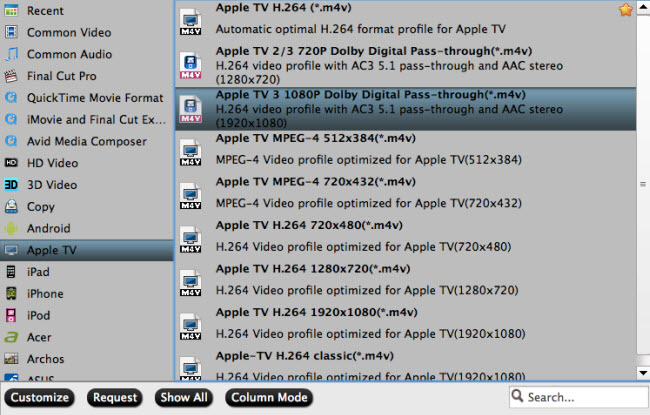 Tip: You can click "Settings" to change the setting from the new default HD profile 4000 to 5000~8000 bitrate (Note: bitrate higher results in big file size, and lower visible quality loss). Learn how to set up Apple TV 4 for Dolby Digital 5.1 pass-through.P.S. The key setting Video Size for your Apple TV 4 is according to your source video exactly. If your source video is in 1080p such as Blu-ray, you can set your video size in 1920*1080 in H.264 codec; while, if your original video size is in standard, 720p in enough. Step 3. Transcode MP4 to Apple TV 4 on Mac. Start the 3D Blu-ray to Apple TV 4 conversion on Mac by clicking on the "Start conversion" button at the bottom right corner. After the short conversion, you will be able to get the output files for Apple TV 4 via clicking on "Open" button effortlessly. Now you can stream 3D Blu-ray on the new Apple TV 4 for enjoying with high quality. You should know, for streaming media from a Mac, iTunes must be 10.6 or later. And to get 5.1 sorround sound, AV Reciever is necessary.Stream ripped 3D Blu-ray on Apple TV 4 via AirPlay or iTunesVia AirPlay: Firstly, to use AirPlay, you need to prepare one of the following devices: iPhone 4 (or later), iPad, iPad mini, or iPod touch (4th generation or later). Add the ripped 3D Blu-ray movies to iTunes and sync to your iOS device.Secondly, be sure iOS device and Apple TV are in the same Wi-Fi network; start play the video on your device, and then swipe up from the bottom of your device screen to access Control Center and tap AirPlay; Thirdly, tap the name of the device you want to AirPlay to.Via iTunes:Firstly, add the ripped 3D Blu-ray videos to iTunes. Then, go to iTunes > Preferences, choose Apple TV, and make sure "Look for Apple TVs" is selected.Secondly, on your Apple TV, choose Settings > Computers > "Connect to iTunes," and note the passcode displayed; in iTunes, select the Apple TV (below Devices), and enter the passcode.Thirdly, click the Summary button and select one of "Automatic Sync" and "Custom Sync".After all the operation, you should be able to play 3D Blu-ray on your Apple TV 4 freely. Just enjoy now!Read More:
Want to watch your favorite DVD movie via Seagate Wireless Plus? This article will the best methods to rip and upload DVD to Wireless Plus with ease.
We travel a lot an have over 500 DVDs in hand, so I bought a 2TB Seagate Wireless Plus then my family members don't have to fight over the laptop for watching DVD movies. In fact, we can get together with friends and family to enjoy DVD movies via Wireless Plus, the question is: how to convert DVD for uploading to Seagate Wireless Plus? Here what you need is to make use use of a professionally designed DVD to Wireless Plus converter to rip Seagate Wireless Plus video files. And Pavtube DVDAid would be your best choice, which can easily rip DVD movies to Wireless Plus compatible H.264 video, MPEG-4, and Motion-JPEG for video, and AAC, MP3, Audible (formats 2, 3, 4), Apple Lossless, A IFF, and WAV for audio quickly with excellent output video quality.Besides converting DVD files, it can also compress a DVD to smaller file size, saving the space for your console if you need. In addition, the built-in editor allows you to customize your DVD videos to get the very part and effect you want with ease. I have tested it, now after perfectly ripping DVDs, I can get my DVDs uploaded to my 2TB Seagate with ease and freely watching on my mini iPads, 1 kindle and 1 nook. The equivalent Mac version is DVDAid for Mac. Just get the right version and copy DVD to Wireless Plus with ease. (Windows 10 or Mac Yosemite are supported). Other Download:- Pavtube old official address: http://www.pavtube.cn/dvd_ripper/- Cnet Download: http://download.cnet.com/Pavtube-DVDAid/3000-7970_4-76158510.html1. Load DVD moviesFirst, insert your DVDs into DVD Drive, and then drag the DVD files to the program; Or you can get to "File" Menu, click "Load DVD" to draw into DVD movies you want to rip. DVD folder and ISO image files are supported as well.
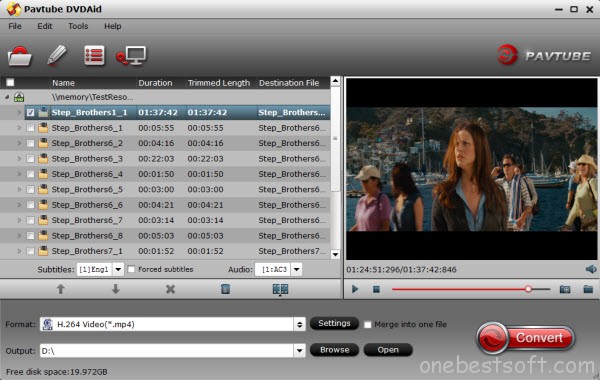 2. Select Seagate Wireless Plus compatible formatsClick the Format bar to select output profile for your Wireless Plus, say "H.264 Video(*.mp4)" from "Common Video".
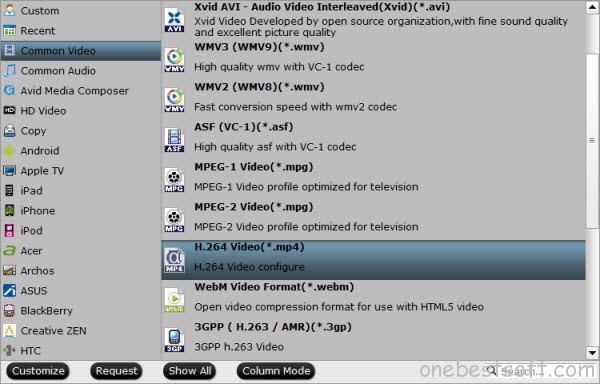 3. Convert DVD movies to Seagate Wireless PlusAfter all necessary settings, you can just click the "Convert" button to start converting your DVD movies. After the conversion, click Open to get the output files for your Seagate Wireless Plus.4. Connect Seagate Wireless Plus to computer for uploadingNow you can copy the converted DVD files to your Seagate Wireless Plus via USB.Tip: Free apps are available across Android, iOS, and Kindle for download, and after downloading the app, users can view available wireless networks and select the Seagate Wireless. And content can be played in many different ways, via the Media app on iOS, Android, or Kindle Fire, via any browser, via Apple Airplay or to any DLNA devices via minidlna, which is built into the OS.
 To play your converted files on your mobile devices, your just need to tap the movie file and play it. Now you have successfully carry your entire DVD media library with you with the Seagate Wireless Plus Portable Hard Drive. Just enjoy while traveling with your family!Want to get more DVD entertainment? Rip DVD to your Nexus 6/9, iTunes 11/12 library or Drobo 5n and TV! Read More:
Source: http://onebestsoft.com/upload-dvds-to-seagate-wireless-plus/
To play your converted files on your mobile devices, your just need to tap the movie file and play it. Now you have successfully carry your entire DVD media library with you with the Seagate Wireless Plus Portable Hard Drive. Just enjoy while traveling with your family!Want to get more DVD entertainment? Rip DVD to your Nexus 6/9, iTunes 11/12 library or Drobo 5n and TV! Read More:
Source: http://onebestsoft.com/upload-dvds-to-seagate-wireless-plus/
Overview: This is an instructional article on showing how to upload DVD to Dropbox by ripping and copying DVD to a Dropbox readable format. Dropbox is a mobile document and media storage tool that allows you to sync you files online for backup. Anything like movies and music you save to your computer can be saved to your Dropbox. If you are looking for a way to upload DVD to Dropbox for viewing as above thread mentioned, read on to find the best solution.Hot Search: Dropbox Transfer Guides | iTunes to Dropbox | Blu-ray to Dropbox | Compress videos to Dropbox | As you know, Dropbox doesn't support DVD video format. If you have some nice DVD movies and want to add to Dropbox for streaming and playback on iPhone, iPad, Android, Surface 3, BlackBerry, Plex, PS4/3, PSP, PS Vita, WDTV, smart TV and more media devices, you have to rip and copy DVD to Dropbox readable formats, as MP4, MOV, etc.To do so, a DVD ripping software is essential. Here Pavtub DVDAid is recommended to you. This DVD ripping tool can rip any encrypted DVD and convert DVD to Dropbox readable MP4, MOV etc. formats as well as other popular formats, like rip DVD to AVI, MKV, M3U8, H.265, WMV, MPG, FLV, SWF, M4V, etc. on Windows (including Windows 10, 8.1 and 8). For the video size limit of Dropbox site, the built-in editor also allows you to extract DVD clips with the very part you want. Or, you can just choose to rip certain chapters of a DVD as you like.If you are a Mac user, please turn to DVDAid for Mac, support Mac OS X Yosemite 10.10, 10.9 Mavericks, 10.8 Mountain Lion, 10.7 Lion, Snow Leopard10.6, Leopard 10.5. Now download the right version of the program and follow the guide below.
 Other Download- Pavtube old official address: http://www.pavtube.cn/dvd_ripper/- Cnet Download: http://download.cnet.com/Pavtube-DVDAid/3000-7970_4-76158510.htmlPart I. How to rip DVD to Dropbox readable video format for uploading?Step 1. Load DVD moviesInsert the DVD disc into your computer’s DVD drive and run DVD Ripper. You can click the "Load DVD" button to load the DVD files to the program. DVD ISO/IFO, VIDEO_TS folder are supported also.Step 2. Specify output formatAs has been stated above, Dropbox supports MP4, etc video files. So you can just select "Common Video" > "H.264 Video(*.mp4)" as the output video format. Also you can transfer your DVD to media hub, Cloud Storage and External Hard Drive/Thumb Drive, Flash drive, Plex for storage and playback.Step 3. Trim/Edit DVD filesSince Dropbox has limitations about the uploading video size(If you only have the free account, you only have 2 GB of space), please pay attention to the video size when ripping DVD movies for Dropbox. Here we should highlight the trim function on this software. Just click "Edit" to trim the DVD videos to get the very part you want. Besides trimming, cropping, adding watermark, adjusting special effect, are well supported as well.Step 4. Start converting DVD to DropboxWhen all these settings are ready, you can click the "Convert" button to begin the DVD to Dropbox conversion. When the ripping is done, you can click on "Open" button to locate the ripped videos.Part II. How to Upload the ripped DVD movies to Dropbox for storage?1. Sign in to the Dropbox website.2. Click the Upload button from the very top of the window. The upload button.3. A window will appear. Click the Choose File button and then select the file on your computer that you’d like to add to your Dropbox.4. Choose as many files as you like, and then click the Start Upload button.5. The window will disappear, your files will start uploading, and you'll be shown a progress indicator. That’s it, you’ve added files to your Dropbox!Detailed steps can be found here.
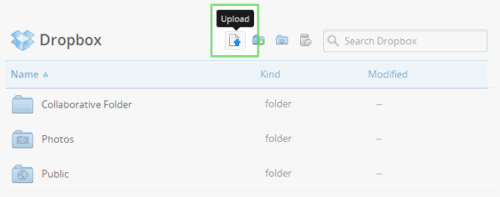 That's all the instructions to rip and upload DVD to Dropbox for sharing. More Tips
Source: http://filmholics.tumblr.com/post/105430096750/upload-dvd-to-dropbox
That's all the instructions to rip and upload DVD to Dropbox for sharing. More Tips
Source: http://filmholics.tumblr.com/post/105430096750/upload-dvd-to-dropbox
4K UHD TV is the hottest buzzword now, and tech giant like Samsung, Sony, Panasonic, Vizio and LG, etc, all introduce 4K UHD TV. Sony also keeps up with the trend. How to get iTunes HD videos on Sony XBR 4K Ultra HD TV (XBR-65X850A & XBR-55X850A/XBR-65X900A & XBR-55X900A/XBR-84X900)? Sony 4K Ultra HD Media Player is your best choice to get 4K movies resources, this media player is the world’s first and only network video service that gives you access to a regularly updated library of full-length feature films and TV shows in 4K Ultra HD right in your living room.But this popular 4K TV also is not perfect on iTunes HD videos playback for the format incompatibility and iTunes DRM protection technology. In this guide, If you want to stream iTunes movies on 4K TV, 4K UHD TV or 4K SUHD TV, this tutorial will help you transfer iTunes video to 4K TV for playback with easy. Hot Search: TOP 10 4K Ultra HD TVs | Best Smart TV Brand Reviews | iTunes to Android | iTunes videos to Surface RT |iTunes to Roku 3... As we all know that iTunes media files are strictly protected by DRM, which limit iTunes media files from playing on other non-Apple devices. So, we should seek help from some third party software, And you can’t install iTunes onto Sony XBR 4K Ultra HD TV. So how to remove DRM protection from iTunes movies? That is a easy job as long as you have a DRM Removal. Pavtube ChewTune (Review) is a exact user-friendly, professional and popular DRM Removal on the market. This software can remove DRM protection from iTunes movies and turn them to other video format with high quality to adapt to your Sony XBR 4K Ultra HD TV. Except for transferring iTunes movies to Sony XBR 4K Ultra HD TV via USB, it also can deal with BBC iPlayer video, Amazon movies, Zune Marketplace videos, etc so that you can watch them on TV, tablet, game console and other players.With it you can remove DRM protection and convert iTunes movies and Episodes losslessly to USB drive supported normal MP4 format in 6X fast speed. For Mac users, you can turn to Pavtube ChewTune for Mac.Now you can download the right version of Pavtube iTunes DRM Video Converter and begin to transfer iTunes videos to Sony XBR 4K Ultra HD TV via USB by following the instructions below.Free download and install:
 Step 1. Download and install Pavtube ChewTune. There would be a command window pop up during the installation, please do not shut down it and let it running until the installation completed.
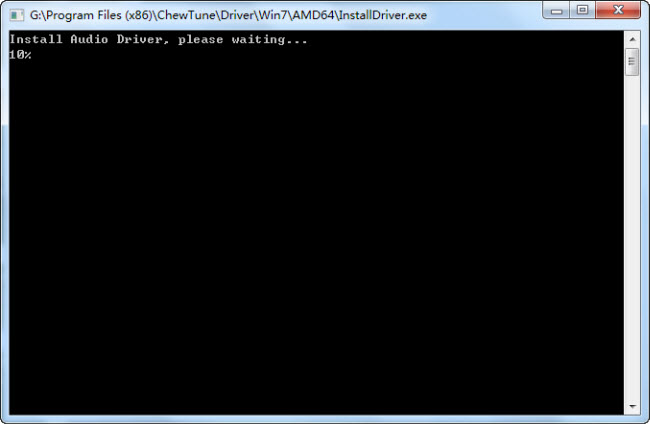 Step 2. Add iTunes Movies and choose target format. Drag and drop your videos to it directly, or you can click icon to import them as below.
 Let’s click the drop-down-list besides “Format” and choose “Same as the source video”for Sony XBR 4K Ultra HD TV.
 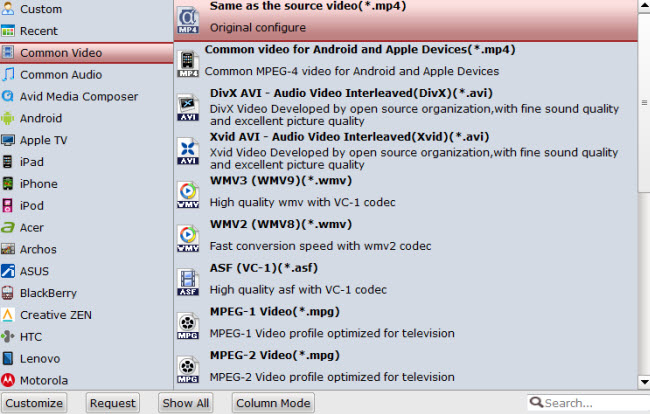 Step 3. Customize target video specs. (Optional)Click “Settings” as above to enter Profile Settings window, you can find settings for video size, codec, bitrate and frame rate. Change them at your own needs.Step 4. Start (batch) conversion.Now click the big red “Convert” icon to start converting DRM videos; this converter will activate your media player automatically and start to play this video (let’s keep it running). The player windows cannot be removed or closed. After conversion, click “Open output folder” to quick locate the converted video. Now, you can transfer the converted videos to your USB flash drive and you are free to move all the movies to USB flash drive.Read More:
Question:
“I want to make video clips using my personal DVD then upload to Youtube. But when I imported DVD to Windows Movie Maker, Movie Maker didn't recognize the DVD. Any idea?”
Best Solution
Windows Movie Maker is software that comes with the Windows operating system which allows users to make their own movies and burn them on DVDs. Sometimes users may run into issues where the DVDs created through Windows Movie Maker cannot be played on a regular DVD player. To rectify this problem, the user must ensure they choose the right DVD ripping tool - Pavtube DVDAid is the highly recommended tool and this guide will help you rectify your “DVD to Windows Movie Maker” problems.
Supported audio/video/picture formats supported by Windows Movie Maker:
- Supported audio format: *.wav, *.snd, *.au, *.aif, *.aifc, *.aiff
- Supported video format: *.asf, *.avi, *.wmv
- Supported picture format: *.jpg, *.bmp, *.gif, etc.
To do that, you have to convert DVD to Windows Movie Maker compatible format like WMV before importing. Have a try of the best DVD to Windows Movie Maker converter - an easy-to-use yet professional utility. It supports creating high quality WMV video from DVD files for your Windows Movie Maker. Besides, it comes with all regular video editing tools like Trim, Crop, Effect, Subtitle, Watermark. For basic video editing tasks, you can even replace your Windows Movie Maker with it. Read the review.
The process of DVD to Windows Movie Maker conversion is straightforward. Pop in your disc, choose WMV as the output format, and click Convert to start the conversion. Below is the detailed guide on converting DVD to WMV for Windows Movie Maker.
Free Download this Top DVD to Windows Movie Maker Ripper:
Other Download:
- Pavtube old official address: http://www.pavtube.cn/dvd_ripper/
- Cnet Download: http://download.cnet.com/Pavtube-DVDAid/3000-7970_4-76158510.html
Best Workaround- Please follow the steps as below.
Step 1. Load DVD movie
After running Pavtube DVDAid, click “File” > “Load from disc” to import your DVD movie. DVD folders/IFO files/ISO Image files stored on our computer’s hard disc drive are also allowed as converted objects.
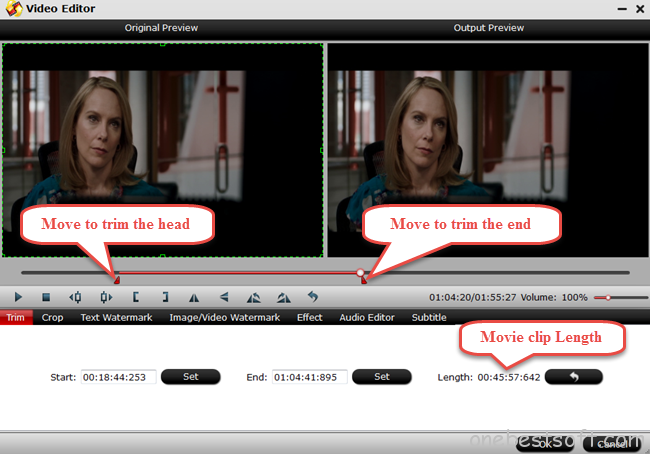
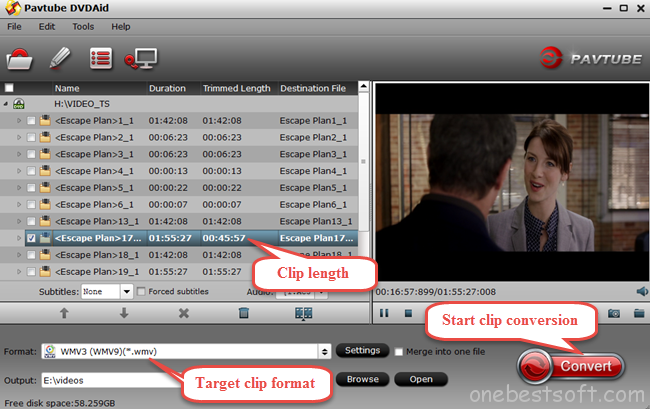 Step 2. Trim DVD movie clips
Click the Pencil icon on top of the main interface to switch to the editing interface where you’re allowed to trim DVD movies clips. Under the trimming menu bar, you’re allowed to set the start time and end time for your favorite movie clip. There are 2 red movable triangles right located at the movie head and end respectively below the original preview and output preview window. You can move the triangle at the movie head to your target point as the start of your clip and move the triangle at the movie end to your target point as the end of you movie clip.
In addition to trimming, Pavtube DVDAid also supports other editing functions such as cropping black bars, adding text/image/video watermark, editing movie audio and embedding subtitles, etc.
Step 2. Trim DVD movie clips
Click the Pencil icon on top of the main interface to switch to the editing interface where you’re allowed to trim DVD movies clips. Under the trimming menu bar, you’re allowed to set the start time and end time for your favorite movie clip. There are 2 red movable triangles right located at the movie head and end respectively below the original preview and output preview window. You can move the triangle at the movie head to your target point as the start of your clip and move the triangle at the movie end to your target point as the end of you movie clip.
In addition to trimming, Pavtube DVDAid also supports other editing functions such as cropping black bars, adding text/image/video watermark, editing movie audio and embedding subtitles, etc.
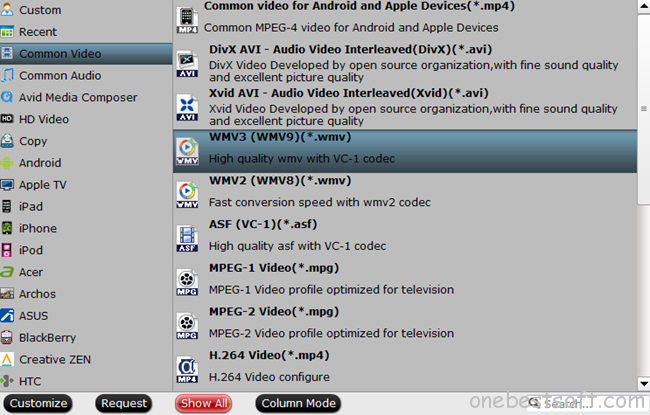
 Step 3. Choose output movie clip format
After getting your favorite DVD movie clip trimmed, go back to the main interface to choose the output video format compatible with Windows Movie Maker. Here we need to click the format bar to choose “common video” > “WMV3(WMV9) (*.wmv)” as your target clip format. If you want your movie clips played on your other devices, have a try of other formats for Partube DVDAid possesses a library of various possible formats.
Step 3. Choose output movie clip format
After getting your favorite DVD movie clip trimmed, go back to the main interface to choose the output video format compatible with Windows Movie Maker. Here we need to click the format bar to choose “common video” > “WMV3(WMV9) (*.wmv)” as your target clip format. If you want your movie clips played on your other devices, have a try of other formats for Partube DVDAid possesses a library of various possible formats.
 Step 4. Start DVD clip to WMV conversion
Click the big red button “Convert” after finishing trimming your DVD movie clip and selecting its proper output format.
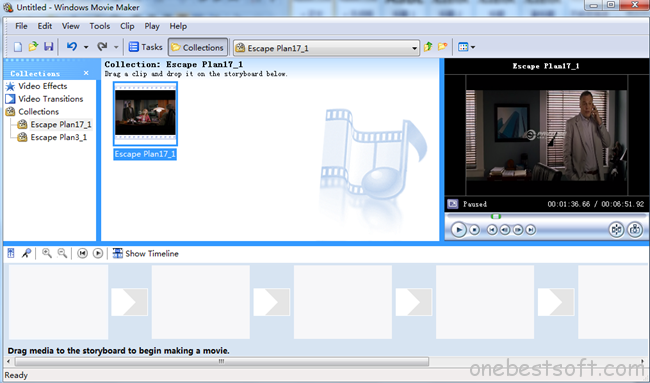
Step 5. Import DVD movie clip to Windows Movie Maker
After getting your DVD movie clip trimmed and converted, run Windows Movie Maker, and click “Import video” to import your movie clip to Windows Movie Maker where you can make your personal movie by adding videos, photos, audio or music.
Step 4. Start DVD clip to WMV conversion
Click the big red button “Convert” after finishing trimming your DVD movie clip and selecting its proper output format.
Step 5. Import DVD movie clip to Windows Movie Maker
After getting your DVD movie clip trimmed and converted, run Windows Movie Maker, and click “Import video” to import your movie clip to Windows Movie Maker where you can make your personal movie by adding videos, photos, audio or music.
 Never had a director dream come true? With Pavtube DVDAid performing its format converting and clip trimming function, and Windows Movie Maker performing its combining and editing function, what are you afraid of? It’s no wonder that there will be a new movie studio rising in the near future.
Wanna make your career brighter? Here I want to deliver my humble advice that you can burn your video clip combinations to DVDs to expand your business. Hope this will help you. And you can get Pavtube DVDAid and DVD Creator with almost half price! Please go to www.multipelife.com/special-offer to find your favorite promotion information.
Read More:
Never had a director dream come true? With Pavtube DVDAid performing its format converting and clip trimming function, and Windows Movie Maker performing its combining and editing function, what are you afraid of? It’s no wonder that there will be a new movie studio rising in the near future.
Wanna make your career brighter? Here I want to deliver my humble advice that you can burn your video clip combinations to DVDs to expand your business. Hope this will help you. And you can get Pavtube DVDAid and DVD Creator with almost half price! Please go to www.multipelife.com/special-offer to find your favorite promotion information.
Read More: