Friday, November 28, 2014

Backup BD/DVD movie directory to a 3TB external network drive for use when traveling

The article mainly tells you how to backup and rip Blu-ray and DVD to a 3TB external network drive in MP4 format for watching anytime while traveling.

As a disc collection owner, you will choose to rip your Blu-ray/DVD movies for backing up or more convenient playback while traveling. And if you have a external network drive, you probably would like to copy your Blu-ray/DVD collection like Avatar, Million Dollar Baby, Serenity, The Last Samurai, The Lost Room, etc. to your external drive to allow you to view via media player like VLC or mobile devices like Asus laptop.

backup blu-ray dvd on external travel drive
And now I will show best way to take the Blu-ray/DVD and put the disc movie library on a 3TV external network drive drive for playing.

Well, to backup dozens of BD/DVD movies to external network drive, you need to get the content off the disc as a protection-free and easily readable element for your external drive. In this case, powerful a third-party software for backup Blu-ray or DVD to external network drive is what you need.

Here, Pavtube BDMagic can do you a favor. It is capable of ripping Blu-ray/DVD to MP4, AVI, MKV for external network drive streaming with no quality loss; it also enables you to copy BD/DVD main movies for backup onto external network drive in .m2ts/.vob format. If you are running on Mac OS X, turn to BDMagic for Mac. Now let's learn how to do it.

How to rip and copy Blu-ray or DVD to a 3TB external network drive

Step 1: Load Blu-ray/DVD movies

Install and launch the best Blu-ray Backup & Ripper, and then click the disc icon to import your source movies to this program. Set your wanted subtitles and audio track from the drop-down box of "Subtitles" and "Audio" tab.

best Blu-ray Backup & Ripper

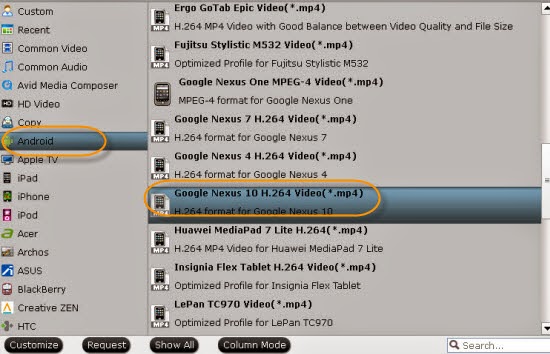
Step 2: Select an output format

To convert Blu-ray/DVD for external network drive storing and syncing, just click on the drop-down menu of "Format", here I prefer "Common Video > H.264 Video(*.mp4)" for output since it produces an acceptable quality and is supported by most media players.

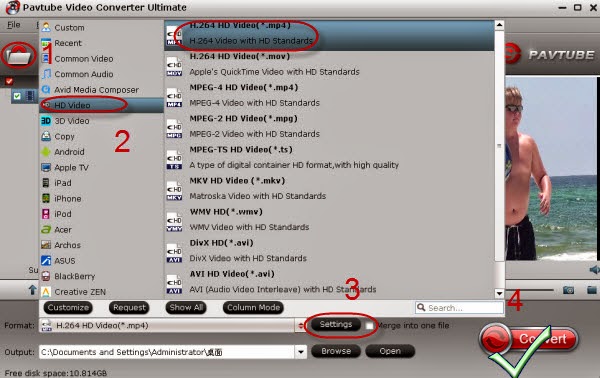
If you want to keep 1080p resolution as source movie, you can choose HD Video > H.264 HD Video(*.mp4) as output format.

Is there a way to lossless backup Blu-ray/DVD to MKV file for playback on PC and HD Media Players? Here it is!

external travel drive video format

Tip: If you like, you can click "Settings" to change the video encoder, resolution, frame rate, etc. as you wish. Keep in mind the file size and video quality is based more on bitrate than resolution which means bitrate higher results in big file size, and lower visible quality loss, and vice versa.

MP4 video settings

Step 3. Rip BD/DVD movies to external network drive

Click the "Convert" button under the preview window, and the Blu-ray ripper will start the conversion from Blu-ray movies to MP4 for your external network drive. After the conversion, you can hit "Open" to quick locate the converted video。

Now you can get your movie directory for wide use on Asus laptop via USB or TV with a HDMI and USB port using a Microsoft wireless display when traveling. When watching movies in public, such as on a plane, you can even use a Skullcandy wireless headset for sound. So wonderful!

What's more, you can also stream BD/DVD via Home Network or copy DVD to QNAP TS-469L NAS.  

Tuesday, November 25, 2014

With Plex Movie Trailers- Get Closer to The Cinema Experience

The cross-platform media server Plex supports movie trailers and extras now. Here shows you how to add local clips to your movie library for enjoyment.

Plex, the official app of the popular media server on most platforms, has just been updated with a couple of much-requested features, including movie trailers and extras, which can cover anything you'd usually find on a DVD or Blu-Ray disk, including interviews, deleted scenes and behind-the-scenes content. It brings functionality a lot of users have been waiting for.
Plex

Are you enjoying Plex Movie Trailers yet? Learn tips and tricks below to add and load local Extras to get closer To The Cinema Experience. Plex Pass users (Plex’ premium subscription service) can get more impressive features.

Trailers and Extras

Trailer and extras support is currently found in Plex Home Theater, the web app, Android and iOS applications. Other platforms should follow shortly. Local extras are detected by the media server and will be shown in the movie library by supported client applications.

plex web trailer

Plex Pass users get a very juicy bonus feature. When Plex adds a new movie to the library and is searching for metadata, high quality trailers and extras will automatically be pulled in from a third-party provider. This content remains in the Cloud, so Plex Pass users need not worry about incurring needless downloads.

plex pass extras

For avid cinema fans, Plex has added the ability to queue a number of cinema trailers when you start watching a new movie (it’s called Home Theater for a reason). To do this, Plex can pull trailers for the unwatched movies in the movie library. In addition, Plex Pass users can opt for trailers of upcoming Blu-Ray and theatre releases.

Getting Started

To get your trailer party started, you’ll need to make sure your Plex installations are up to date and properly configured.
Update Your Server & Client Applications

Both your Plex Media Server and Plex Home Theater installations will need to be up to date to process and access extras. Plex Home Theater may update automatically but, depending on your setup, Plex Media Server might not. Make sure you’re up to date in either case.

You can manually update Plex Home Theater by navigating to Preferences > System > Software Update in the application. To update Plex Media Server, just download the most recent installer from Plex Downloads and run the installation file.
Adding Local Extras

You can manually add trailers to your library that you’ve ripped from DVD or Blu-ray, or scraped from the Internet with Media Companion. For Plex Media Server to pick them up, the extras need to be added to the relevant movie’s folder in your library and follow Plex’ naming guidelines.

In a gist, this means that extras need to have a descriptive name suffixed with the type of extra. e.g.

Movie_Folder/Descriptive Name-ExtraType.ext

Currently, you can choose from six different ExtraType specifiers:

-behindthescenes
-deleted
-interview
-sample
-scene
-trailer

An example of a good name might be Avatar-trailer.mp4 or Theatrical Trailer II-trailer.mp4. The descriptive part of the name will determine how the content is shown in your Plex client.

plex extras naming scheme

If you’ve organised your library in a more hierarchical structure, with different subfolders for external subtitle files and metadata, you can also organise extra content with different subdirectories for each type of extra. Refer to the naming guidelines for more information.

plex update library

If you want Plex to spot these new files, make sure to update your library afterwards.
Automatically Load Extras (Plex Pass Feature)

Plex will automatically try to grab extras for Plex Pass users. This usually happens when Plex is processing movies that are newly added to your library. It’s important to note that these extras will not be downloaded to your computer; links to the extras are simply added to the movie metadata. In other words, if you’re a Plex Pass user, there’s really nothing to lose here!

plex settings freebase agent

To verify your media server configuration, open your Plex Media Server settings (you can also access these from the Plex/Web app if you’ve configured Plex for remote access) and browse to Agents > Movies. Make sure the Freebase agent is enabled in both the Freebase and The Movie Database tabs. It doesn’t need to be at the top of the list.


freebase settings

Open the preferences of the Freebase agent and make sure that the Find trailers and extras automatically option is enabled. Here you can also choose whether to download (more explicit) red band trailers and include extras with subtitles.

plex force refresh

You’ll probably also want to grab extras for the movies that are already in your library. To achieve this, you’ll need to do a Force Refresh of your movie library. This forces Plex to run all movies by the metadata agents again to check for new content, so this will take some time to complete.

Are movie trailers something you love, or try to avoid? Share your thoughts in the comments below!

More related news:
Source: makeuseof.com 

Monday, November 24, 2014

How to: DVD and Blu-ray ripping

Learn how to get a Blu-ray/DVD onto your hard drive by ripping them with Handbrake or find its alternative tool.

Blu-ray and DVD offer a handy way to get high-quality video into your lounge room, but discs are less convenient once you want to stream those movies around your home or slip them in your pocket as you walk out the front door.

DVD and Blu-ray ripping

This guide explains how to rip your Blu-ray and DVD and copy them to your computer’s hard drive so you can enjoy them without ever having to get up off your couch to drop a disc in the DVD player.

Unfortunately Australia’s copyright rules don’t permit ripping your DVD and Blu-ray movies to your computer. The recent copyright law review is unlikely to change this, although it’s worth remembering that we were ripping our music CDs for many years before Australian law caught up with the times. You’ll need to draw your own moral line in the sand when it comes to copying content which you’ve legally purchased on disc. These days some discs come with a digital download, but it might not be in a format which suits you.

THE RIGHT TOOLS FOR THE JOB 

There are several applications designed specifically for ripping movies, but let’s stick with the highly-respected HandBrake video transcoder. It’s available for Windows, Mac and Ubuntu, and because it’s open source, it’s completely free.

HandBrake removed its DVD decoding features several years ago, but you can get around this by installing the VLC media player.

Together these two free applications should happily convert your DVD library to MP4 video files which will play on a wide range of gadgets. You can also opt for MKV, but HandBrake ditched support for DivX and XviD several years ago.

Nothing separates MP4 and MKV in terms of picture quality, because technically they’re only container files. By default, HandBrake uses the H.264 video format inside both MP4 and MKV files. MKV is a little more flexible but, when in doubt, stick with MP4 because it’s compatible with a much wider range of devices. If you’re catering to Apple gadgets then definitely stick with MP4, ensuring you use the .M4V file extension so files play nicely with iTunes.

Pavtube ByteCopy can make a bit-perfect copy of your movies and save them on your computer as hefty VOB or M2TS files. Occasionally you’ll run into a particularly stubborn disc which these applications can’t rip due to damage or aggressive copyright protection. However, ByteCopy can deal with all kinds of Blu-ray and DVD discs.

THINK ABOUT THE BIG PICTURE 

Before you rip anything, consider how you’ll watch your movie files.

You need to cater to the fussiest devices in your ecosystem, which will most likely be Apple gadgets, Smart TVs or perhaps games consoles. Also consider how you’ll deliver files – perhaps you’ll copy them to the internal drive or a USB stick, perhaps you’ll stream them over your home network or the internet. Try to keep transcoding to a minimum.

In a perfect world the idea is to rip once, store in a central location and watch everywhere. This means finding resolutions and quality rates which look good on your large screens but don’t create files too large for your portable devices. Create test files before you go on a ripping frenzy.

LET IT RIP 

Ripping DVDs with HandBrake and VLC is very straightforward but it’s best to master the basics of converting DVDs before tackling your Blu-ray collection.

Click HandBrake’s Source button and point it at the DVD in the optical drive. It takes a minute to examine the disc and identify its list of titles. Even if you’ve got VLC installed, HandBrake might ask for the libdvdcss file in order to handle the encryption – although you should be presented a link for downloading it.

HandBrake selects the largest title and assumes it is the main movie. If the disc contains several TV episodes HandBrake will only choose one, but make sure it’s an individual episode rather than the Play All playlist. Sometimes you’ll see more than one title which looks like it could be the main movie. Some movie houses make life difficult by creating 99 titles, most of them dummies.

HandBrake has a knack for choosing the right title, but to be sure you can play the DVD in VLC. Go to the disc’s main menu and press Play on the movie or episode you want to rip. Don’t press Play All. Once it’s playing, click the Playback dropdown menu and look under Title to see which title number you’re watching.

HandBrake might take forever or even crash when scanning the disc. Or it might not see the title number you need. Once you know the title number, click Source, Title Specific Scan, Open Folder and then select the VIDEO_TS folder on the disc. Enter the title number and press Open Title. If you’re still stuck, try ripping the disc as an ISO first. Just having AnyDVD HD running in the background might be enough for HandBrake to read the disc correctly.

At this point you can keep things simple by choosing a device preset from the list on the right, such as iPhone, Apple TV or Android tablet. Now go to the destination bar, click browse and specify a folder along with a file name. Press Start and go make yourself a coffee. If there’s a string of TV episodes on the disc you should enable the auto-naming option in the preferences. Press Add to Queue and repeat for each title before you click Start and rip them as a batch.

GET CRACKING 

It’s a simple enough process, but you may want to dip into HandBrake’s Video settings to tweak the file size and picture quality. It’s a good idea to rip a few minutes of your movie as a test. Look for a scene with fast-moving action, dark shadows, skin tones and panning shots so you can watch for blur, pixelation and jitter when testing the different video quality settings on your devices.

For a quick settings check use the Preview button to generate a 30-second clip (although it can be flaky at times). When you’re ready to test on your various devices, choose a title but only scan chapters 1 through 1. Play this short test clip on every server and device you’re trying to cater for. Some devices can be very fussy even with files that they’re supposedly compatible with.

If the result looks terribly distorted and blocky then the DVD’s copyright protection probably hasn’t been bypassed. It’s also possible that VLC isn’t supplying the correct version of libdvdcss.dll and you’ll then need to download it.

Go to download.videolan.org/pub/libdvdcss/1.2.12 and grab the 32 or 64-bit version of libdvdcss-2.dll (if you’re running a 64-bit version of Windows then make sure you’re also running a 64-bit version of HandBrake). Now rename it libdvdcss.dll and move it into the HandBrake folder inside the Program Files folder.

EDITOR'S NOTE

But as for encrypted Blu-ray and DVD conversions, HandBrake's ability does not equal to its ambition any more. At Times you need HandBrake Alternative software to achieve better Blu-ray/DVD conversion, and Pavtube ByteCopy is the best recommended HandBrake Alternative. More details can be found on its official website:

http://www.multipelife.com/bytecopy

There are plenty of reasons that make ByteCopy surpass other competitive HandBrake Alternatives, even go beyond HandBrake itself, here lists some main advantages:

  • Do not need to worry about which OS your computer running on
  • Seldom crashes when dealing with encrypted Blu-rays and DVDs
  • Run more stable and convert Blu-ray/DVD movies faster
  • More specified profile setting for Galaxy Note 4, iPhone 6, iPhone 6 Plus
  • Perfect BD/DVD backup solution
  • Lossless Blu-ray/DVD copying
  • Multi-track preservation
  • Various video editing functions
  • 3D video output
  • Export single SRT subtitle file 
More related info:

Friday, November 21, 2014

Transfer and Play iTunes Movies on InnoTab Max, InnoTab 3S/3 Plus

If you want to watch downloaded iTunes movies on InnoTab Max, InnoTab 3S/3 Plus, here offers the easy way to remove the DRM protection from iTunes for freely playback on InnoTab. 

When it comes to electronics for kids, no other name shows up in ads and stores as much as VTech. InnoTab MAX and the entire line of kid-safe, kid-friendly InnoTab tablets, which includes InnoTab 3S Plus and InnoTab 3 Plus offer premium features for unsurpassed value as compared to competitive children’s learning tablets. With kid-safe Wi-Fi so kids can explore appropriate online videos that have been pre-selected by VTech.
Play iTunes Movies on InnoTab Max, InnoTab 3S/3 Plus
However, it currently lacks a good source for playing video on InnoTab Max, InnoTab 3S/3 Plus except MP4. What if to like DRM protected Cartoon or Disney movies from iTunes store on InnoTab?
As we know, movies purchased from iTunes store are locked by Apple DRM protection and can only play on Apple products like iPhone, iPad, Apple TV, QuickTime, etc. In order to play iTunes video on InnoTab Max, InnoTab 3S/3 Plus, you have to remove DRM from iTunes movies and convert iTunes movies to VTech InnoTab compatible video formats.

To do this, just get a top DRM remover- and accomplish your task in a few mouse clicks! Pavtube ChewTune, well compatible with Windows (Windows 8.1/8), is an intuitive and stable DRM converter to help you remove DRM protection from iTunes, Amazon, Zune, BBC iPlayer, Napster, Blockbuster, etc. and convert videos to all popular video formats like MP4, MOV, MKV, WMV, AVI, FLV, etc. for playing and sharing anywhere you like. ( Read Top 5 Best DRM Removal Programs Review )

Free download the DRM converter and  make your iTunes movies playable on InnoTab Max, InnoTab 3S/3 Plus without any hassle!

Few tips before starting the iTunes to InnoTab conversion:

1. The DRM removing process may mislead your anti-virus software to falsely report virus/worm. Please ignore the report to keep on ripping.

2. This product cannot convert unplayable video (damaged, unauthorized, etc).

3. Allow the audio driver installed during the Pavtube ChewTune installation.

audio driver installed

4. Close iTunes before running the Pavtube DRM Removal Converter when converting iTunes M4V movies.

5. It would take as long as the source movie length for the whole iTunes contents to InnoTab conversion process since Pavtube ChewTune records source DRM files in 1:1 video and audio quality.

How to Remove DRM-protection from iTunes movies to InnoTab Max, InnoTab 3S/3 Plus?

Step 1. Run Pavtube ChewTune, drag and drop the source iTunes content from local computer to ChewTune. Or hit the "Add Video" or "Add from folder" button to import your iTunes DRM contents.

InnoTab DRM Media Converter

Step 2. From “Format” drop-down list, choose “Common Video > H.264 Video(*.mp4)” as the output format.

InnoTab Max, InnoTab 3S/3 Plus Video Format

Step 3. If you like, you can enter “Settings” option to adjust profile parameters, such as video codec, bitrate, frame rate, size, etc to get better video and audio quality on InnoTab Max, InnoTab 3S/3 Plus.

VTech InnoTab Video Settings

Step 4. Click the big “Convert” button on software main UI to start iTunes to InnoTab conversion. This converter will activate your media player automatically and start to play this video. The player windows cannot be removed or closed.

In the meanwhile, it will start to record this video in MP4 real-time. The conversion time is equal to the video length itself; you can do other tasks during the converting the process.

Note: the system volume could turn off temporally during this period; no worries, do not touch it to get perfect DRM removed video.

After the conversion, click "Open output folder" to quick locate the converted video.

Then transfer movies from PC to InnoTab Max, InnoTab 3S/3 Plus. Now you are ready to watch DRM-free videos and music from iTunes store on InnoTab the nest time you wait for a bus, travel, or go camping trip.

Learn more Special offer:

Thursday, November 20, 2014

Thanksgiving Day Necessity- 30% OFF Best Blu-ray/DVD Ripper

Great info!!! From now, Pavtube Studio launches its biggest Thanksgiving Promo 2014, offering amazing UP to 50% OFF discount on its featured Blu-ray DVD ripping/backup programs. All specials and giveaway are available for both Windows and Mac users. Enjoy your crazy money-saving trip before December 10th, 2014, never miss!!!
Thanksgiving Promo 2014


As one of the most recommended product, Pavtube BDMagic are offered with a 30% discount. It is designed to offer every buyer full holiday Blu-ray and DVD entertainment enjoyment. For customers who have a large collection of Blu-ray/DVD discs, plenty of Blu-ray/DVD ISO image files saved in personal server, rented Blu-ray/DVDs but been busy during the lease term, etc. Pavtube BDMagic offers a quite easy yet efficient way to backup your Blu-ray/DVD permanently and convert them to compatible audio and video formats for playback on your favorite portable devices. 2D/3D Blu-ray and standard DVD to 3D converting is supported. It is now $34.3, saving you 14.7 dollars!
  • Learn how to use the maigic 30% OFF Blu-ray ripping tool here.
The Thanksgiving celebration activities are being warmly put forward to all people to get a harvest Thanksgiving. Don't waste your chance to get your unique gift at Pavtube 2014 Thanksgiving Hot Deal before December 10th, 2014.

Grab more 20% OFF ~ 30% OFF gifts and get more special offer at Pavtube Facebook.

Read More:

Wednesday, November 19, 2014

Download digital copy movies onto Kindle Fire HDX and Fire HD 6 for viewing

Wanna download and transfer a Digital Copy movie to Kindle Fire HDX and Fire HD 6 for entertainment? Follow this simple guide to get the work done. 

Question: I just bought Perks of Being a Wallflower, and it comes with a digital copy. What are the steps I would use to do this put it on my Kindle Fire HDX and a fire hd 6 which I plan to buy for my kids?
Kindle Fire HDX and Fire HD 6

Digital Copy is a standard definition digital version of your purchased DVD/Blu-ray. These digital copies can only be transferred to iTunes or Windows Media Player, so your device has to support either Quicktime formats (.m4v, .mp4, .mov) or .wmv. Even there, they come with DRM restrictions, so it defeats the entire purpose.

In order to get Digital Copies and Kindle Fire HDX and Fire HD 6 to play nicely, you'll need to get rid of DRM from Digital Copies first. Digital Copy playback doesn't stop there, and there are many programs out there that allow you make digital copies out of DRM-protected contents. 

If you are interested in doing likewise, check out Pavtube ChewTune, a top DRM Removal and Converter for Android which can handle Digital Copy DRM-restricted movies, iTunes DRM-protected videos and Windows Media DRM contents for almost all popular Android-based Tablets and smartphones including Kindle Fire HDX and Fire HD 6. I've found the output quality to be excellent, and see no difference when compared to playing the original digital copies themselves. Below is a simple guide.

First, download the Digital Copy to Kindle Converter to your computer. For mac users, get mac version here
Ways for you to save more money:


Guide: Convert and transfer Digital Copy movies to Kindle Fire HDX and Fire HD 6 
Before conversion you need first to transfer Digital Copy to computer in Windows Media (.wmv) or iTunes video format (.m4v). Here we go with the DRM removal process: 

Step 1. Download and install the digital copy to Kindle converter on your PC or Mac.

Step 2. Launch the program, drag and drop the digital copy file into it (Please make sure you have transfered the digital copy movie to your computer ).

digital copy to Kindle converter 

Step 3. Choose output format for Kindle Fire HDX and Fire HD 6. Click on ” Format > Android > Amazon Kindle Fire HD(*.mp4)”.
Kindle Fire HDX and Fire HD 6 Video Format 

This profile is special designed for Kindle Fire HD(including Fire HD 6), but also works well on Kindle Fire HDX. If necessary, you can also click on “Settings” button to custom the video quality by yourself.

For example, if you want to get 720p video quality, you just need to adjust the video size as “1280*720“, to get 1080p video quality, adjust the size as “1920*1080“. Or set size as "1280*800" for Fire HD and "1920*1200" for Fire HDX for full screen playback.


Fire HD Video Settings 

Step 4. Having finished the settings? OK, Finally, just click on the “Convert” button to start converting digital copy movies to Kindle Fire HDX and Fire HD 6 tablet.

When the conversion task is finished, you can click “Open” button to get the final output files for your Fire HDX/Fire HD 6 and transfer it to your tablet.

Now, you can play digital copy movies on Kindle Fire HDX and Fire HD 6 as ease. You have got it. Enjoy your time! Also learn how to play Blu-ray, DVD and DVD ISO/IFO to your Kindle tablet.

Monday, November 17, 2014

Backup/Rip How to Train Your Dragon 2 DVD to Kindle Fire HDX, Fire HD and Fire

Find it's difficult to watch "How to Train Your Dragon 2" DVD movies on Kindle Fire HDX, Fire HD and Fire? This page will focus on backing up/ripping DVD on your Kindle tablet.

The fantasy sequel to How to Train Your Dragon creates a vivid, sprawling fantasy world that makes you want to reach out, grab a controller, and explore. How to Train Your Dragon 2 takes place five years after the first film, featuring Hiccup and his friends as young adults as they meet Valka, Hiccup's long-lost mother, and Drago Bludvist, a madman who wants to conquer the world. It is released in DVD on November 11, 2014.
Rip How to Train Your Dragon 2 DVD to Kindle Fire HDX, Fire HD and Fire

Want to backup your How to Train Your Dragon 2 DVD movies and rip them for viewing on devices such as Kindle Fire HDX, Fire HD and Fire? Frankly, it's seldom you can copy a protected DVD to Kindle directly without error. You have to remove such copy protection from your DVD first. Here we go.

What we need?

To backup DVD movies on Kindle tablet, the key point is a good ripping & copying tool. After several trials, we recommend this Pavtube DVDAid which does a great job in backup the entire DVD movie without qualtiy loss. Meanwhile, it is a powerful tool to rip your DVDs to compatible format for Kindle Fire HDX, Fire HD and Fire or make the clips of your favorite scenes from a movie playable on your Kindle. You are free to try free trial version (Pavtube DVDAid for Mac is for Mac users)

Now let me show you how to backup/rip "How to Train Your Dragon 2" DVD movie to Kindle Fire HDX, Fire HD and Fire for watching.

Step 1: Load DVD to Pavtube DVDAid.

Click "Load file' icon on the top left to import the "How to Train Your Dragon 2" DVD disc.

DVD to Kindle Ripper 

Step 2: Choose output format


Under "Format' menu, there are many formats and devices for you to choose.

For ripping DVDs for playback on Kindle Fire HDX and Fire HD, choose the corresponding format, like “Amazon Kindle Fire HD(*.mp4)” from “Android” option.
Kindle Fire HDX, Fire HD and Fire supported format 

Or select "Amazon Kindle Fire(*.mp4)” from “Android” for playing on Kindle Fire. 

Step 3: Start ripping

Click big "Convert' button to start coping or ripping your "How to Train Your Dragon 2" DVD Disc. Once completed, hit "Open' button you will go to location of generated files.

Tip: Before start the conversion, you can select wanted audio track and subtitles language from "Subtitles" and "Audio" option. Interested, you can check "Only show forced subtitles" to convert DVD to Fire HD for playing with forced subtitles only.

Step 4: Transfer DVD movie files to Kindle Fire HDX, Fire HD and Fire via USB.

Once putting DVD movies to Fire HDX, Fire HD and Fire, you could get an amazing movie enjoyment on it wherever you go. Plus, Blu-ray, ISO/IFO and Tivo recordings can also be played on your Kindle.

Friday, November 14, 2014

Easy solution to convert XviD/DivX videos to iPad Mini 3 on Windows 10/Yosemite

Following is a brief guide on how to convert unrecognized video files AVI(Xvid/DivX) to supported format of iPad Mini 3 on Windows 10/Yosemite.

The iPad Mini 3 is a curious beast. Both the display and battery life are excellent, and the addition of Touch ID takes care of our biggest complaint from last year. Yet the limit to video format still and will always exist for the reason of developer’s benefit. Since Apple users are not all surprising the fact that Apple products only accept videos in MPEG4/H.264/M4V formats.
Convert Xvid/Divx AVI to iPad Mini 3

When you get some Xvid or DivX AVI videos, it's hard to transfer and play these AVI on iPad Mini 3. Thouht there is no official XviD/DivX player for iPad Mini 3 to make our life easier, there is still easy solution to make XviD/DivX AVI playable on iPad Mini 3, no matter on Windows 10 or Mac OS X Yosemite.

To add Xvid/Divx videos to iPad Mini 3 for playback, you requires to encode AVI to iPad Mini 3 supported video format. Then the AVI to iPad Mini 3 Converter for Win/Mac here is recommended which is specially offered for you to achieve your goal of Xvid/Divx AVI to iPad Mini 3 conversion in an easy way. It enables you to encode and convert Xvid/Divx AVI to iPad Mini 3 preferred format with best quality output video. (Read Best Mac Blu-ray Ripper Review for iOS  devices)
Tutorial on encoding Xvid or DivX AVI files to iPad Mini 3 on Windows 10/Yosemite

Step 1. Run the iPad Mini 3 AVI Converter to import your .avi files to it. This program supports batch conversion.

iPad Mini 3 AVI Converter 

Step 2. Click on Format, and from the dropdown menu, select iPad > iPad Mini HD Video(*.mp4) that is the optimal output format for iPad Mini 3.

best video format for iPad Mini 3 

Step 3. To get a full-screen and HD video for iPad Mini 3, tap the Settings button to modify the video resolution, video/audio bitrate for your iPad Mini 3.


a. For your 1080p source video, keep the video size as 1920*1080, set video bitrate as 5000-6000fbps is proper.

b. For 720p HD video, we recommend 1280*720(720p HD) video size and 3000-4000fbps video bitrate.

best video settings for iPad Mini 3 

Step 4. Press the Convert button; it will start to convert Xvid or DivX AVI to iPad Mini 3 on Windows 10/Yosemite immediately.

When the conversion ends, click “Open” button to get the generated h.264 .mp4 movies and then sync the videos to iPad Mini 3 via iTunes. Later, playing Xvid or DivX AVI moives on iPad Mini 3 will be so much easy for you.

Tips:

1. If necessary, tick off the "Merge into one file" box that helps you merge multiple AVI video files into single one file.

2. If you wanna split your large video, it's also an easy task. Just click the "Split" button and it will help you make it.

3. It's worth mentioning that, this tool supports NVIDIA CUDA and ATI Stream (AMD APP) acceleration technologies. If your computer running on a CUDA-enabled Graphics card, or an AMD graphics card with AMD APP technology, the conversion speed will be much faster.

4. If you are disc lovers, you can also watch your Blu-ray, DVD on iPad Mini 3 or put Blu-ray ISO and DVD ISO/IFO to old iPad Mini 2 for enjoying.

Wednesday, November 12, 2014

Natively View DVD ISO/IFO Files on Nexus 9

From this article you will get best solutions on how to view DVD ISO/IFO files on Nexus 9 with ease? Do you want to have a look?


How much do you know about Google Nexus 9?
Brief introduction you can read here. The Nexus 9 was available for pre-order starting October 17th, and it will be available in the Play Store as of November 3rd. Of course it comes with Android 5.0 Lollipop which was just announced as well, next to the Nexus 6. Nexus 9 comes boasting an 8.9 inch IPS LCD display. It will arrive with a magnetic keyboard case which turns into a make-shift laptop in a cinch. Google is really pushing this tablet as a tablet for work, breaking into a new market in my opinion. 

Something Nexus 9 cannot handle well:
However, as I know, for almost all tablets on market, you won’t successfully work ISO/IFO files with them, fight? Also, Nexus 9 is included. With the traditional MP4 format as the best maybe you need a DVD ripper as the assistant. Let me introduce you one here: Pavtube DVD to Nexus 9 Ripper, such a professional converting tool specially for ISO or IFO files.

Supported OS: NT/2000/XP/Vista/Win7/Win8/Win8.1/Win10

According to the instructions, you can download the program and let your DVD ISO/IFO files in with the button ‘File’ on left corner. Then on the output list you can easily find the ‘Android’>>’Google Nexus 10 H.264 Video (*.mp4)’ as the best. The following screen can show you the correct way.


Next, it you need, you can go to the ‘Settings’ item for advanced adjustments to change the video encoder, frame rate, resolution, etc. Remember the file size and video quality is based more on bitrate than resolution which means bitrate higher results in big file size, and lower visible quality loss. 


Tips: If you want to watch Blu-ray files on Nexus 9, maybe this program won’t work well. Pavtube MDMagic is another choice.

Any questions or comments you can leave them below, or you can click the ‘Convert’ button to start your work after preparation.

More:

Monday, November 10, 2014

Load YouYube Videos to iTunes (M4V,MP4, MOV) on Mac?

As YouTube fans, you must want to know how to download your YouTube Videos to iTunes as M4V, MP4 or MOV, let’s together see how-to.


Why we all love YouTube so much? Mainly we get the fun or significant information from YouTube and it is so hot! Sometimes, we would download YouTube videos for a enjoyment on our handle tablets or phones, right? But the only disappointing point is that we can't enjoy these YouTube videos offline. And as Mac users, we used to use iTunes to manage our media files including video and audio files.

For those Mac users, it would not be easier to load videos or music to iTunes and import them to iPhone or iPad, etc. Today, what I want to tell you is how to make YouTube videos compatible with these devices. The professional easy-to-use YouTube to iTunes Video Converter for Mac can do you a big favor with a hassle free experience. It offers you ultra-fast conversion speed, loss-less video quality, extremely easy conversion steps. Let’s see how it works:

Firstly, load your YouTube video files to this program. When you downloaded the YouTube videos on your computer, just directly drag or drop your YouTube videos to the Mac application. Or you can tap the ‘Add Video’ and ‘Add from folder’ to the successfully put your files in.


Next, let’s select the compatible output formats for iTunes. For example, go to the ‘Common Video’ to select ’M4V MPEG-4 Video (*.m4v)’ as the best. In other ways, you can search ‘MP4’ or ‘MOV’ in searching box there, any output formats there for Apple devices id okay!


Note: Have several FLV movie clips and want to combine all of them so that you can enjoy a long movie without interruption? Just check ‘Merge into one’. The smart YouTube to iTunes Mac software additionally offers some useful edit functions to enhance your video


Finally, when we have all the preparation done, we can tap the ending item ‘Convert’ to finish our work. If you have any other opinions or suggestions, you leave them below and we will give you response as soon as possible.

For more?

Thursday, November 6, 2014

Download YouTube Videos to Windows Media Player for Enjoyment

You said you got a hobby of watching YouTube videos? Read the article below and know how to watch them on Windows Media Player.


Surely if you indeed have the hobby of watching YouTube videos on Windows Media Player, it is possible after installing some basic packages. It will bring some incompatibility issues if not sorted out in advance. For smoothly watching YouTube videos on Windows, all you need to do is turn to a good YouTube to Windows Media Player Converter.

This article has all the information you need to know about that and will be a proper guideline to use. If you already have some YouTube videos in your hard drive and want to watch them in Windows Media Player. There is theYouTube Video Converter will do all that right from the browser. It will convert to popular formats like 3GP, MOV, MP4, AVI, RM, WMV, M2TS, MPEG, TS and ASF in a quick and easy way. Now click the Download button below to get the program.

Some Steps you may know for watching YouTube videos in Windows Media Player.

The first thing will be adding all the files to the converter and you will have to browse them from the right folder. You can achieve the goal by clicking the ‘Add from folder’ on the bottom left corner. Alternatively, you can also drag and drop the files to the program. The added files will be listed in the video library as thumbnails. Next, just go to the output list to get the ‘HD Video’>>’H.264 HD Video (*.mp4) as the best output one.


For some advanced users, ‘Settings’ or ‘Editor’ will be a better place before you planed to click the ‘Convert’ button to start your work. Make some personal adjustments for a nice enjoyment on Windows Media Player, so we also called the program as ‘tiny editor’, is that awesome?

Expires on November 10th, in last several days, all you guys can enjoy a 50% off discount on this ‘Promotion Page’. The first one is what you need! Hurry up!

Tips: Also five common problems you may get when working Windows Media Player. Take them for a reference?
1) Poor internet connection is one of the problems encountered with Windows Media Player. It is always smart but can fail to connect automatically in a few cases and will send a notification to that effect.
2) The second problem is corrupt Windows Media Player library. If this happens, you will be unable to access your stored files or even add new ones.
3) Thirdly, you are likely to experience interrupted playback especially when you are streaming videos with Windows Media Player. The performance of the media player will be greatly affected leading to slowed video buffering.
4) The fourth problem that you need to know about is CD ripping error which makes it impossible to extract audio files from the disc. Generally, it is a trouble-free mission when ripping CDs using the Windows Media Player and this problem occurs in selected instances.
5) Lastly, you can have the Windows Media Player freeze out when playing on a full screen mode. This will be nagging to those people who like enjoying their videos on full screen mode. The problem is majorly caused by incompatibility between the video format and the player which can be prevented by converting the files in advance.

More:

Wednesday, November 5, 2014

Again Celebration of Halloween Converters Promotion by Pavtube Studio!

This paper mainly tells us the introduction of several popular video converters on Pavtube studio which also has the Halloween discount!


Searched online, you guys may know so many popular videos converters that can especially meet most photographers or video editor’s requirements. With different functions or prices, it is hesitating for us to make some decisions, right? Follow the 2014 Halloween which past only several days, here we introduce some Pavtube Video Converters with special Halloween discounts. More details on Halloween Topic Page?

Pavtube MTS/M2TS Converter for Windows/Mac, especially for converting MTS/M2TS/M2T/TS/AVCHD/MOD/TOD footage to almost all video formats. What’s more, so many popular editing tools or media devices you can find listed on output items in this program. What else we also call it as a simple editor because you can adjust your files in ‘Editor’, like trim, crop, subtitles, etc. Let’s just make our MTS/M2TS compatible with everything.

Pavtube Video Converter for Windows/Mac, which is a functional assistant that can handle almost all HD/SD audio/video formats. For another way, it’s the best one for Tivo/DVR recordings. So other items you can have a try on main interface such as ‘Settings’, ‘Editor’, ‘Merge into one’, etc. All Windows operation it can work well. Also, GPU acceleration technology is available. For example,  iPad Air 2, iPad Mini 3, iPhone 6 plus, iPhone 6, Galaxy Note 4, Galaxy Note Edge, Nexus 6, Nexus 9, Kindle Fire HDX, Surface Pro 3, etc are offered there.


Pavtube HD Video Converter for Windows/Mac, the biggest highlight this one can handle HD digital camcorder footages such as AVCHD (MTS, M2TS), MXF, MOV, etc. Others? Deinterlace to get the better video, advanced adjustments for some professional video editors, wide range of outputs and supported devices, etc.

Pavtube MXF Converter for Windows/Mac, especially designed for MXF footages which shot by MXF cameras. For example, it can convert MXF files for free playback on iDevices, Android devices and media players. Furthermore, MXF files batch conversion can be also supported. Is that cool?

Pavtube MXF MultiMixer/iMixMXF, do you know the biggest characteristic of this program? Keep multiple audio tracks/channels in multi-track MKV/MP4/MOV formats, surely with rich editing functions. On the output list, you can find the item ‘Multi-track Video’ that other products don’t have. Others for example, batch conversion, merging and splitting. 
For Blu-ray or DVD rippers, you can also see here. Pavtube DVDAid for Windows/Mac or BDMagic for Windows/Mac. I’m sure it can meet your needs such as ‘Copy’ files, rip DVDs or Blu-rays, etc.


Whatever video formats shot by cameras you wanna edit for a nice enjoyment or upload on websites, the programs we mentioned above can do you a big favor. For now, I have to mention here is to celebrate the 2014 Halloween, such a big discount on this paper! 50% OFF on all BD/DVD or Video tools! Only 5 days left! What are you waiting for?