Thursday, February 27, 2014

Rip 1080p Blu-ray movies to 720p MKV with lossless audio for playback on Windows media player

From this article, you can learn how to keep 1080p Blu-ray movies to 720p MKV on hard drive for playback on media player with lossless audio.

I used to think that I could play my Blu-ray movies on my media player. But when I have a try by myself, it shows that I was wrong. After did some research and I found something. Take Windows media player as an example, Windows media player is capable of playing all types of media. However, many video formats, such as Blu-ray, are proprietary and typically require a royalty payment in the form of a license to its owner. In order for Microsoft to include support for Blu-ray discs, it would have to pay Sony a royalty, which would likely mean passing on that cost to consumers. Instead, Microsoft chooses to let the consumer decide on whether to pay to use Blu-ray technology.

Due to this, I searched online for a blu-ray ripping software to convert 1080p Blu-ray movies to 720p MKV while keeping all lossless audio for playback on my Windows Media player. I searched for “was capable of ripping Disney blu-rays” and many blu-ray ripping software came up. I’ve tried some such as MakeMKV, Handbrake and son on. However, although MakeMKV helps me to get MKV files, it suffers a little quality loss, while Handbrake only help me convert normally 30GB file down to 3-6GB. My problem wasn’t completely solved until I tried Pavtube ByteCopy (Mac user: ByteCopy for Mac). I really appreciate its profile of backing up blu-ray movies to MKV without quality loss. Beside, it could have worked on all my movies.

Below is the method how I convert 1080p Blu-ray movies to 720p MKV keeping all lossless audio for playback on my Media player.

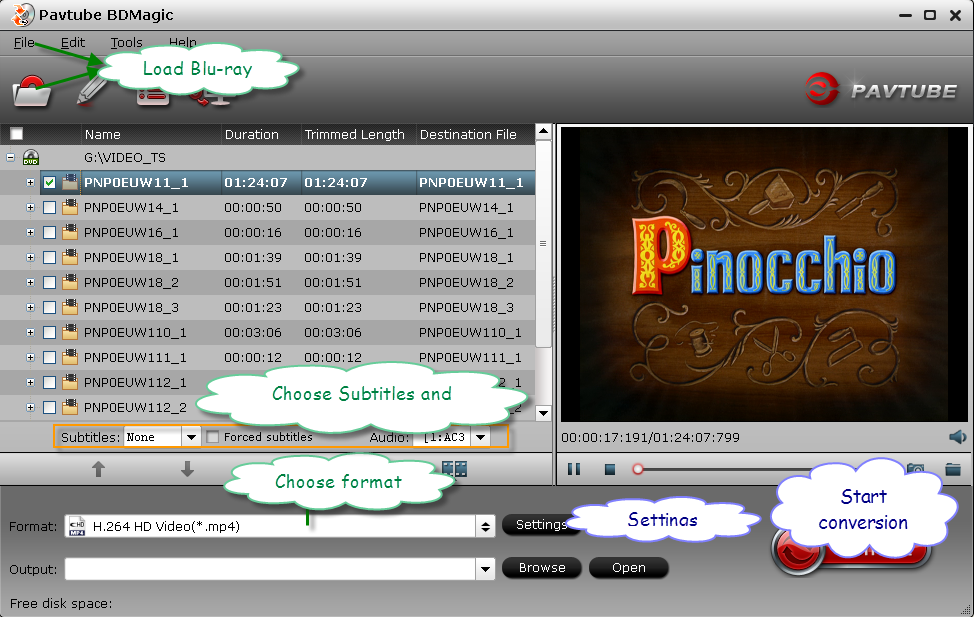
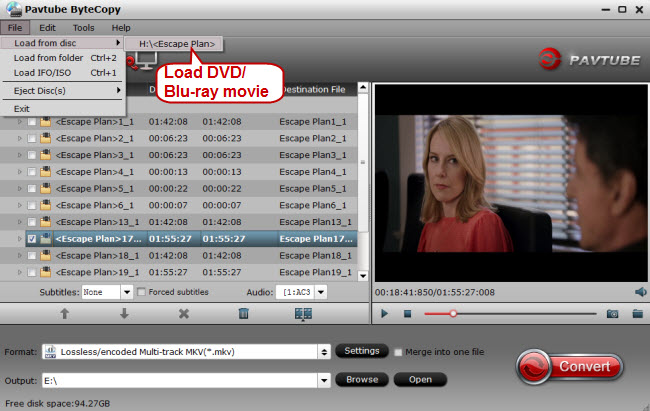
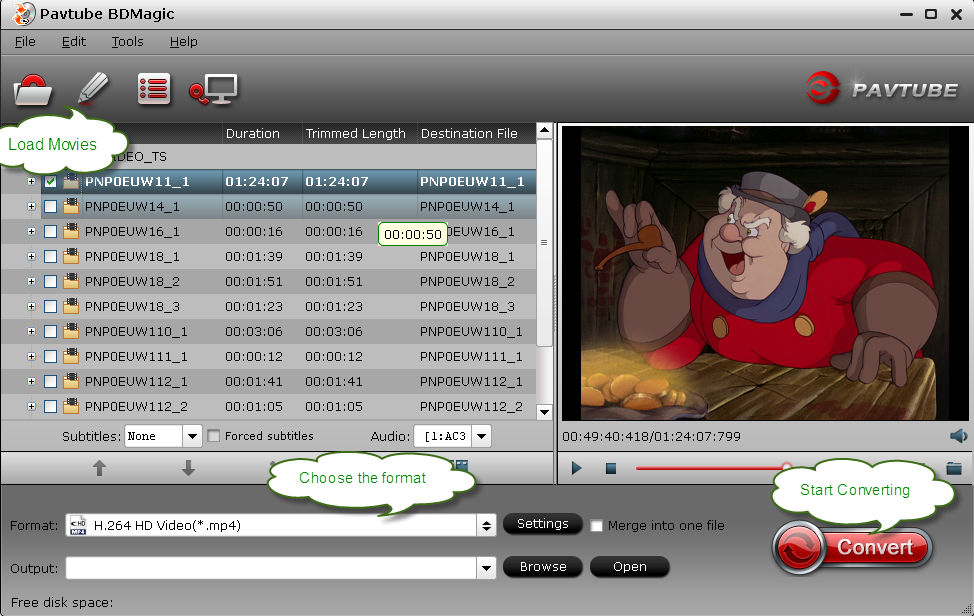
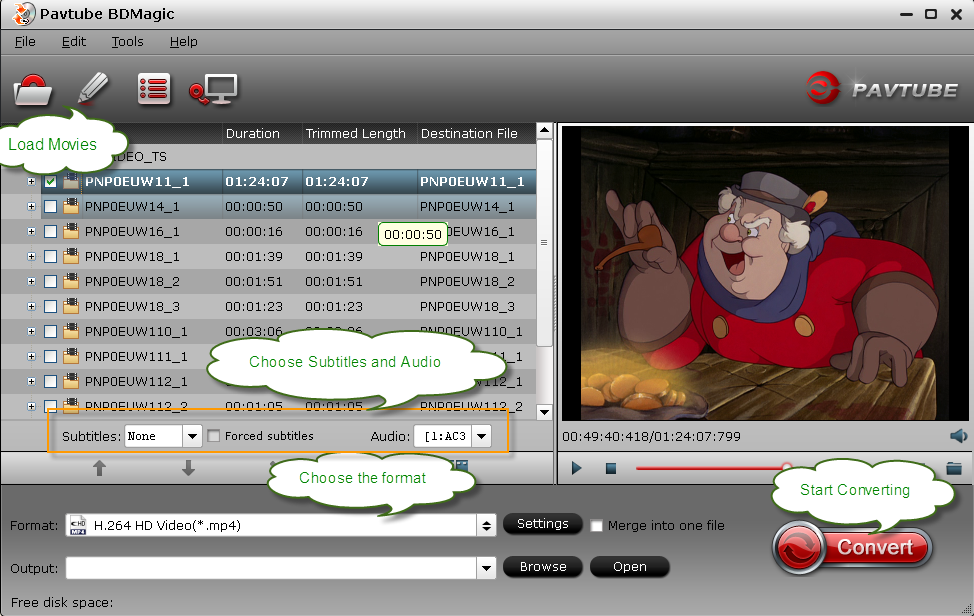
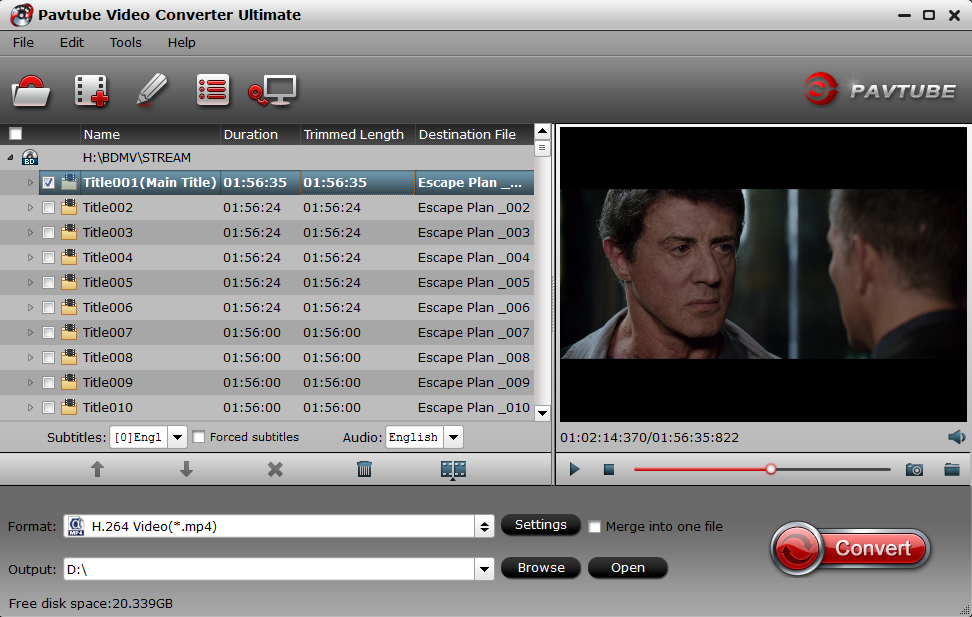
1. Install and run the converter. Click load disc button to import the Blu-ray movies to the program.


Blu-ray to Multi-track MKV Converter

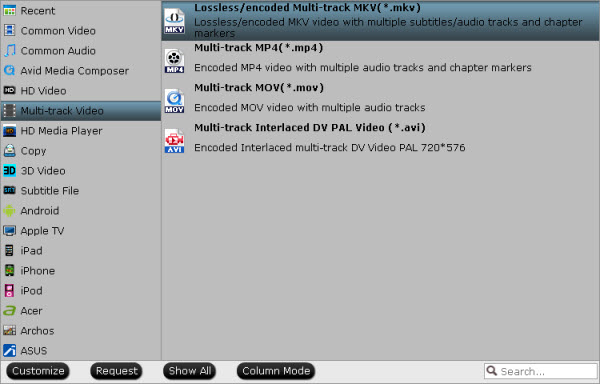
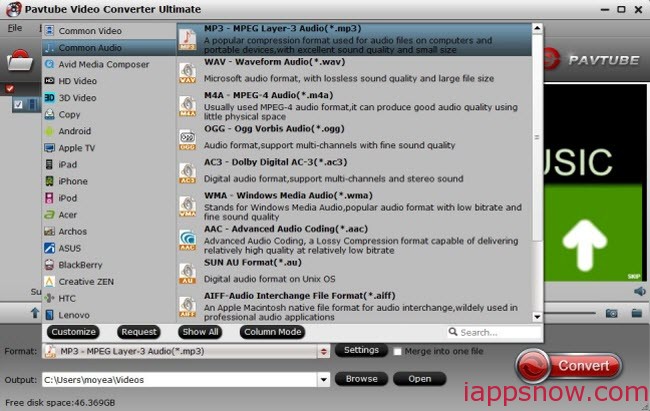
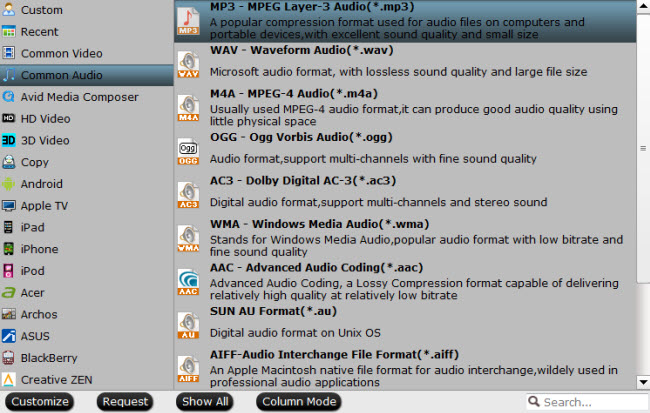
2. Click the Format menu, select “Lossless/encoded Multi-track MKV(*.mkv) as the output video format. 

Choose lossless mkv format

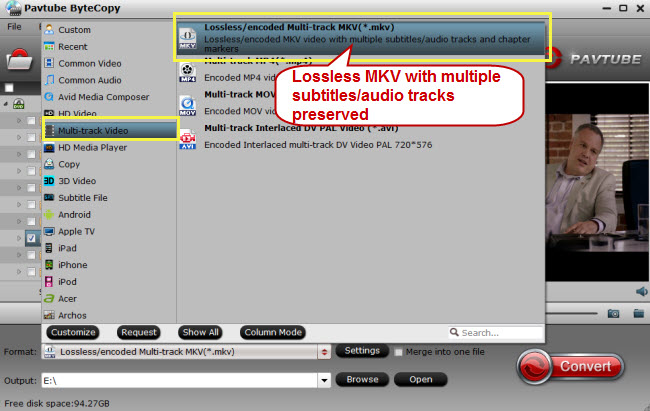
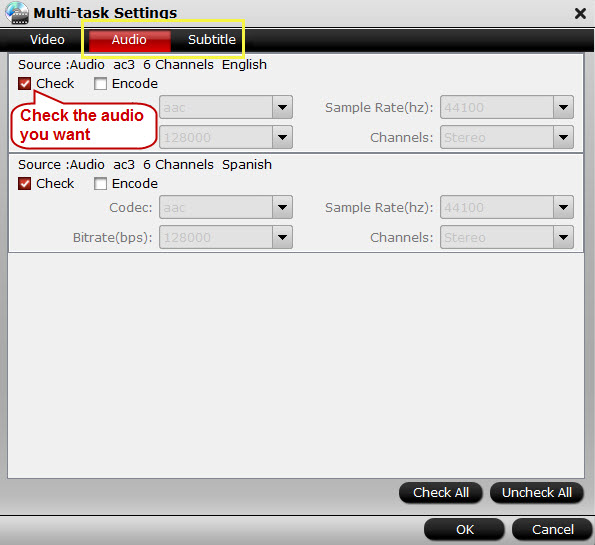
3. This specific profile could allow you to choose the audios you want as well as encode them.

Check audio settings

4. Finally click the Convert button to begin ripping blu-ray to 720p MKV keeping all lossless audio.

After encoding process has finished successfully, go into the destination directory and backup the converted files to my hard drive, then I could playback on a media player I like.

Some articles about ripping blu-ray movies:

Wednesday, February 26, 2014

Convert video/films from school DVD/Blu-ray to WMV for use in classrooms

If you are a teacher, to make your class more vivid, you need the help of muti-media. Video is one of the representatives of media teaching. If you comes up with the problem of converting school DVD/Blu-rays to the format you need, please read on.

“As an IT manager in school, my job is to help teacher to make the videos for classroom computers and delivering lessons. Some of the source videos are school dvd/blu-ray, while some are various school films or clips. Due to the variety of format, I need some useful software to help me finishing the format conversion”


With the population of media teaching and with the help of Blu-ray/dvd videos, the class will become more vivid and attractive to children. However, with the limitation of media player in class, you are not allowed to play these Blu-ray/DVD source files directly in class. If you have the same problem and was searching for useful software as the guy above, after reading this article, you could stop you step.

Software recommended: Pavtube Video Converter Ultimate

Pavtube Video Converter Ultimate is an all-in-one solution to backup Blu-ray/DVD movies, convert disc content and transcode common videos. It supports to convert Blu-ray/DVD and videos to friendly format for your either your media player or classroom computer. If you are a Mac user, it also has the Mac version Pavtube iMedia Converter for Mac.

How to convert school DVD/Blu-ray to WMV on Windows?

Step 1. After install and launch the program, load school DVD/Blu-ray to the program by clicking “Load file” icon.


Step 2. Choose the friendly format for your computer in class. Here we take “HD Video > WMV HD (*.wmv)” as example.


Step 3. When these steps are done, hit the big “Convert” button to start the conversion of School DVD/Blu-ray to WMV. 

After the conversion is over, just located the output WMV format and transfer it to the player you want need via USB cable. With the help of these videos, you could give a vivid class to your children.

How to sync WAV Files to iTunes to play in iPhone, iPad, iPod?

This is a magic WAV to iTunes guide to let you add songs in WAV format to iTunes, so that you can stream them to iPhone, iPad, iPod via iTunes.
Q: "Hello hello. I'm having a bit of trouble with my iTunes at the minute. I have an album on my computer and the songs are in .wav format, and iTunes not letting me import them. Any help? Btw, my iTunes is at version is up to date."
WAV is an audio format for storing sound in files developed jointly by Microsoft and IBM. Support for WAV files was built into Windows 95 making it the de facto standard for sound on PCs. WAV sound files end with a .wav extension and can be played by nearly all Windows applications that support sound.

However, when it comes to Mac OS, some of the WAV files still can't be loaded to iTunes although it claims to support WAV format. It means you cannot stream your WAV songs to iPhone, iPad and iPod in this way. 

In order to solve "iTunes won't import WAV" problem, I've tried several ways including convert WAV to aac format via iTunes but it still cannot be accepted by my iPod. So I turned over to third party software and luckily I found this Pavtube WAV Converter Ultimate (Read review).

This Pavtube Video Converter Ultimate, as the Pavtube WAV to iTunes Converter, is an all-in-one tool which does not only support converting WAV format to MP3 for iTunes, it support various audio & video (excluding CRM files) format so that you can stream the files to iPhone, iPad, iPod for watching. Moreover, it's also capable of digitalizing your Blu-rays and DVDs to MP4, MOV, etc. formats that your IOS devices accept; isn't it cool?

Tips: Find its Mac version here – iMedia Converter for Mac

Download a trial below:


How to convert WAV to MP3 format for iTunes on iPad, iPhone and iPod

Step 1. Import WAV files; choose format.

Click the plus icon to import WAV files into it, or you can drag-and-drop directly. Then you will find a horn icon on the left that indicates it's an audio file. 


Move your cursor to Format and choose "Common Audio > MP3 – MPEG Layer-3 Audio(*.mp3)" as below:


As listed above, there are several presets for other audio format; just choose one as your needs.

Step 2. Adjust audio specs (optional).

If you are not satisfied with the default audio quality, just click the "Settings" icon and choose wanted audio settings including sample rate, bitrate and audio channel. 

Step 3. Start converting WAV to MP3.

Now back to the main interface and hit "Convert" to convert your WAV files to MP3 format. It will start batch conversion automatically one by one. Wait for a while during the progress; after it completed, click "Open output folder" to locate the converted audio file.

Ok, now your WAV song has been converted to MP3 which is perfect for iTunes. 

See how to transfer Media Files from iTunes to iPhone | Move Video/Music/Photo from iTunes to iPad

Related articles:

Tuesday, February 25, 2014

Put Blu-ray/DVD movie collection on Asustor NAS and play through TV

If you want to search for an useful conversion software to put movie collection on Asustor NAS and play through TV, this article will give my own experience about it and it may provide some reference for you.

As a powerful multimedia storage and sharing center, Asustor NAS provides much convenience for my digital life. The most entertainment it helps me is enjoy my movie collection on the TV through the NAS. 

However, at the fist time I was in the dilemma of how to convert my DVD and Blu-ray collections to MP4 so that it could be accepted by my Asustor AS-302T NAS. I used to use Leawo, but it stopped using for they stole MakeMKV code. Although there are many format converters on the market, I wan to pay for a worthy program. After searching on Internet, a blog named "Top 5 best Blu-ray Ripper Review" enlightened my way. This article lists top 5 best Blu-ray Ripper programs review during 2013 to 2014 according to Google Ranking and user popularity. Finally I choose Pavtube BDMagic which lists on the Top 1 of the review. After using it for a period of time, I really appreciate it for five reasons:
  • Clean interface
  • Quick retrieval of information before ripping
  • Forced subtitles
  • GPU acceleration
  • Didn't steal from MakeMKV

Now, I will show the simply steps on how to convert Blu-ray and DVD movies to Asustor AS-302T NAS supported MP4 format.

Things you need:
Download the format converter: Pavtube BDMagic (if you are a Mac user, you should download BDMagic for Mac)
If you the movie you wanna convert are Blu-ray, you need a Blu-ray drive.

Then, let's begin the conversion process.

Step 1 Launch the movies to NAS converter and load Blu-ray and DVD movies to the program. The clean main interface is showed below:


Step 2 Choose the MP4 format for my Asustor AS-302T NAS. I always use "H.264 HD Vidoe(*.mp4)" under "HD Vidoe" profile.

Tip:
1. The Forced subtitle which I appreciate is also on the main interface and if you check this function, it could show the forced subtitles you chose in the output video.


2. If your computer have Nvidia CUDA/ATI AMD ready graphics card, you can have GPU encoding and the conversion would be faster.


Step 3 Hit the "Convert" button to start the conversion. It may take some time to finish the conversion, and with this period, I just do some housework to wait it.

When the conversion is over, just click the "Open" icon to locate the output video and then transfer the files to Asustor AS-302T NAS. So easy, right? Then I could enjoy these movie collections on my TV as I like.

Related articles:

Thursday, February 20, 2014

How to Extract Blu-ray Audio to MP3 Music to listen on CD?

Want to listen the audio of Blu-ray movies on your portable players? Want to rip Blu-ray to lossless audio? If you happened to have such questions, don't worry any more. This article is just writing to help you to extract Blu-ray audio to MP3 Music to listen on CD with lossless quality.

Question:
"I would like to have the audio parts of Blu Ray copied to CD for use in the car,etc.Is there any way to extract the audio from a Blu Ray concert?"
"I'm a classical music fan. As such, I have a number of Blu-ray discs of classical concerts and operas. I recently got it into my head that I wanted to rip the audio from some of these to be able to listen to them on my office stereo. I wasn't interested in the surround-sound mixes—I don't have the appropriate equipment to play back music in such formats—just the stereo tracks."
Answer:
All the commercial Blu-ray discs are encrypted by mighty Blu-ray protection to avoid pirate. So before extract MP3 music out of Blu-ray disc, you need a powerful program which can defeat all Blu-ray encryptions and read the BD audio track then decompress / recompress the audio to MP3 format (from AC3 DTS to MP3), even  FLAC, WAV, AIFF. It's that easy to rip music and audio from Blu-Ray on a Mac computer or on a Windows PC with the help of Pavtube ByteCopy or ByteCopy for Mac.

About Pavtube ByteCopy
  • Backup BD/DVD to MKV without quality loss.
  • Preserve all audio tracks, subtitles and chapter markers.
  • Provide best settings for tablets like Samsung Galaxy Tab 3 10.1, Galaxy TabPro 10.1, iPad Air, Surface 2, Kindle Fire HDX; phones like Sony Xperia Z1, Galaxy S4, Galaxy Note 3, iPhone 5S, iPhone 6.
  • Edit movie by trimming, cropping, merging, etc.
How to Extract Blu-ray Audio to MP3 Music to listen on CD?

Step 1: Install and launch the program; import your Blu-ray Disc or Backup saved on hard drive by clicking "Load File" icon.


Step 2: Choose "Common Audio" > "MP3 – MPEG Layer -3 Audio (*.mp3)" as the output format. You could choose other audio format according to your own audio player.


Tip:
If you want to extract just the music or the beloved audio from one Blu-Ray chapter, so you need to use the Trimming function to cut off the unwanted audios. So, just click Edit, them trim to get the songs for extracting later


Step 3: Right click the Convert button to start the conversion.

Just wait a while and when the conversion is over, click the "Open" icon to locate the output .mp3 file. The last thing you need to do is transfer the converted audio file to your audio player. You could enjoy the audio of your Blu-ray everywhere without limitation!

More posts:

Wednesday, February 19, 2014

Make digital copies of DVD/Blu-ray movies for watching on tablet

This article will give you an easy way to make digital copies of DVD and Blu-ray movies so you could watch them on your tablets.

Recently, I just bought an Asus MemoPad HD 7. The screen resolution is 1600*900 and it would be a good enjoyment to watch my DVD/Blu-ray collections on it. However, most DVD and Blu-ray movies are all protected. In order to solve the problem, the only way to make it possible is making digital copies of movies I owned so I could watch them on my tablet. 


Then I googled "blu-ray ripper" online and came across this article, Pavtube BDMagic were the top pick. After owning the program, I use it to rip movies so that I coluld watch them on my new tablet while traveling. Besides, my son has a Galaxy Tab 7. He is 11 years old and uses the Tab mostly for games, although I ripped a couple of his movies for him to watch.

Here is the easy process when I use Pavtube BDMagic to do the conversion.

Step 1. After installing the program on your computer, launch it. Click "Load File" icon to load DVD/Blu-ray movies to the program. Then choose the subtitle and audio you need on the main interface.


Tip:
The "Setting" icon beside the format bar is designed for you to adjust specific video size, bitrate, frame rate, audio bitrate, channels, etc. according you own needs.

Step 2. Click "Format" bar and choose "HD Video > H.264 HD Video (*.mp4)" as the output format. This format is suitable for the new released tablet, either my Asus MemoPad HD 7 or my son's Galaxy Tab 7.


Step 3. The last and not the least step is just start the conversion by clicking the "Convert" button on the bottom right corner. 

Everything is OK! Wait for a moment and the program will finish the conversion automatically. As my own experience, the time of converting Blu-ray movies is much longer than DVD movies. When the conversion is over, hit the "Open" icon to locate the output videos, and transfer them to your tablet via USB cable.

So easy, right? I am sure even you are a fresh man of this program; you could do the conversion at ease. If you are a Mac user, it also has Mac version. Have fun of enjoying your movies on your tablet with the help of the easy-operated software.

Monday, February 17, 2014

Review + Guide: Convert Video Files to InnoTab 3/InnoTab 2 for Kids

This article will give you a brief review about VTech InnoTab 2 and 3, then provide a detailed guide on how to convert videos and movies to InnoTab 3 and InnoTab 2.

Part 1: InnoTab 3 and InnoTab 2 Review

InnoTab 3 and InnoTab 2 Review

InnoTab 3:
VTech have announced the InnoTab 3, a new model for 2013. Last year’s InnoTab 2 model is still a viable choice this year too and there are various bundles available with this tablet. Which tablet should you choose? Look at the below comparion:

The InnoTab 3 is a smaller, lighter kids tablet at an affordable price. The InnoTab 2 and 2S are quite chunky tablets, the InnoTable 3 has reduced the screen size from 5” to 4.3” and scaled down the casing (it’s still tough) this makes it a more portable option.

The InnoTab 3 also has an updated camera at 2MP (vs 1.3MP in order models) this is an important detail. This feature with the smaller size makes the InnoTab 3 a useful kid camera in addition to other features. It also has a added a D-pad controller-physical arrow key buttons- these do make navigation and game play more efficient for some kinds of game.

InnoTab 2:
The InnoTab 2 was last years upgraded model with a faster processor. It has a 5” screen so some will prefer it over the smaller screen of the newer InnoTab 3.

Now that the newer models are available the other main advantage of this model will be if you are price conscious and can find the InnoTab 2 discounted, as part of good value bundle, or even used. It will work with the new titles coming out for the platform.

Summary:

There’s not a huge amount between these tablets and they all offer the same basic experience to kids, with minor differences. If you bought an InnoTab 3/2 for your kids, do they can’t wait to play videos and movies on it? Follow the steps below to convert videos and movies to InnoTab 3/InnoTab 2 for kids.

Required software:

This app offers an easy way to transcode virtually all video and audio types, camcorder HD footages and TiVo recordings to desired video/audio format for portable devices.

How to convert videos and movies to InnoTab 3/InnoTab 2 friendly format?

Step 1. Insert the program to your computer and import the videos and movies to the app.


Step 2. Click on the pull down menu of “Format” to choose “Common Video” > “H.264 Video (*.mp4)” as the compatible format for the tablet.

Convert Videos to InnoTab MP4

Tip:
If you want to customize the output size and quality, click the “Settings” icon to adjust video size, bitrate, audio channel, etc. Just remember the higher bitrate you set, the bigger output file size you will get.

Step 3. Hit the “Convert” button to start converting videos and movies to InnoTab 3/2. Wait for a while and when the conversion is over, you can find the output video in the “Output folder”.

Copy the converted files to your InnoTab for your kids

Connect the InnoTab to your PC using the USB cable and turn it on. If you have the VTech Learning Lodge Navigator software installed, it may start up automatically, but you will not use that to copy the file, so close it.

The InnoTab will show up as a Removable Disk as follows:


Navigate the folder structure on the InnoTab, and find the MOVIE folder within a folder called LLN. Copy all of your converted movie files into this folder.

Once the file copy process is complete, turn off the InnoTab and disconnect it from your computer.

Additional tips:
  1. For people who is looking for a powerful all-in-one converter to convert Blu-ray/DVD/ISO/IFO files as well as videos. Pavtube Video Converter Ultimate will be the best choice.
  2. Special offers for bundle package:  ByteCopy($42) + Video Converter Ultimate($65) = Only $79.9, Save $27.1   |   Video Converter Ultimate($65) + Vidpie($29) = Only $74.9, Save $19.1

Related posts:

Easy way to view Blu-ray Movies on HTC One Max, HTC One 2 (M8)

The guide introduces how to put and play Blu-ray movies on HTC One Max and HTC One 2 (M8).

The HTC One Max was the Taiwannese Company’s first foray into the phablet category. It is a 5.9-inch colossus among regular smartphone with full HD (1920*1080) resolution. While the device was launched, new leaks indicate that HTC may already be at work on its next large-display bearing smartphone. The handset, which is slated to be unveiled in the first quarter of 2014, comes with the name HTC One 2 (M8). It suggests that the device coming with either a 5-inch or a 5.2-inch display, making it slightly smaller than the One Max. It will carry the newest Android 4.4 KitKat system and it also will have 2GB RAM and 16GB storage capacity. 

Without doubt, such phones are currently the best devices for us to watch the new released Blu-ray movies like Endless Love, Winter’s Tale, About Last Night, The Returned, Adult World, etc. while moving around. Its Full HD screen produces video image in an unbelievable crisp level and its top-notch processor delivers ultra-fast speed while loading HD Blu-ray movies. 
View Blu-ray Movies on HTC One Max, HTC One 2 (M8)

Having said that, it is still impossible to watch Blu-ray movies on HTC One Max or HTC One 2 (M8). You know, nearly all smartphones including HTC One Max and the releasing HTC One 2 (M8) cannot read Blu-ray format directly and there is even no Blu-ray drive in its design. So, if anyone hoping to play Blu-ray movies on HTC One Max or HTC One 2 (M8), resorting to a highly acclaimed tool called Pavtube BDMagic is quite essential. Such app will help you decrypt/rip BD/DVD disc movies to any video/audio format for Android phones, including HTC, Nexus, SamSung and more. Here follow me to know how to do the Blu-ray to HTC One Max, HTC One 2 (M8) conversion. Mac users, you could turn to Pavtube BDMagic for Mac.

Read more: Top 5 Blu-ray Rippers Review - Choose the best one for you

Full guide on how to rip and transfer Blu-ray to HTC One Max, HTC One 2 (M8)


Step 1: Run Pavtube Blu-ray Ripper as the wonderful Blu-ray to HTC devices Converter here, click “Load file” to load your favorite Blu-ray disc files.

Step 2: Select subtitles and audio track language you like from the “Subtitle” and “Audio” drop-down list. For example, you can choose “French” subtitle for conversion if you need.

Step 3: Choose HTC One Max, HTC One 2 (M8) playback formats by clicking “Format > HD Video > H.264 HD Video (*.mp4)” recommended. Or, you can select other HTC One Max, HTC One 2 (M8) workable video formats, like MP4, WMV.


Step 4: Customize output settings for HTC One Max, HTC One 2 (M8) by clicking the “Settings” button. Here the video resolution as 1920*1080 by default is to fit the Android smartphone’s display for full video playback.


Step 5: Convert Blu-ray to HTC One Max, HTC One 2 (M8) .mp4 by clicking the Convert icon. Within a short time, you will get the converted movie files.

Step 6: Transfer the ripped Blu-ray movies to HTC One Max, HTC One 2 (M8) through USB cable.

Tip:
If you just need the main movie in the disc, you could “directly copy” the Blu-ray movies. According to my own experience, this could save the conversion time and the storage space for your phone.

More Articles:
  

Sunday, February 16, 2014

Rip and Backup Disney Copy-Protected DVD Movies for Your Kids

Do you have bought some Disney DVD movies for your kids and want to backup them in case of future carelessness break? Are you going to buy the latest Disney DVDs for enjoying on phones or tablets with your kids when camping? Need a DVD ripper to help you decrypting and ripping Disney copy-protected DVDs? The answer is in the below article.

The Walt Disney Company has released and planned to release many fantastic animation movies like “Monsters University”, “Planes”, “Frozen”, “The Good Dinosaur”, “Big Hero 6”, etc and you may collect a pile of Disney DVDs. However, the Disney DVDs have encryption encoded with new copy protection to prevent owners from copying the discs.

 Disney Copy-Protected DVD Movies 

How to judge if your DVDs are protected by Disney Copy Protection System?

  • Disney Copy Protected DVDs has 99 titles and the DVD movie size is larger than 40GB.
  • The DVDs are not playable on your DVD player which is not matching for the protected DVDs.
  • When you use common DVD backup tool to copy Disney protected DVDs, error message pops up or the program crashes.
  • The new copy protection will prevent the DVDs from ripping by general DVD ripping software and the videos converted from DVD will be out of order.


So many movies have been released and most of them are on DVDs. Whether you are suffering from collateral damage of DVDs mishandled, or you meet problems when ripping and making backup of the recently released DVDs, what you need is reliable DVD ripping software. Here we strongly recommended Pavtube ByteCopy (or ByteCopy for Mac) to you.

Reasons for choosing ByteCopy
  • Legally bypass the copyright protection of Disney X-project DRM.
  • Backup BD/DVD to MKV without quality loss. (Keep 1080p quality at 16:9 aspect ratio).
  • Allow full preservation of all audio tracks, subtitles and chapter markers
  • Provide best settings for iOS/Android/Windows Tablets/Phones 
  • Only backup the main movie for saving conversion time and storage space.
  • Keep forced subtitles and export .srt subtitles  
  • Support adding *.srt and *.ass subtitles to BD/DVD movies 

Guide on How to Rip and Backup Disney Protected DVD movies for Your Kids?

Note: Please respect the copyright law in your country. It is illegal to rip or copy DVDs for commercial use. It is allowed to clone a copy of copyright material for your own use under the concept of Fair Use in most countries.

Step 1. Run the Pavtube ByteCopy, insert DVDs in computer DVD-ROM, You can load from DVD driver by clicking “DVD Disc” or from DVD folder, DVD ISO image file.

Disney DVD Ripper

After completing movie content loading, this DVD ripper software will analyze your disc and display all the available segments. The app will also automatically choose the recommend title to rip.

You can backup and convert latest Blu-ray and DVD movies to any other formats like MKV/MP4/MOV with multi-track audios, M4V, AVI, WMV, MPG, M2TS, FLV, etc. for playback on iOS/Android/Windows Tablets/Phones, HD Media Players, 3D/4K TVs and more.


Step 2. Specify “Output Format” to select target video format; Specify “Output Path” to preserve the converted videos. You may make personal settings before the ripping start.

Just click Convert Button, and you can do other things before the DVD backup is completed.

After that, you can watch Disney DVD directly on your computer, or transfer it to your portable devices.

Useful Tips:

1. If you want to personalize your DVD movies, this DVD Ripper provides you amazing video editing features like trim, crop, merge function, add subtitles, etc.
2. If you do not need the keep the multiple audio and tracks and subtitles, Pavtube DVDAid is the professional DVD ripping software for you. It also has the Mac version: Pavtube DVDAid for Mac.

Related Source:

Thursday, February 13, 2014

How to Play 2D/3D Movies, ISO Files and HD Videos on Galaxy S5?

With the release of SamSung Galaxy S5, you may want to make good use of the latest smartphone, like put 2D/3D Blu-ray movies, DVDs, ISO/IFO image files to Galaxy S5 and play 1080p/720p MKV, AVI, VOB, MPG, WMV, M2TS, Tivo, FLV on Galaxy S5. But these files cannot be played directly. Well, this article will share you the solution.

The SamSung Galaxy S4 is old news. Sure, it’s a great smartphone, but now all eyes are firmly locked on the SamSung Galaxy S5. Though the launch date has not yet been determined, but more and more rumors and reports are telling us the Galaxy S5 is coming. 

galaxy s5

Although it is rumored that the S5 lists the spec as a 5.2-inch 1080p screen, a Snapdragon 800/Exynos 5 Octa processor, and 2GB of RAM, if we have a quick glance of SamSung Galaxy S4 video format list, it can fully support MP4 video, but not the ISO files, IFO files or some HD videos, as well as Galaxy S5. In other words, if you want to play various 2D/3D Blu-rays, DVDs, ISO/IFO files and 1080p/720p Videos on your Galaxy S5, you need to convert them to Galaxy S5 support format in advance. Pavtube Galaxy S5 Video Converter Ultimate is a good choice.

This program is good at dealing with all kinds of 2D/3D Blu-ray and DVD movies, including commercial Blu-ray/DVD with protections like BD+, region code to any common video format like MP4, AVI, WMV, FLV, MKV, VOB, MOV and more as you need. So, with this Blu-ray/DVD/Video Converter tool, it will be easy to rip/convert 2D/3D Blu-ray movies, DVDs, ISO/IFO image files and HD videos to SamSung Galaxy S5 compatible formats, and then you can watch Blu-ray and DVD movies on S5 as ease.

Free Trial: http://pavtubecrm.pavtube.com/download/?s=dfcbd46029100cdf59546df26a16fadc&n=video-converter-ultimate

Purchase: http://www.multipelife.com/video-converter-ultimate/purchase

Now please follow the steps below: 

How to Rip and Convert Blu-ray/DVD, ISO/IFO files and HD Videos for Galaxy S5?

Step 1. Install this Blu-ray/DVD to Galaxy S5 Converter on your computer. Run it and load your Blu-ray DVD ISO/IFO image file into it.

galaxy s5 video movie converter

Tips:
You may choose the subtitles and audio language for Blu-ray and DVD movies. You could also set the “forced subtitles”.


“Forced subtitles” means if you choose the English subtitles, you could not see the subtitles when it is English-speaking, but only it is non-English speaking, the subtitles will appear.

Step 2. Choose output format for Galaxy S5. Here I recommend you “SamSung > SamSung Galaxy S III Video (*.mp4)” which is a format specially designed for Galaxy S3 but also works for S4 and S5.


Click on "Settings" you could easily set bitrate, frame rate, codec, channels, sample rate, etc to adjust parameters that affect video quality and file size for the video you prefer.
  
Step 3. Click Convert button to run this ISO/IFO image files to Galaxy S5 conversion.

When the conversion is over, transfer the converted video files to Galaxy S5, and then you could enjoy ISO/IFO image files and HD video on your new Galaxy S5 as you like.

There are many features for you to edit your BD/DVD/Video files.


  • Trim - Select the wanted movie scenes and leave out unwanted.
  • Crop - Cut off the black bars and unwanted area of the source video.
  • Text Watermark - Add text to the videos.
  • Image/Video Watermark - Add image or video.
  • Audio Editor - Edit audio.
  • Subtitle - Add the subtitle file(*.srt, *.ass/*.ssa)

Related posts:

Don't Miss Pavtube Valentine's Day Giveaway

Valentine's Day is the ideal occasion for the modern man or woman to express their love, but it's also one of the biggest gift-giving holiday challenges for many men. There are as many possibilities of romance as there are people in the world, so what you've got for your sweet other half?

Spending a day out dating? Sharing romantic movies? Or you can choose to make a sweet Valentine's Day greeting video or DVD for her/him.


For all these above, you should not miss Pavtube Valentine's Day Giveaway!

Let's see what are prepared for you:

Giveaway:

Media Magician for Mac
Edit videos from any source on Mac to create great video as Valentine gift with touching moments and share on YouTube, play in any players, or further edit in Final Cut Pro with Apple Prores codec.

Free Link: http://download.pavtube.com/retain/mediamagicianmac_retain.pkg

Media Magician for Windows
Convert great videos as Valentine gift or memory and share on YouTube, play on iPad, iPhone, or tablets, or edit further in Adobe Premiere in best format.

Free Link: http://download.pavtube.com/retain/mediamagician_retain.exe

Free DVD Creator for Mac
Combine and edit videos and photos in popular formats and create wonderful video DVD as Valentine gift or saving.

Free Link: https://itunes.apple.com/us/app/free-dvd-creator/id565884248?ls=1&mt=12

DVD Creator for Windows
Combine and edit videos and photos from any source and create wonderful video DVD as Valentine gift or saving.

Free Link: http://download.pavtube.com/retain/dvdcreator_retain.exe

Half-price Deals

ByteCopy for Windows or Mac
Backup and convert Valentine Romantic Blu-ray and DVD movies and enjoy the wonderful moments watching them with your lover.

Windows Version
Free Trial: http://pavtubecrm.pavtube.com/download/?s=3cec56a854ce63b0d99a12282301c2de&n=bytecopy
Buy Now: http://www.multipelife.com/bytecopy/purchase

Mac Version
Free Trial: http://pavtubecrm.pavtube.com/download/?s=3aed6a8d0005e4b4bff34c00c9ae166f&n=bytecopy-mac
Buy Now: http://www.multipelife.com/bytecopy-mac/purchase